# Android SDK को कस्टमाइज़ करें

<Aside type="note">
सुनिश्चित करें कि आपने Pushwoosh Android SDK को अपने प्रोजेक्ट में इंटीग्रेट कर लिया है:

*   [Firebase इंटीग्रेशन](/hi/developer/pushwoosh-sdk/android-sdk/firebase-integration/quick-start/)
*   [Amazon इंटीग्रेशन](/hi/developer/pushwoosh-sdk/android-sdk/amazon/)
</Aside>

## डीप लिंकिंग

आपकी एक्टिविटी में जो डीप लिंक को हैंडल करेगी, उसमें स्कीम, होस्ट और पाथप्रीफिक्स पैरामीटर्स के साथ \<data> टैग जोड़ें।

```txt
<activity
          android:name=".PromoActivity"
          android:label="PromoActivity">
    <intent-filter>
        <action android:name="android.intent.action.VIEW" />
        <category android:name="android.intent.category.DEFAULT" />
        <category android:name="android.intent.category.BROWSABLE" />

        <data android:scheme="com.pushwoosh"
          android:host="promotion"
          android:pathPrefix="" />
    </intent-filter>
</activity>
```

<Aside type="note">
डीप लिंक पेज का नाम (दिए गए उदाहरण में _promotion_) **host** फ़ील्ड में जाता है, **pathPrefix** में नहीं।
</Aside>

ऊपर दिए गए उदाहरण में, डीप लिंक PromoActivity को खोलेगा। नीचे दिया गया बेसिक इम्प्लीमेंटेशन सरलता के लिए प्रोमो आईडी मान के साथ अलर्ट प्रदर्शित करता है। आपके एप्लिकेशन में यह निश्चित रूप से कुछ उपयोगी कर सकता है!

```java
public class PromoActivity extends Activity
{
		@Override
		protected void onCreate(Bundle savedInstanceState)
		{
				super.onCreate(savedInstanceState);

				setContentView(R.layout.deep_link);
				setTitle("Deep link activity");

				Intent intent = getIntent();
	  	  String action = intent.getAction();
	    	Uri data = intent.getData();

		    if (TextUtils.equals(action, Intent.ACTION_VIEW))
		    {
	  		  	openUrl(data);
		    }
		}

		private void openUrl(Uri uri)
		{
				String promoId = uri.getQueryParameter("id");
				Toast.makeText(getApplicationContext(), promoId, Toast.LENGTH_LONG).show();
		}
}
```

## इन-ऐप खरीदारी ट्रैकिंग

यदि आप [Customer Journeys](/hi/product/customer-journey/pushwoosh-journey-overview) में इन-ऐप खरीदारी को ट्रैक करना चाहते हैं, तो इस मेथड को कॉल करके Pushwoosh को खरीदारी की जानकारी भेजने के लिए कॉन्फ़िगर करें:

```java
Pushwoosh.getInstance().sendInappPurchase(@NonNull String sku, @NonNull BigDecimal price, @NonNull String currency);
```

## जियोज़ोन पुश नोटिफिकेशन

Geozone पुश का उपयोग करने के लिए, `com.pushwoosh:pushwoosh-location` लाइब्रेरी जोड़ें और कॉल करें:

```java
PushwooshLocation.startLocationTracking();
```

अपने **AndroidManifest.xml** में, आवश्यक अनुमतियाँ शामिल करें:

```xml
<manifest ... >
  <!-- Required for geolocation-based push notifications -->
  <uses-permission android:name="android.permission.ACCESS_COARSE_LOCATION" />

  <!-- Required for precise location tracking -->
  <uses-permission android:name="android.permission.ACCESS_FINE_LOCATION" />

  <!-- Required for background location access on Android 10 (API level 29) and higher -->
  <uses-permission android:name="android.permission.ACCESS_BACKGROUND_LOCATION" />
</manifest>
```

## Pushwoosh के साथ स्थानीय सूचनाओं का उपयोग करना

यदि आप Pushwoosh Local Notifications API का उपयोग करते हैं, तो अपने AndroidManifest.xml में RECEIVE\_BOOT\_COMPLETED अनुमति जोड़ें:

```txt title="AndroidManifest.xml"
<uses-permission android:name="android.permission.RECEIVE_BOOT_COMPLETED"/>x
```

## Android पर बैज नंबर का उपयोग करना

Pushwoosh निम्नलिखित Android लॉन्चर के लिए ऐप आइकन शॉर्टकट पर बैज नंबर सेट करने का समर्थन करता है:\
Sony, Samsung, LG, HTC, ASUS, ADW, APEX, NOVA, HUAWEI, ZUK, OPPO।\
इस कार्यक्षमता का उपयोग करने के लिए, बस अपने एप्लिकेशन में `com.pushwoosh:pushwoosh-badge` लाइब्रेरी जोड़ें।

## कस्टम एक्टिविटी खोलना

यदि आप पुश नोटिफिकेशन के जवाब में कोई विशेष एक्टिविटी शुरू करना चाहते हैं, तो उस एक्टिविटी में निम्नलिखित इंटेंट-फ़िल्टर जोड़ें:

```txt title="AndroidManifest.xml"
<activity android:name="YourActivity">
    <intent-filter>
        <action android:name="${applicationId}.MESSAGE"/>
        <category android:name="android.intent.category.DEFAULT"/>
    </intent-filter>
</activity>
```

## लॉग लेवल को नियंत्रित करना

डीबगिंग और इंटीग्रेशन में सहायता के लिए, SDK डिफ़ॉल्ट रूप से कंसोल पर सभी अनुरोधों को प्रिंट करेगा। जब आप प्रोडक्शन बिल्ड के लिए तैयार हों, तो AndroidManifest.xml में "ERROR" मान के साथ `com.pushwoosh.log_level` मेटा-डेटा जोड़ें। इस तरह केवल त्रुटियों के बारे में जानकारी कंसोल पर जाएगी। अन्य विकल्प निम्नलिखित में से एक हो सकता है:

_NONE_ - SDK से कोई लॉग नहीं\
_ERROR_ - कंसोल में केवल त्रुटियाँ प्रदर्शित करें\
_WARN_ - चेतावनियाँ भी प्रदर्शित करें\
_INFO_ - सूचनात्मक संदेश प्रदर्शित करें\
_DEBUG_ - अब डिबग जानकारी भी प्रदर्शित होती है\
_NOISE_ - SDK जो कुछ भी प्रिंट कर सकता है और उससे भी अधिक

```txt title="AndroidManifest.xml"
<meta-data android:name="com.pushwoosh.log_level" android:value="ERROR" />
```

## Proguard का उपयोग करना

Proguard का उपयोग करते समय, निम्नलिखित विकल्प जोड़ें:

```txt title="proguard-rules.pro"
-keep class com.pushwoosh.** { *; }
-dontwarn com.pushwoosh.**
```

**Google Play Services** लाइब्रेरी की Proguard से संबंधित आवश्यकताओं को यहाँ देखें:\
[https://developers.google.com/android/guides/setup](https://developers.google.com/android/guides/setup)

## नोटिफिकेशन ओपन बिहेवियर को कस्टमाइज़ करना

यदि आपको प्रोग्रामेटिक रूप से यह चुनना है कि पुश नोटिफिकेशन के परिणामस्वरूप कौन सी एक्टिविटी प्रदर्शित की जाए, तो आप एक कस्टम [NotificationServiceExtension](https://github.com/Pushwoosh/pushwoosh-android-sdk/blob/master/Documentation/notification/NotificationServiceExtension.md) बना सकते हैं और अपने NotificationServiceExtension का पूरी तरह से योग्य क्लास नाम `com.pushwoosh.notification_service_extension` मान के तहत मेटाडेटा में शामिल कर सकते हैं।

```txt title="AndroidManifest.xml"
<meta-data
    android:name="com.pushwoosh.notification_service_extension"
    android:value="com.your.package.YourNotificationServiceExtension" />
```

```java title="YourNotificationServiceExtension.java"
public class YourNotificationServiceExtension extends NotificationServiceExtension {
    @Override
    protected void startActivityForPushMessage(PushMessage message) {
      // super.startActivityForPushMessage() starts default launcher activity
      // or activity marked with ${applicationId}.MESSAGE action.
      // Simply do not call it to override this behaviour.
        // super.startActivityForPushMessage(message);

        // start your activity instead:
        Intent launchIntent  = new Intent(getApplicationContext(), YourActivity.class);
        launchIntent.setFlags(Intent.FLAG_ACTIVITY_NEW_TASK | Intent.FLAG_ACTIVITY_RESET_TASK_IF_NEEDED);

        // (Optional) pass notification data to Activity
        launchIntent.putExtra(Pushwoosh.PUSH_RECEIVE_EVENT, message.toJson().toString());

        context.startActivity(launchIntent);
    }
}
```

<Aside type="note">
**महत्वपूर्ण**

यदि आप प्रोडक्शन बिल्ड में proguard का उपयोग करते हैं, तो सुनिश्चित करें कि आपका कस्टम NotificationServiceExtension ऑबफस्केटेड नहीं है ( `-keep class` नियम जोड़कर), अन्यथा यह ClassNotFoundException का कारण बनेगा।
</Aside>

## पुश नोटिफिकेशन को कस्टमाइज़ करना

पुश नोटिफिकेशन के व्यू को कस्टमाइज़ करने के लिए, आपको एक कस्टम फैक्ट्री बनाने की आवश्यकता है, आप एक कस्टम [NotificationFactory](https://pushwoosh.github.io/pushwoosh-android-sdk/pushwoosh/com.pushwoosh.notification/-notification-factory/index.html) बना सकते हैं और अपने NotificationFactory का पूरी तरह से योग्य क्लास नाम `com.pushwoosh.notification_factory` मान के तहत मेटाडेटा में शामिल कर सकते हैं।

```txt title="AndroidManifest.xml"
<meta-data
    android:name="com.pushwoosh.notification_factory"
    android:value="com.your.package.YourNotificationFactory" />
```

```java title="YourNotificationFactory"
public class YourNotificationFactory extends PushwooshNotificationFactory {
	@Override
	public Notification onGenerateNotification(@NonNull PushMessage pushMessage) {
		if (customNotification) {
       // TODO: generate and return custom notification
    }

    // return default Pushwoosh notification
		return super.onGenerateNotification(pushMessage);
	}
}
```

## ग्रुप समरी को कस्टमाइज़ करना

[ग्रुप समरी](https://developer.android.com/training/notify-user/group#set_a_group_summary) के अपीयरेंस को कस्टमाइज़ करने के लिए, एक कस्टम फैक्ट्री बनाएं। आप कस्टम SummaryNotificationFactory बना सकते हैं और अपने SummaryNotificationFactory का पूरी तरह से योग्य क्लास नाम com.pushwoosh.summary\_notification\_factory मान के तहत मेटाडेटा में शामिल कर सकते हैं।

```java title="AndroidManifest.xml"
<meta-data
    android:name="com.pushwoosh.summary_notification_factory"
    android:value="com.your.package.YourSummaryNotificationFactory" />
```

```java title="YourSummaryNotificationFactory"
public class YourSummaryNotificationFactory extends PushwooshSummaryNotificationFactory {
    @Override
    public String summaryNotificationMessage(int notificationsAmount) {
	      // return the message you want
        return super.summaryNotificationMessage(notificationsAmount);
    }
    @Override
    public int summaryNotificationIconResId() {
	      // return the icon resource id you want
        return super.summaryNotificationIconResId();
    }
}
```

## प्राइवेट एंडपॉइंट URL

<Aside>
केवल **कस्टम प्लान** सब्सक्रिप्शन के लिए। अधिक जानकारी के लिए, कृपया हमारी [सेल्स टीम](https://www.pushwoosh.com/demo/?utm_source=docs&utm_medium=post&utm_campaign=customizing-android-sdk) से संपर्क करें।
</Aside>

Pushwoosh कस्टम प्लान सब्सक्रिप्शन वाले ग्राहकों के लिए प्राइवेट एंडपॉइंट प्रदान करता है। Android SDK के लिए प्राइवेट एंडपॉइंट सेट करने के लिए, आपको अपनी **AndroidManifest.xml** फ़ाइल में निम्नलिखित जोड़ना होगा:

```txt title="AndroidManifest.xml"
<meta-data android:name="com.pushwoosh.base_url" android:value="PUSHWOOSH_PRIVATE_ENDPOINT_URL_PROVIDED" />
```

## एक रिच मीडिया क्यू बनाना

यदि एक साथ कई रिच मीडिया पेज प्रदर्शित करने हों (उदाहरण के लिए, दो या दो से अधिक इन-ऐप्स के लिए ट्रिगर इवेंट एक ही समय में होते हैं, या एक रिच मीडिया पेज पहले से ही प्रदर्शित हो रहा है जब एक अलग ट्रिगर इवेंट होता है), तो आप रिच मीडिया पेजों के प्रदर्शन के लिए एक क्यू सेट कर सकते हैं। एक क्यू बनाने के लिए, अपने प्रोजेक्ट में निम्नलिखित कोड जोड़ें:

```java title="Application.java"
package com.pushwoosh.testingapp;

import com.pushwoosh.RichMediaManager;
import com.pushwoosh.exception.PushwooshException;
import com.pushwoosh.richmedia.RichMediaPresentingDelegate;
import com.pushwoosh.richmedia.RichMedia;
import com.pushwoosh.internal.utils.PWLog;

import java.util.ArrayDeque;
import java.util.concurrent.locks.ReentrantLock;

public class DefaultRichMediaPresentingDelegate implements RichMediaPresentingDelegate {
    private final String TAG = DefaultRichMediaPresentingDelegate.class.getSimpleName();
    private ArrayDeque<RichMedia> richMediaQueue = new ArrayDeque<>();
    private RichMedia currentRichMedia = null;
    private ReentrantLock reentrantLock;

    public DefaultRichMediaPresentingDelegate() {
        PWLog.noise(TAG, "new DefaultRichMediaPresentingDelegate:" + this);
        reentrantLock = new ReentrantLock();
    }

    @Override
    public boolean shouldPresent(RichMedia richMedia) {
        PWLog.noise(TAG, "shouldPresent:" + richMedia);
        if (currentRichMedia == null) {
            PWLog.noise(TAG, "currentRichMedia is null");
        }
        if (richMedia.isLockScreen()) {
            PWLog.noise(TAG, "isLockScreen is true");
            return true;
        }
        try {
            reentrantLock.lock();
            if (currentRichMedia == null) {
                PWLog.noise(TAG, "show:" + richMedia);
                currentRichMedia = richMedia;
                return true;
            } else {
                PWLog.noise(TAG, "add to queue:" + richMedia);
                richMediaQueue.add(richMedia);
                return false;
            }
        } finally {
            reentrantLock.unlock();
        }
    }

    @Override
    public void onPresent(RichMedia richMedia) {
        PWLog.noise(TAG, "onPresent" + richMedia);
    }

    @Override
    public void onError(RichMedia richMedia, PushwooshException pushwooshException) {
        PWLog.error(TAG, pushwooshException + " richMedia:"+richMedia.toString());
        tryShowNextRichMediaThreadSafety();
    }

    @Override
    public void onClose(RichMedia richMedia) {
        PWLog.noise(TAG, "onClose:" + richMedia);
        tryShowNextRichMediaThreadSafety();
    }

    private void tryShowNextRichMediaThreadSafety() {
        try {
            reentrantLock.lock();
            tryShowNextRichMedia();
        } finally {
            reentrantLock.unlock();
        }
    }

    private void tryShowNextRichMedia() {
        if (!richMediaQueue.isEmpty()) {
			currentRichMedia = richMediaQueue.poll();
			PWLog.noise(TAG, "try manual show:" + currentRichMedia);
			RichMediaManager.present(currentRichMedia);
		} else {
			PWLog.noise(TAG, "richMediaQueue is empty");
			currentRichMedia = null;
		}
    }
}
```

<Aside type="caution" title="महत्वपूर्ण">
हम दृढ़ता से अनुशंसा करते हैं कि **Application** में एक क्यू सेट अप करें, न कि **Activity** में। अन्यथा, यह कई क्यू बना सकता है।
</Aside>

<Aside type="note">
प्रत्येक [postEvent](/hi/developer/api-reference/user-centric-api/#postevent) मेथड कॉल केवल एक इन-ऐप को प्रदर्शित करने की अनुमति देता है, और प्रत्येक पुश केवल एक रिच मीडिया से जुड़ा हो सकता है। यदि आप कई इन-ऐप्स दिखाना चाहते हैं, तो [postEvent](/hi/developer/api-reference/user-centric-api/#postevent) मेथड को आवश्यक संख्या में कॉल करें।
</Aside>

## कस्टम साउंड पुश

<Aside>
Android 8+ डिवाइस के लिए उपलब्ध है।
</Aside>

1.  अपनी ऑडियो फ़ाइल को उचित फ़ोल्डर में रखें। नेटिव Android फ्रेमवर्क के लिए, आपकी फ़ाइलों को `/app/src/main/res/raw` फ़ोल्डर में रखा जाना चाहिए।

<Aside type="note">
कृपया अन्य फ्रेमवर्क में बने प्रोजेक्ट्स में ऑडियो फ़ाइल कहाँ रखनी है, यह जानने के लिए संबंधित गाइड देखें।
</Aside>

2\. एक [नोटिफिकेशन चैनल बनाएं।](/hi/developer/pushwoosh-sdk/android-sdk/notification-channels/)

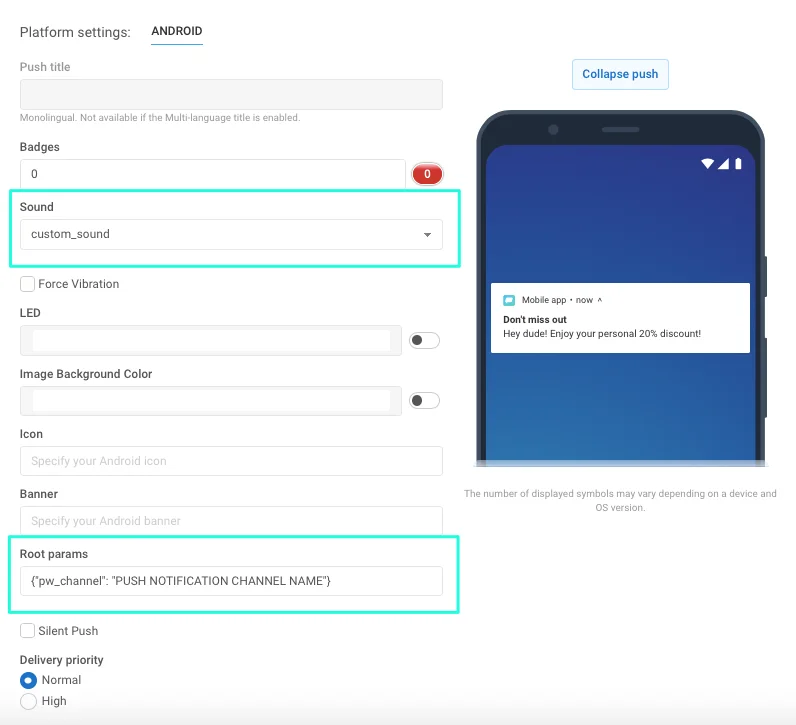
3\. पुश संदेश कॉन्फ़िगर करते समय एक ध्वनि चुनें।

<img src="/android-push-notifications-customizing-android-sdk-5.0-1.webp" alt=""/>

4\. उस नोटिफिकेशन चैनल को सेट करें जिससे संदेश संबंधित होगा। ऐसा करने के लिए, "Android root params" फ़ील्ड में निम्नलिखित निर्दिष्ट करें:`{"pw_channel": "PUSH NOTIFICATION CHANNEL NAME"} //`` `_`यहां आपको कस्टम साउंड वाले अपने चैनल का नाम निर्दिष्ट करना होगा`_

रिमोट API का उपयोग करने के मामले में, अपने /createMessage API अनुरोध के भीतर पैरामीटर निम्नानुसार सेट करें:

```java
"android_root_params": {"pw_channel": "push"} // यहां आपको कस्टम साउंड वाले अपने चैनल का नाम निर्दिष्ट करना होगा, उदाहरण के लिए, push.wav साउंड वाले नोटिफिकेशन के लिए "push"।
"android_sound": "push" // यहां आपको एक्सटेंशन के बिना फ़ाइल का नाम निर्दिष्ट करना चाहिए
```

एक बार जब आप उन पैरामीटर्स के साथ पुश भेजते हैं, तो चयनित ध्वनि के साथ नोटिफिकेशन चैनल Android 8+ वाले सभी डिवाइसों के लिए बन जाता है।

अब, कस्टम साउंड के साथ पुश भेजने के लिए, आपको केवल उस ध्वनि से जुड़े चैनल को निर्दिष्ट करना होगा।

### कस्टम नोटिफिकेशन साउंड के लिए Proguard नियम

यदि आपका ऐप कोड और रिसोर्स श्रिंकिंग के लिए proguard का उपयोग करता है, तो यह महत्वपूर्ण है कि आपकी साउंड फ़ाइलें बरकरार रहें और बाहरी लाइब्रेरी के लिए उपलब्ध हों। यदि आप अपने **build.gradle** में **`minifyEnabled = true`** प्रॉपर्टी का उपयोग करते हैं, तो अपने **proguard-rules.pro** में निम्नलिखित नियम जोड़ें:

```
-keep public class your.package.name.R$raw {
 *;
}
```

यदि आप **`shrinkResources=true`** प्रॉपर्टी का उपयोग करके कोड श्रिंकिंग के ऊपर अपने ऐप के रिसोर्सेज को श्रिंक करते हैं, तो आपको अतिरिक्त रूप से यह निर्दिष्ट करना चाहिए कि आप कौन से रिसोर्सेज रखना चाहते हैं। ऐसा करने के लिए, किसी भी नाम से एक नई XML फ़ाइल बनाएं, इसे अपने प्रोजेक्ट में कहीं सेव करें (उदाहरण के लिए, res/xml में), और **`resources`** टैग में **`tools:keep`** पैरामीटर के तहत रिसोर्स नाम निर्दिष्ट करें:

```
<?xml version="1.0" encoding="utf-8"?>
<resources xmlns:tools="http://schemas.android.com/tools"
 tools:keep="@raw/*"
/>
```

## Android SDK मेटा-डेटा फ्लैग की पूरी सूची

एक फ्लैग सेट करने के लिए, आपको **application** टैग के अंदर अपनी **AndroidManifest.xml** फ़ाइल में मेटा-डेटा ब्लॉक जोड़ना होगा। उदाहरण के लिए, यदि आप Pushwoosh एप्लिकेशन आईडी सेट करना चाहते हैं, तो अपनी **AndroidManifest.xml** फ़ाइल में निम्नलिखित कोड जोड़ें:

```txt title="AndroidManifest.xml"
<meta-data
    android:name="com.pushwoosh.appid"
    android:value="XXXXX-XXXXX" />
```

<table><thead><tr><th width="262.33243208828077" align="center">फ्लैग</th><th width="284" align="center">विवरण</th><th align="center">संभावित मान</th></tr></thead><tbody><tr><td align="center">com.pushwoosh.appid</td><td align="center">Pushwoosh एप्लिकेशन आईडी सेट करता है।</td><td align="center">XXXXX-XXXXX</td></tr><tr><td align="center">com.pushwoosh.log_level</td><td align="center">लॉगिंग स्तर सेट करता है। विवरण के लिए, <a href="#controlling-log-level">लॉग स्तर को नियंत्रित करना</a> देखें।</td><td align="center">NONE / ERROR / WARN / INFO / <strong>DEBUG</strong> (<em>डिफ़ॉल्ट</em>) / NOISE</td></tr><tr><td align="center">com.pushwoosh.base_url</td><td align="center">Pushwoosh सर्वर बेस यूआरएल को ओवरराइड करता है।</td><td align="center"><a href="https://cp.pushwoosh.com/json/1.3/">https://cp.pushwoosh.com/json/1.3/</a> (<em>डिफ़ॉल्ट</em>)</td></tr><tr><td align="center">com.pushwoosh.notification_service_extension</td><td align="center">कस्टम NotificationServiceExtension। विवरण के लिए, <a href="#customising-notification-open-behaviour">नोटिफिकेशन ओपन बिहेवियर को कस्टमाइज़ करना</a> देखें।</td><td align="center">com.myapp.MyNotificationServiceExtension</td></tr><tr><td align="center">com.pushwoosh.notification_factory</td><td align="center"><p>कस्टम NotificationFactory।</p><p>विवरण के लिए, <a href="#customizing-push-notifications">पुश नोटिफिकेशन को कस्टमाइज़ करना</a> देखें।</p></td><td align="center">com.myapp.MyNotificationFactory</td></tr><tr><td align="center">com.pushwoosh.summary_notification_factory</td><td align="center">कस्टम SummaryNotificationFactory।</td><td align="center">com.myapp.MySummaryNotificationFactory</td></tr><tr><td align="center">com.pushwoosh.multi_notification_mode</td><td align="center">यदि सही है, तो नोटिफिकेशन समूहीकृत किया जाएगा। यदि गलत है, तो केवल अंतिम प्राप्त नोटिफिकेशन प्रदर्शित किया जाएगा।</td><td align="center">true / <strong>false</strong> (<em>डिफ़ॉल्ट</em>)</td></tr><tr><td align="center">com.pushwoosh.allow_server_communication</td><td align="center">यदि सही है, तो SDK को Pushwoosh सर्वर पर नेटवर्क अनुरोध भेजने की अनुमति है।</td><td align="center"><strong>true</strong> (<em>डिफ़ॉल्ट</em>) / false</td></tr><tr><td align="center">com.pushwoosh.handle_notifications_using_workmanager</td><td align="center">यदि सही है, तो WorkManager को नोटिफिकेशन को संभालने के लिए सेट किया गया है।</td><td align="center">true / <strong>false</strong> (<em>डिफ़ॉल्ट</em>)</td></tr><tr><td align="center">com.pushwoosh.notification_icon</td><td align="center">कस्टम नोटिफिकेशन (छोटा) आइकन रिसोर्स नाम। यदि शून्य है, तो डिफ़ॉल्ट एप्लिकेशन आइकन का उपयोग किया जाएगा।</td><td align="center">res/drawable-xxhdpi-v11/notification_small_icon.png / null</td></tr><tr><td align="center">com.pushwoosh.notification_icon_color</td><td align="center">नोटिफिकेशन (छोटा) आइकन पृष्ठभूमि रंग।</td><td align="center">#FFFFFF</td></tr><tr><td align="center">com.pushwoosh.allow_collecting_device_data</td><td align="center">यदि सही है, तो SDK को डिवाइस डेटा एकत्र करने और Pushwoosh को भेजने की अनुमति है।</td><td align="center"><strong>true</strong> (<em>डिफ़ॉल्ट</em>) / false</td></tr><tr><td align="center">com.pushwoosh.allow_collecting_device_os_version</td><td align="center">यदि सही है, तो SDK को डिवाइस OS संस्करण एकत्र करने और Pushwoosh को भेजने की अनुमति है।</td><td align="center"><strong>true</strong> (<em>डिफ़ॉल्ट</em>) / false</td></tr><tr><td align="center">com.pushwoosh.allow_collecting_device_locale</td><td align="center">यदि सही है, तो SDK को डिवाइस लोकेल एकत्र करने और Pushwoosh को भेजने की अनुमति है।</td><td align="center"><strong>true</strong> (<em>डिफ़ॉल्ट</em>) / false</td></tr><tr><td align="center">com.pushwoosh.allow_collecting_device_model</td><td align="center">यदि सही है, तो SDK को डिवाइस मॉडल एकत्र करने और Pushwoosh को भेजने की अनुमति है।</td><td align="center"><strong>true</strong> (<em>डिफ़ॉल्ट</em>) / false</td></tr><tr><td align="center">com.pushwoosh.in_app_business_solutions_capping</td><td align="center"><em>push-unregister</em> इन-ऐप को एक दिन में कितनी बार दिखाया जा सकता है, इसकी संख्या को सीमित करता है।</td><td align="center"><strong>1</strong> (<em>डिफ़ॉल्ट</em>), 2, ..., n</td></tr><tr><td align="center">com.pushwoosh.start_foreground_service</td><td align="center">यदि सही है, तो PushwooshLocation.startLocationTracking() कॉल के साथ फोरग्राउंड सर्विस लॉन्च की जाती है</td><td align="center">true / <strong>false</strong> (<em>डिफ़ॉल्ट</em>)</td></tr><tr><td align="center">com.pushwoosh.foreground_service_notification_text</td><td align="center">"com.pushwoosh.start_foreground_service" कुंजी के लिए फोरग्राउंड सर्विस लॉन्च होने पर बनाए गए नोटिफिकेशन का टेक्स्ट सेट करता है।</td><td align="center"><strong>Work in progress</strong> (<em>डिफ़ॉल्ट</em>)</td></tr><tr><td align="center">com.pushwoosh.foreground_service_notification_channel_name</td><td align="center">"com.pushwoosh.start_foreground_service" कुंजी के लिए फोरग्राउंड सर्विस लॉन्च होने पर बनाए गए नोटिफिकेशन के लिए चैनल का नाम सेट करता है।</td><td align="center"><strong>Foreground service</strong> (<em>डिफ़ॉल्ट)</em></td></tr><tr><td align="center">com.pushwoosh.trusted_package_names</td><td align="center">निर्दिष्ट पैकेज के साथ Pushwoosh HWID साझा करने की अनुमति देता है</td><td align="center">"com.mycompany.myapp1, com.mycompany.myapp2"</td></tr></tbody></table>

## TTL (टाइम-टू-लिव) के माध्यम से पुश नोटिफिकेशन हटाना

TTL (टाइम-टू-लिव) का उपयोग करके एक निर्दिष्ट समय अवधि के बाद पुश नोटिफिकेशन को स्वचालित रूप से हटाने के लिए, इन चरणों का पालन करें:

1.  एक कस्टम NotificationFactory बनाएं। [और जानें](#customizing-push-notifications)

2.  `onGenerateNotification()` मेथड में, `Notification.Builder` या `NotificationCompat.Builder` क्लास का उपयोग करके एक नोटिफिकेशन बनाएं और `setTimeoutAfter` मेथड को कॉल करें:

```java
public class YourNotificationFactory extends PushwooshNotificationFactory {

    @Override
    public Notification onGenerateNotification(@NonNull PushMessage pushMessage) {
        Notification.Builder builder = new Notification.Builder(getApplicationContext(), addChannel(pushData));

        Notification notification = builder.setContentText(pushData.getMessage())
                                           .setContentTitle(title)
                                           .setContentText(text)
                                           // rest of your notification creation code
                                           .setTimeoutAfter(timeout) // time in milliseconds before the notification is canceled
                                           .build();
    }
}

```

## अपनी प्रतिक्रिया हमारे साथ साझा करें

आपकी प्रतिक्रिया हमें एक बेहतर अनुभव बनाने में मदद करती है, इसलिए यदि आपको SDK इंटीग्रेशन प्रक्रिया के दौरान कोई समस्या आती है तो हम आपसे सुनना पसंद करेंगे। यदि आपको कोई कठिनाई आती है, तो कृपया [इस फॉर्म](https://docs.google.com/forms/d/e/1FAIpQLSd_0b8jwn-V_JmoPLIxIFYbHACCQhrzidOZV3ELywoQPXRSxw/viewform) के माध्यम से अपने विचार हमारे साथ साझा करने में संकोच न करें।