# कस्टम डेटा भेजें
यह गाइड आपको यह बेहतर ढंग से समझने में मदद करेगी कि पुश नोटिफिकेशन पेलोड में अपने ऐप्स को कस्टम डेटा कैसे पास करें ताकि आपका ऐप ऐसे पुश पर प्रतिक्रिया दे सके और उसके अनुसार विभिन्न कार्य कर सके।
आपके व्यावसायिक उद्देश्यों के अनुसार कस्टम डेटा को संभालने के तरीके अलग-अलग हो सकते हैं। इस लेख में हम कस्टम डेटा को पार्स करने और सरल कार्य करने के कुछ बुनियादी उदाहरण दिखाएंगे:
* ऐप के बैकग्राउंड का रंग बदलना;
* आपके ऐप में एक कस्टम पेज खोलना।
## पूर्वापेक्षाएँ
यह गाइड iOS नेटिव डेवलपमेंट को कवर करती है। यह माना जाता है कि आपके पास एक iOS सैंपल एप्लिकेशन कॉन्फ़िगर है और [iOS गेटिंग स्टार्टेड गाइड](/hi/developer/pushwoosh-sdk/ios-sdk/setting-up-pushwoosh-ios-sdk/quick-start/) के अनुसार पुश नोटिफिकेशन प्राप्त कर रहा है।
`AppDelegate` में `didFinishLaunchingWithOptions` फ़ंक्शन में, हम पुश नोटिफिकेशन प्रोसेसिंग के लिए `self.viewController` को एक डेलीगेट के रूप में उपयोग करेंगे:
```swift
func application(_ application: UIApplication, didFinishLaunchingWithOptions launchOptions: [UIApplication.LaunchOptionsKey: Any]?) -> Bool {
Pushwoosh.sharedInstance().delegate = self.viewController
Pushwoosh.sharedInstance().registerForPushNotifications()
if let launchOptions = launchOptions {
Pushwoosh.sharedInstance().handlePushReceived(launchOptions)
}
return true
}
```
हमारा `ViewController` `PWMessagingDelegate` प्रोटोकॉल को लागू करता है:
```swift
extension ViewController: PWMessagingDelegate
```
और इसलिए इसमें `onMessageOpened` फ़ंक्शन है जो प्राप्त पुश नोटिफिकेशन को संभालता है:
```swift
// User pressed on the push notification
func pushwoosh(_ pushwoosh: Pushwoosh, onMessageOpened message: PWMessage) {}
```
## दूसरा ViewController खोलना और बैकग्राउंड का रंग बदलना
अब हम पुश पेलोड से `customData` प्राप्त कर रहे हैं। उदाहरण के लिए, चलिए व्यू के बैकग्राउंड का रंग और डिस्काउंट प्रतिशत बदलते हैं। हम मानते हैं कि कस्टम डेटा में JSON ऑब्जेक्ट प्रारूप में `"r"`, `"g"`, `"b"`, और `"d"` आइटम होंगे:
```swift
guard let customDataJson = message.customData,
let redString = customDataJson["r"] as? String,
let greenString = customDataJson["g"] as? String,
let blueString = customDataJson["b"] as? String,
let discount = customDataJson["d"] as? String else {
return
}
setViewBackgroundColor(red: redString, green: greenString, blue: blueString, discount: discount)
```
हम एक नया ViewController खोलने और बैकग्राउंड का रंग और डिस्काउंट प्रतिशत सेट करने के लिए निम्नलिखित फ़ंक्शन का उपयोग करेंगे:
```swift
func setViewBackgroundColor(red: String, green: String, blue: String, discount: String) {
let red = CGFloat((red as NSString).floatValue)
let green = CGFloat((green as NSString).floatValue)
let blue = CGFloat((blue as NSString).floatValue)
let color = UIColor(red: red / 255.0, green: green / 255.0, blue: blue / 255.0, alpha: 1)
if let topController = UIApplication.shared.topMostController() {
let storyboard = UIStoryboard(name: "Main", bundle: nil)
if let customViewController = storyboard.instantiateViewController(withIdentifier: "custom_page") as? CustomPageViewController {
customViewController.discount = discount
customViewController.bgColor = color
topController.present(customViewController, animated: true, completion: nil)
}
}
}
```
चलिए अपने उदाहरण का परीक्षण करते हैं। Pushwoosh Journey पर नेविगेट करें और कैनवास में एक **Push element** जोड़ें। अगला, **Create new content** पर क्लिक करें। खुलने वाले पुश कंटेंट फॉर्म में, कोई भी पुश नोटिफिकेशन टेक्स्ट दर्ज करें।
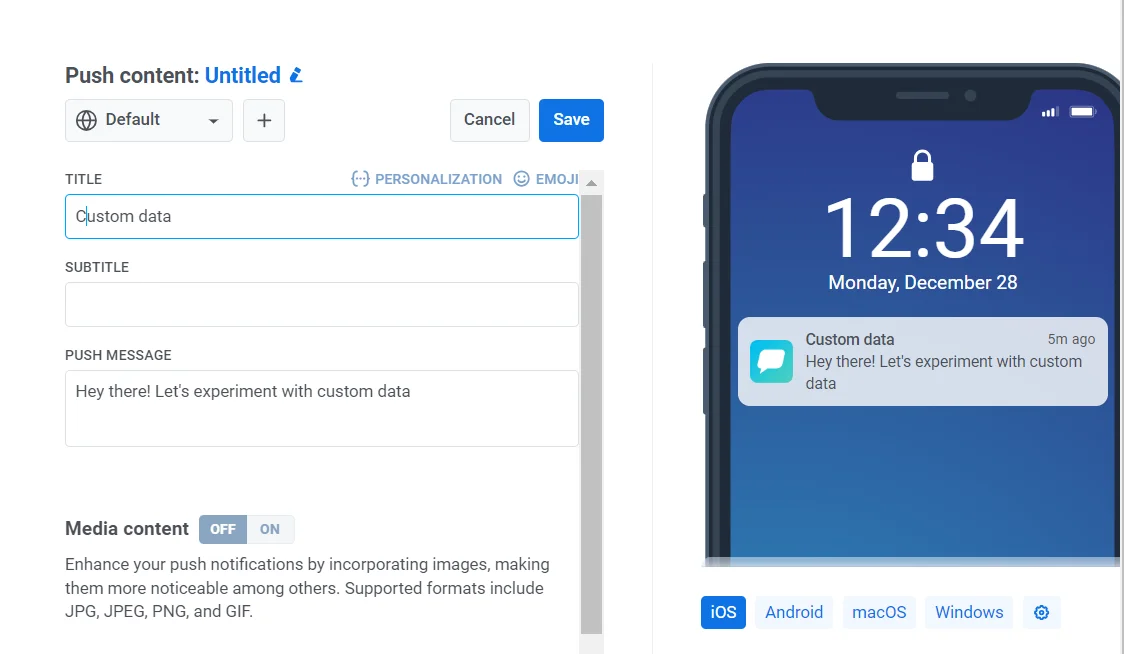 फिर `Send custom data` को ऑन करें। कस्टम डेटा फ़ील्ड में JSON डालें।
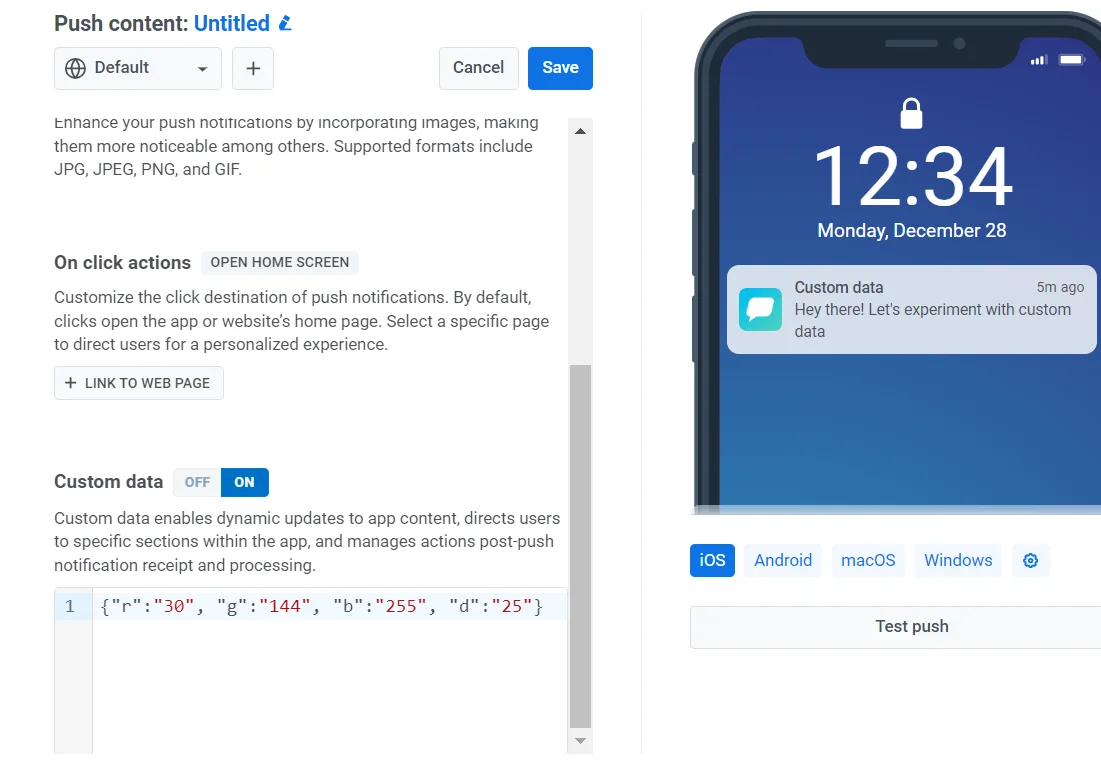
जैसा कि हमने तय किया है कि हमारा कस्टम डेटा प्रारूप `"r"`, `"g"`, `"b"` मानों के साथ एक JSON ऑब्जेक्ट होगा, हमें कंट्रोल पैनल में `"custom data"` फ़ील्ड का उपयोग करने और इसे JSON ऑब्जेक्ट `{"r":"30", "g":"144", "b":"255", "d":"25"}` से भरने की आवश्यकता है:
फिर `Send custom data` को ऑन करें। कस्टम डेटा फ़ील्ड में JSON डालें।
जैसा कि हमने तय किया है कि हमारा कस्टम डेटा प्रारूप `"r"`, `"g"`, `"b"` मानों के साथ एक JSON ऑब्जेक्ट होगा, हमें कंट्रोल पैनल में `"custom data"` फ़ील्ड का उपयोग करने और इसे JSON ऑब्जेक्ट `{"r":"30", "g":"144", "b":"255", "d":"25"}` से भरने की आवश्यकता है:
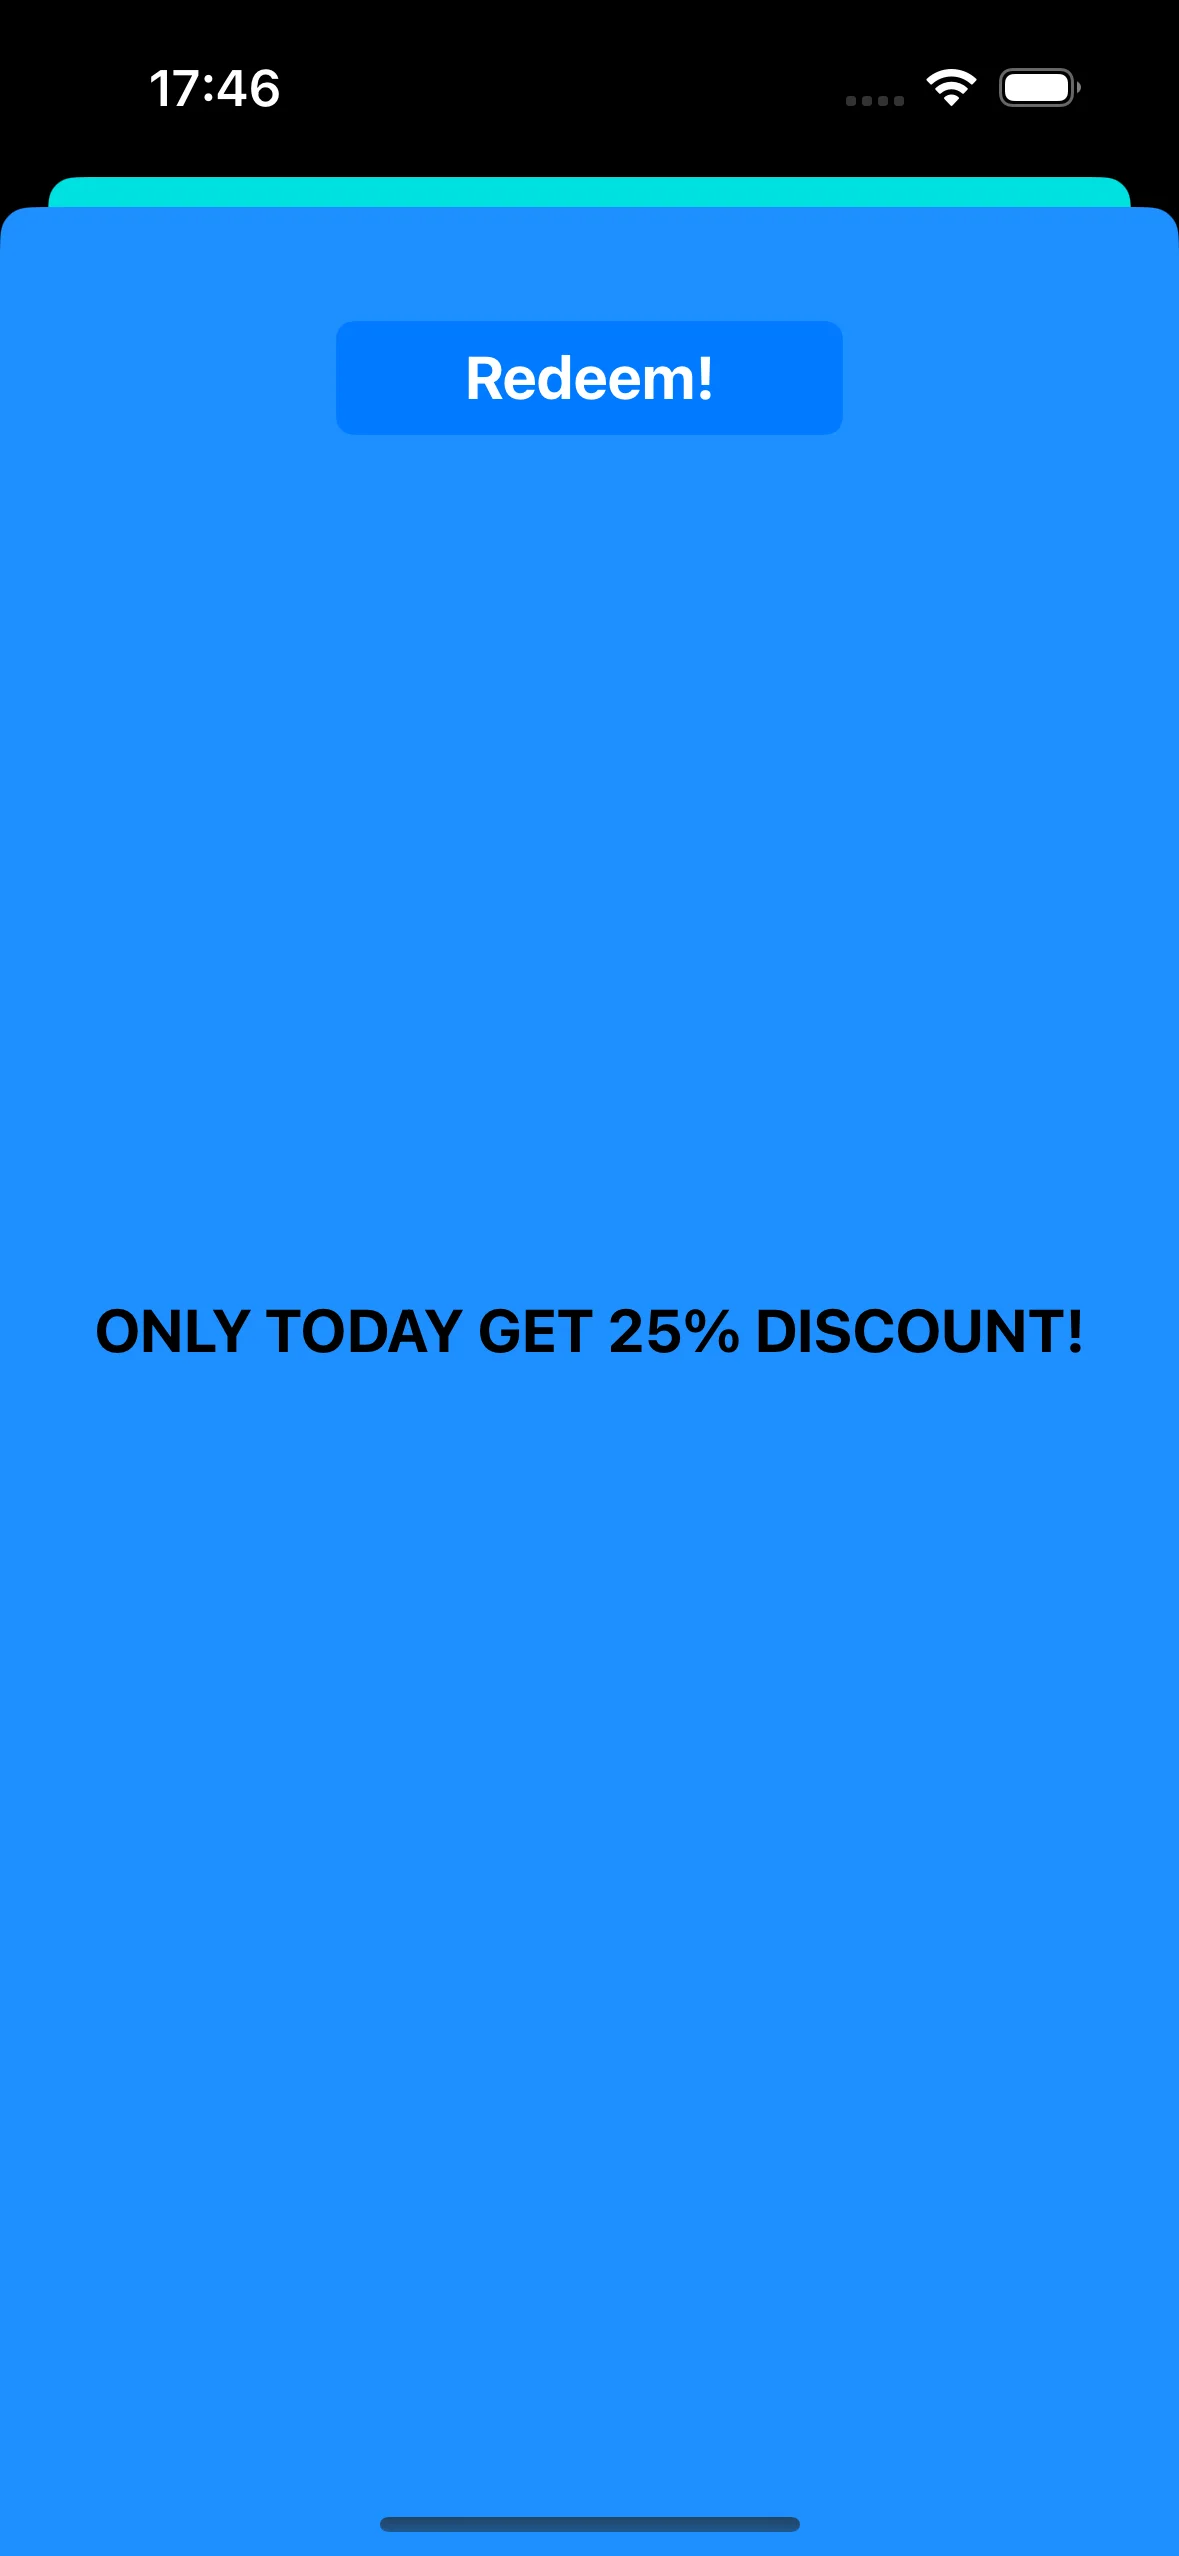
 पुश नोटिफिकेशन पर टैप करने पर, `CustomPageViewController` खुलता है, बैकग्राउंड का रंग सेट हो जाता है, और डिस्काउंट लागू हो जाता है:
 CustomPageViewController कोड:
```swift
class CustomPageViewController: UIViewController {
var bgColor: UIColor?
var discount: String?
@IBOutlet weak var titleLabel: UILabel!
override func viewDidLoad() {
super.viewDidLoad()
self.view.backgroundColor = self.bgColor
if self.discount != nil {
self.titleLabel?.text = "ONLY TODAY GET \(self.discount!)% DISCOUNT!"
}
}
func showPromoPage(discount: String) {
let vc = CustomPageViewController()
vc.bgColor = self.view.backgroundColor
vc.discount = discount
vc.modalTransitionStyle = UIModalTransitionStyle.crossDissolve
if self.presentedViewController != nil {
self.dismiss(animated: true, completion: {
self.present(vc, animated: true, completion: nil)
})
} else {
self.present(vc, animated: true, completion: nil)
}
}
@IBAction func closeButtonAction(_ sender: Any) {
self.dismiss(animated: true)
}
}
```
हम मानते हैं कि डिस्काउंट मान पुश नोटिफिकेशन पेलोड के JSON में `"d"` पैरामीटर के रूप में आएगा। चूंकि पुश नोटिफिकेशन पेलोड आकार में सीमित होते हैं, इसलिए आप पैरामीटर के लिए छोटे नामों का उपयोग करना बेहतर समझेंगे।
```swift
guard let customDataJson = message.customData,
let redString = customDataJson["r"] as? String,
let greenString = customDataJson["g"] as? String,
let blueString = customDataJson["b"] as? String,
let discount = customDataJson["d"] as? String else {
return
}
```
आप पुश नोटिफिकेशन पेलोड में पास किए गए पैरामीटर के आधार पर विभिन्न View Controllers को इनिशियलाइज़ करने और खोलने के लिए कोड लिख सकते हैं।
## A/B टेस्टिंग व्यू कंट्रोलर खोलना
चलिए पुश नोटिफिकेशन में कस्टम डेटा के लिए एक और उपयोग के मामले पर विचार करते हैं। उदाहरण के लिए, हमें एक यूज़र सेगमेंट के लिए एक व्यू कंट्रोलर और दूसरे यूज़र सेगमेंट के लिए दूसरा व्यू कंट्रोलर खोलने की आवश्यकता है। सीधे शब्दों में कहें, हम आपके एप्लिकेशन में A/B टेस्टिंग के लिए कस्टम डेटा का उपयोग कर सकते हैं।
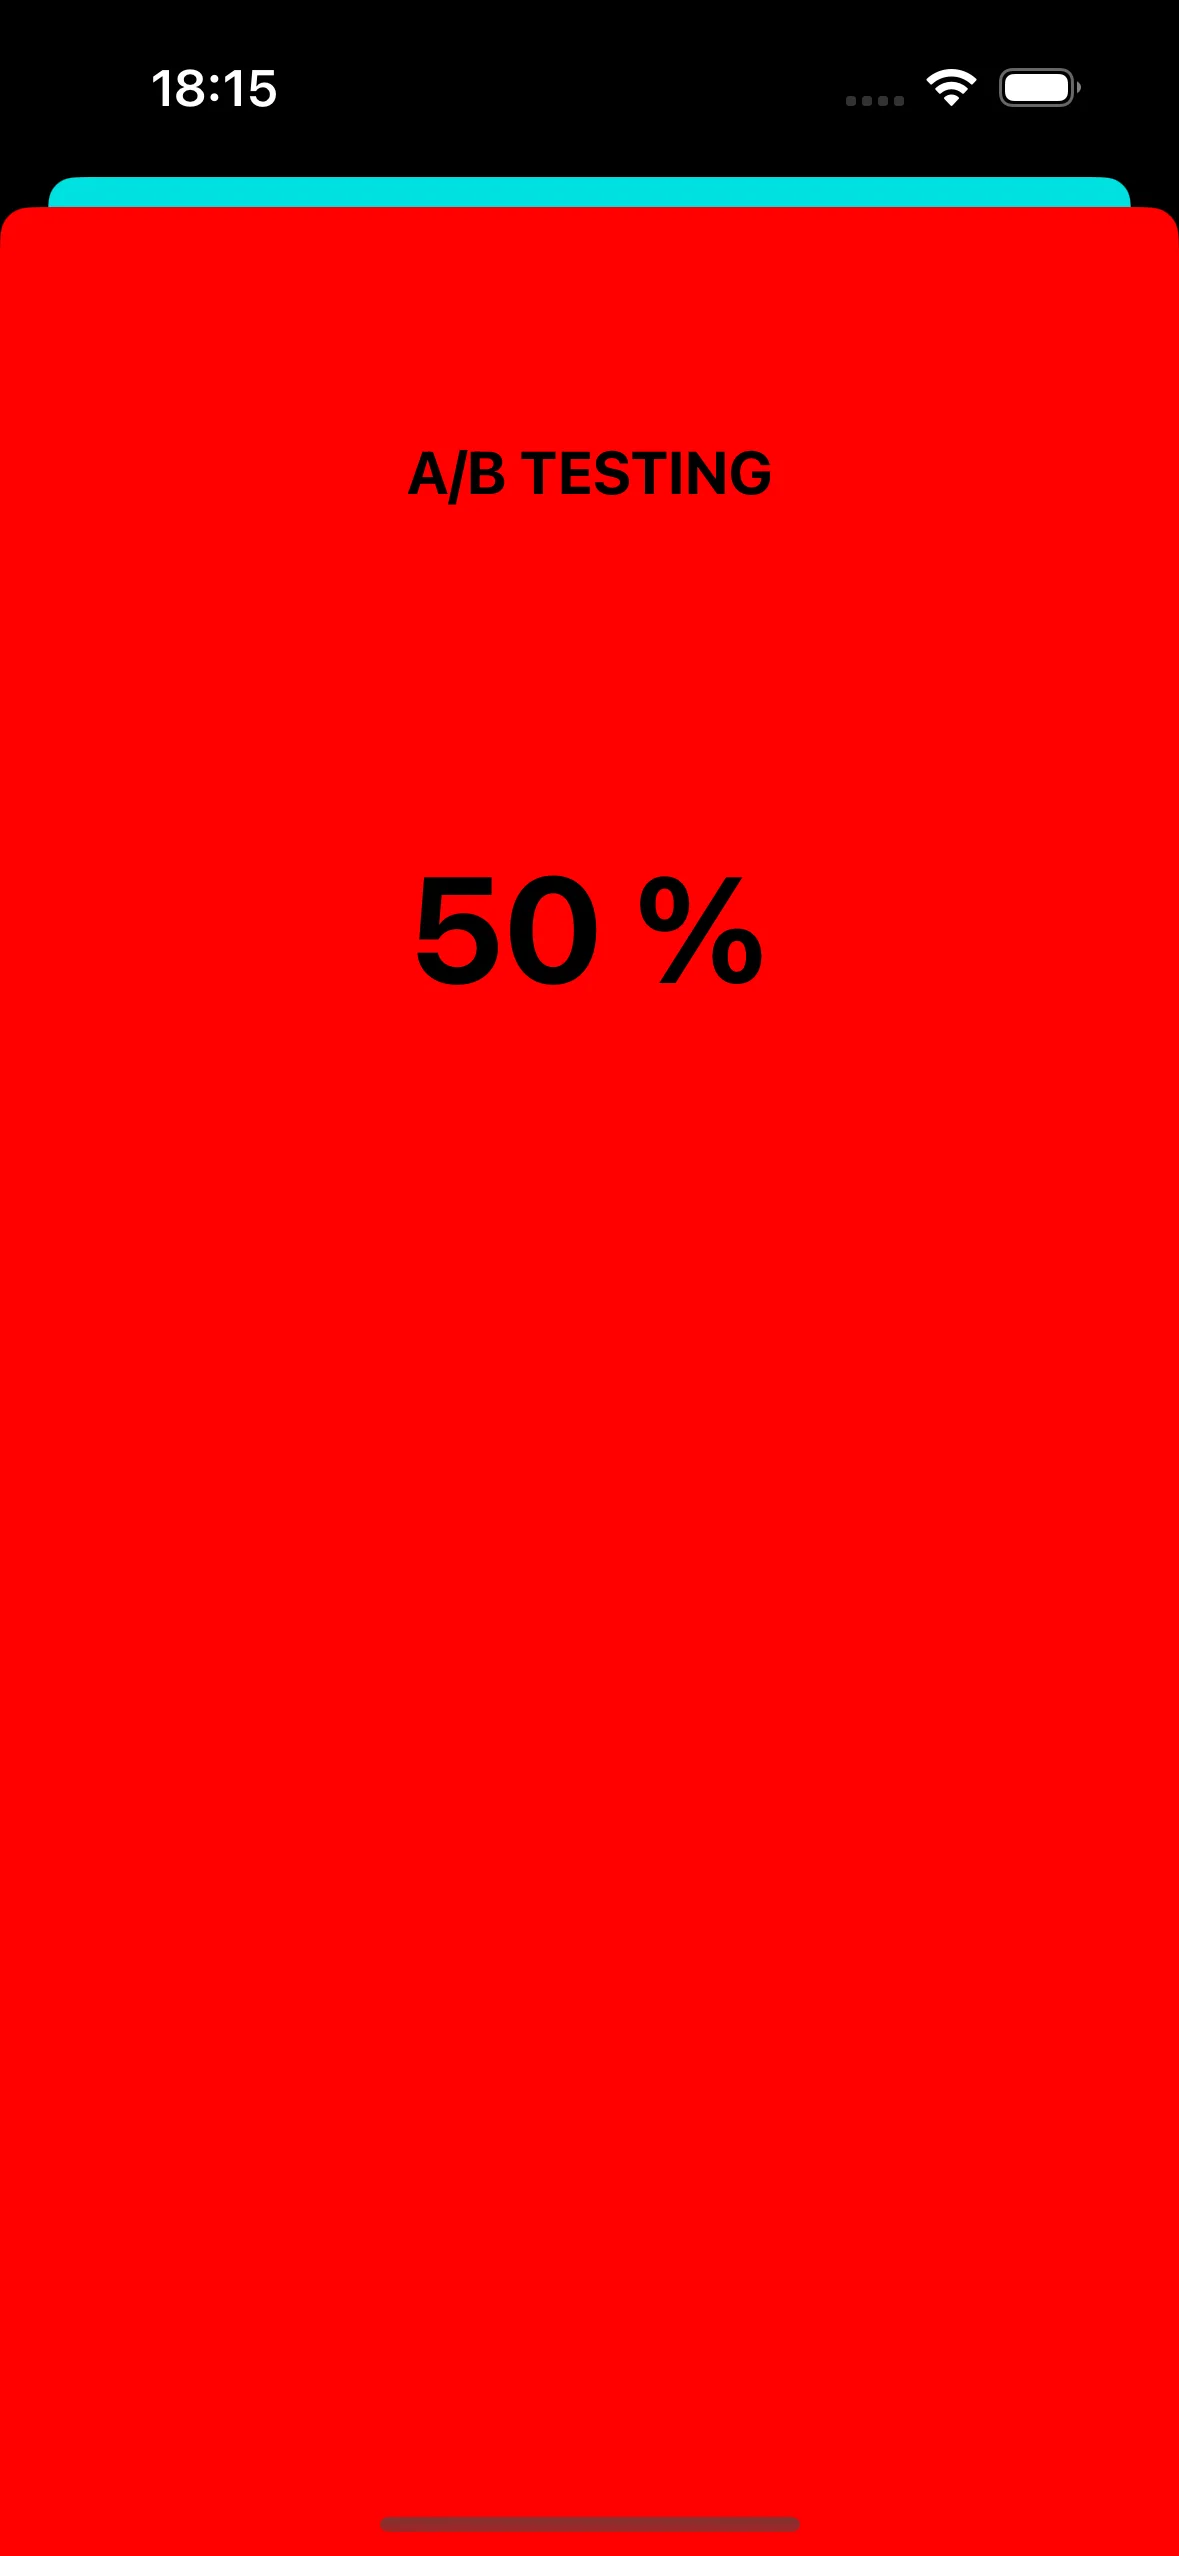
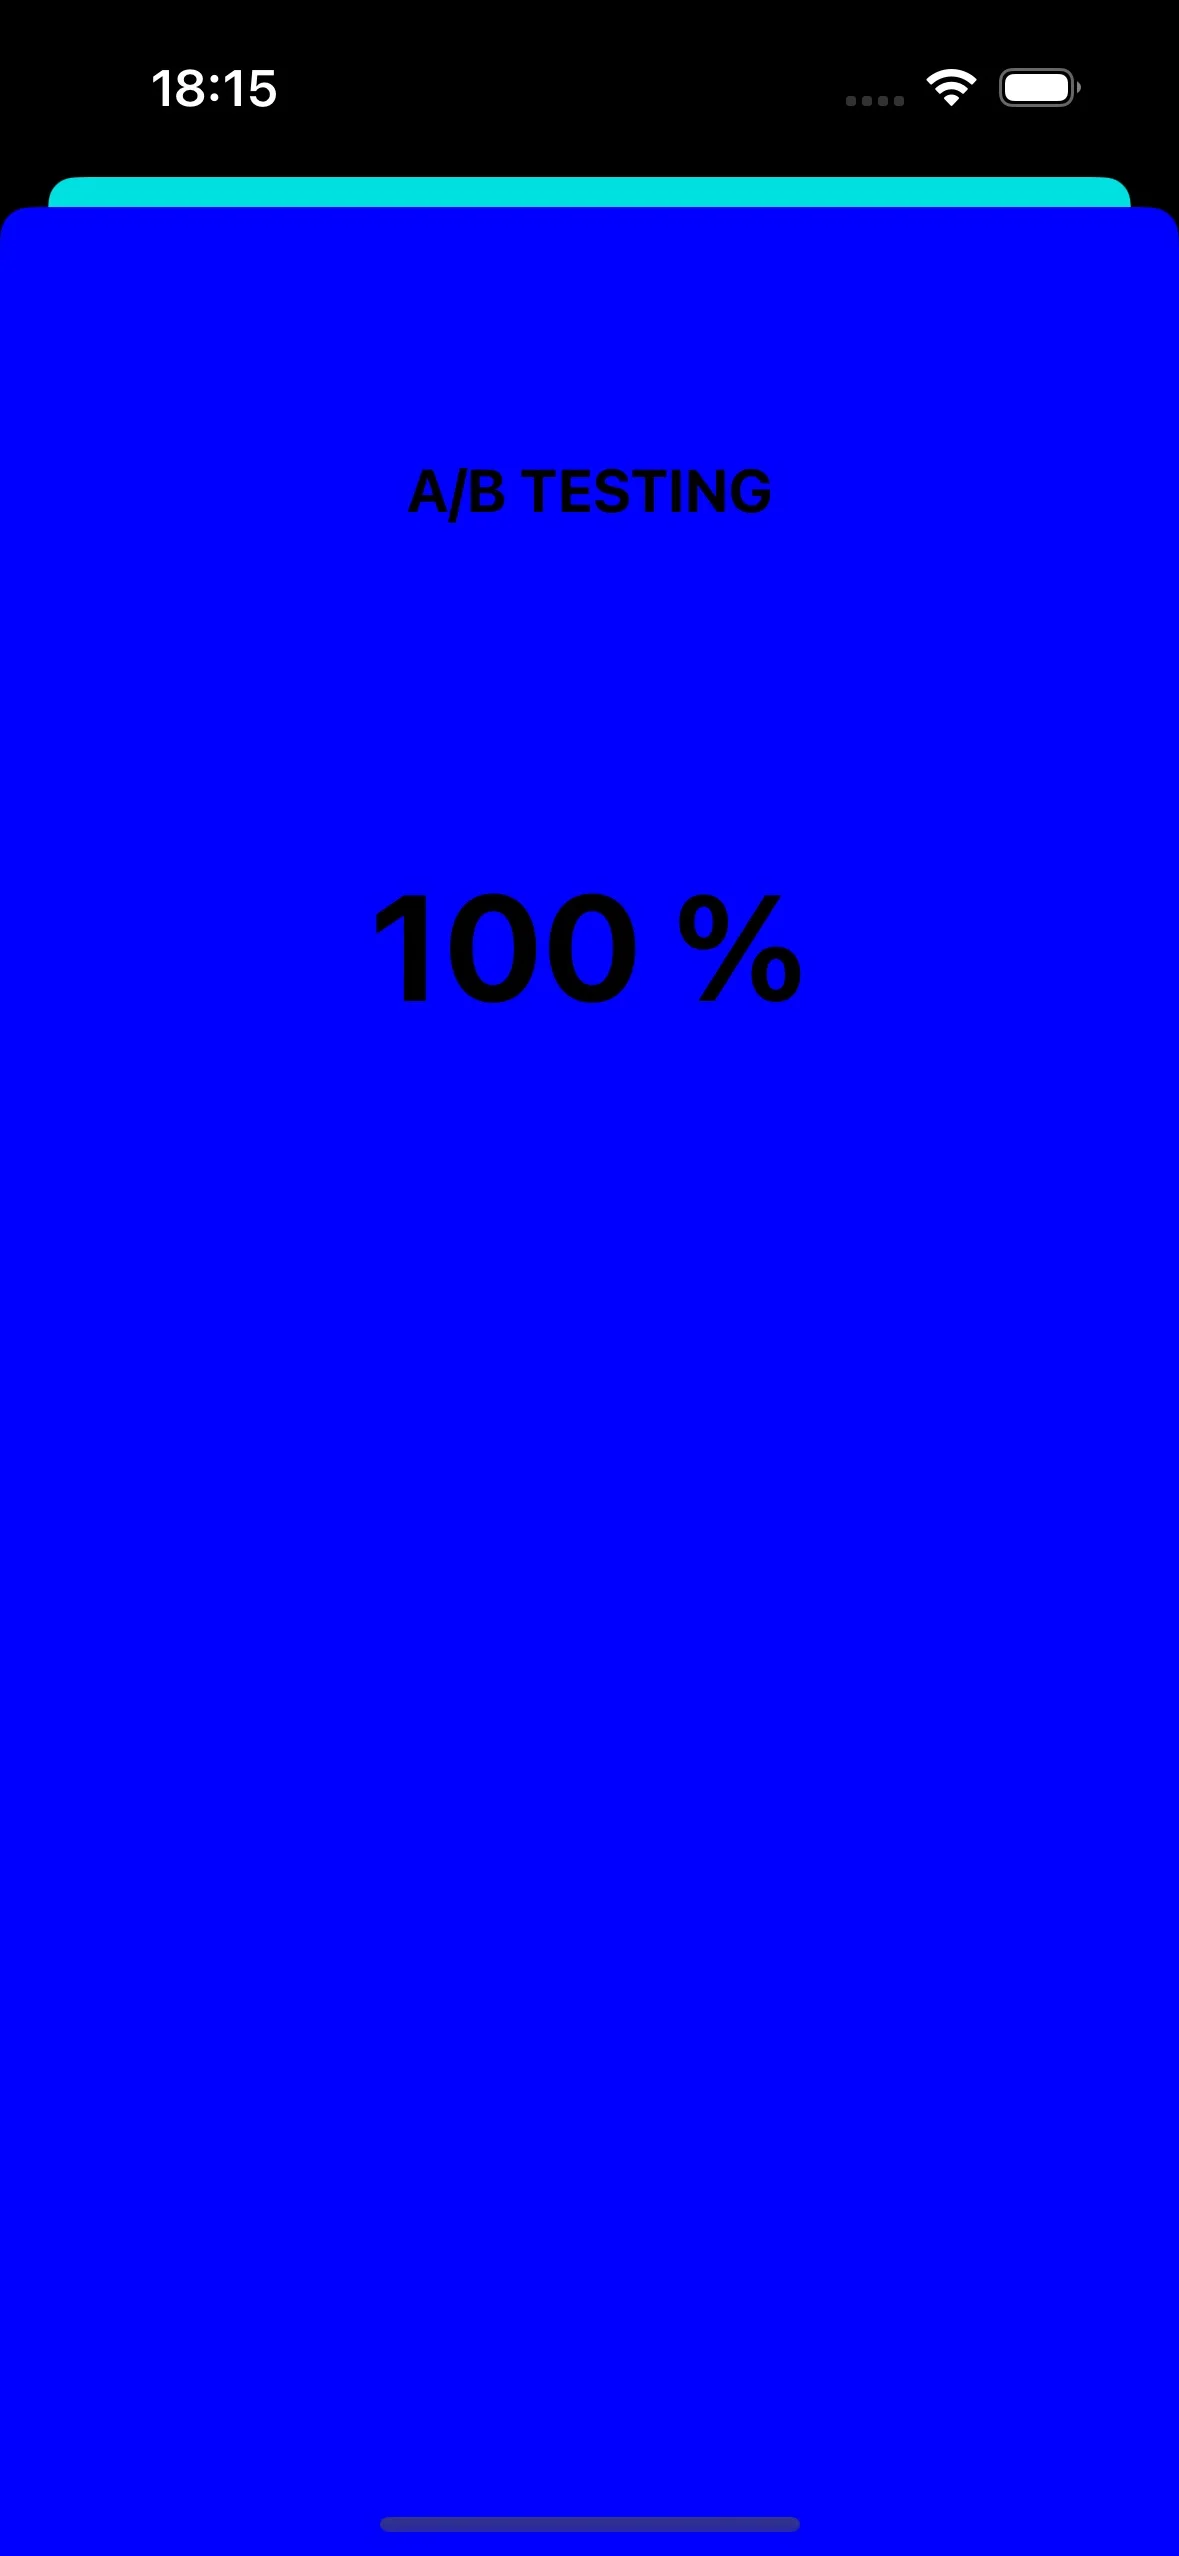
चलिए दो व्यू कंट्रोलर बनाते हैं। एक कंट्रोलर (A) एक डिस्काउंट मान के साथ खुलेगा, और दूसरा कंट्रोलर (B) एक अलग डिस्काउंट पैरामीटर के साथ खुलेगा।
अब चलिए वह कोड लिखते हैं जो पुश नोटिफिकेशन पेलोड के आधार पर उपयुक्त व्यू कंट्रोलर खोलेगा:
```swift
func pushwoosh(_ pushwoosh: Pushwoosh, onMessageOpened message: PWMessage) {
// MARK: - A/B Testing via Custom Data
guard let customDataJson = message.customData,
let viewController = customDataJson["vc"] as? String else {
return
}
if viewController == "A" {
setControllerA()
} else if viewController == "B" {
setControllerB()
}
}
func setControllerA() {
if let topController = UIApplication.shared.topMostController() {
let storyboard = UIStoryboard(name: "Main", bundle: nil)
if let customViewController = storyboard.instantiateViewController(withIdentifier: "a_vc") as? AViewController {
customViewController.discountA = "50"
topController.present(customViewController, animated: true, completion: nil)
}
}
}
func setControllerB() {
if let topController = UIApplication.shared.topMostController() {
let storyboard = UIStoryboard(name: "Main", bundle: nil)
if let customViewController = storyboard.instantiateViewController(withIdentifier: "b_vc") as? BViewController {
customViewController.discountB = "100"
topController.present(customViewController, animated: true, completion: nil)
}
}
}
```
अपना JSON कस्टम डेटा फ़ील्ड में जोड़ें।
```
{
"vc": "A"
}
// Choose your Custom Data (A or B)
{
"vc": "B"
}
```
आपके द्वारा पुश पेलोड में भेजे गए कस्टम डेटा के आधार पर, या तो `'vc': 'A'` या `'vc': 'B'`, यूज़र्स का एक सेगमेंट एक कंट्रोलर खोलेगा, जबकि यूज़र्स का दूसरा सेगमेंट एक अलग कंट्रोलर खोलेगा।
#### व्यू कंट्रोलर "A"
CustomPageViewController कोड:
```swift
class CustomPageViewController: UIViewController {
var bgColor: UIColor?
var discount: String?
@IBOutlet weak var titleLabel: UILabel!
override func viewDidLoad() {
super.viewDidLoad()
self.view.backgroundColor = self.bgColor
if self.discount != nil {
self.titleLabel?.text = "ONLY TODAY GET \(self.discount!)% DISCOUNT!"
}
}
func showPromoPage(discount: String) {
let vc = CustomPageViewController()
vc.bgColor = self.view.backgroundColor
vc.discount = discount
vc.modalTransitionStyle = UIModalTransitionStyle.crossDissolve
if self.presentedViewController != nil {
self.dismiss(animated: true, completion: {
self.present(vc, animated: true, completion: nil)
})
} else {
self.present(vc, animated: true, completion: nil)
}
}
@IBAction func closeButtonAction(_ sender: Any) {
self.dismiss(animated: true)
}
}
```
हम मानते हैं कि डिस्काउंट मान पुश नोटिफिकेशन पेलोड के JSON में `"d"` पैरामीटर के रूप में आएगा। चूंकि पुश नोटिफिकेशन पेलोड आकार में सीमित होते हैं, इसलिए आप पैरामीटर के लिए छोटे नामों का उपयोग करना बेहतर समझेंगे।
```swift
guard let customDataJson = message.customData,
let redString = customDataJson["r"] as? String,
let greenString = customDataJson["g"] as? String,
let blueString = customDataJson["b"] as? String,
let discount = customDataJson["d"] as? String else {
return
}
```
आप पुश नोटिफिकेशन पेलोड में पास किए गए पैरामीटर के आधार पर विभिन्न View Controllers को इनिशियलाइज़ करने और खोलने के लिए कोड लिख सकते हैं।
## A/B टेस्टिंग व्यू कंट्रोलर खोलना
चलिए पुश नोटिफिकेशन में कस्टम डेटा के लिए एक और उपयोग के मामले पर विचार करते हैं। उदाहरण के लिए, हमें एक यूज़र सेगमेंट के लिए एक व्यू कंट्रोलर और दूसरे यूज़र सेगमेंट के लिए दूसरा व्यू कंट्रोलर खोलने की आवश्यकता है। सीधे शब्दों में कहें, हम आपके एप्लिकेशन में A/B टेस्टिंग के लिए कस्टम डेटा का उपयोग कर सकते हैं।
चलिए दो व्यू कंट्रोलर बनाते हैं। एक कंट्रोलर (A) एक डिस्काउंट मान के साथ खुलेगा, और दूसरा कंट्रोलर (B) एक अलग डिस्काउंट पैरामीटर के साथ खुलेगा।
अब चलिए वह कोड लिखते हैं जो पुश नोटिफिकेशन पेलोड के आधार पर उपयुक्त व्यू कंट्रोलर खोलेगा:
```swift
func pushwoosh(_ pushwoosh: Pushwoosh, onMessageOpened message: PWMessage) {
// MARK: - A/B Testing via Custom Data
guard let customDataJson = message.customData,
let viewController = customDataJson["vc"] as? String else {
return
}
if viewController == "A" {
setControllerA()
} else if viewController == "B" {
setControllerB()
}
}
func setControllerA() {
if let topController = UIApplication.shared.topMostController() {
let storyboard = UIStoryboard(name: "Main", bundle: nil)
if let customViewController = storyboard.instantiateViewController(withIdentifier: "a_vc") as? AViewController {
customViewController.discountA = "50"
topController.present(customViewController, animated: true, completion: nil)
}
}
}
func setControllerB() {
if let topController = UIApplication.shared.topMostController() {
let storyboard = UIStoryboard(name: "Main", bundle: nil)
if let customViewController = storyboard.instantiateViewController(withIdentifier: "b_vc") as? BViewController {
customViewController.discountB = "100"
topController.present(customViewController, animated: true, completion: nil)
}
}
}
```
अपना JSON कस्टम डेटा फ़ील्ड में जोड़ें।
```
{
"vc": "A"
}
// Choose your Custom Data (A or B)
{
"vc": "B"
}
```
आपके द्वारा पुश पेलोड में भेजे गए कस्टम डेटा के आधार पर, या तो `'vc': 'A'` या `'vc': 'B'`, यूज़र्स का एक सेगमेंट एक कंट्रोलर खोलेगा, जबकि यूज़र्स का दूसरा सेगमेंट एक अलग कंट्रोलर खोलेगा।
#### व्यू कंट्रोलर "A"
 #### व्यू कंट्रोलर "B"
 ## पुश नोटिफिकेशन के माध्यम से ऐप आइकन बदलना
एक और उदाहरण कि हम iOS में पुश नोटिफिकेशन का उपयोग कैसे कर सकते हैं, वह है ऐप आइकन बदलना।
सबसे पहले, चलिए एसेट्स में तीन अलग-अलग आइकन जोड़ते हैं। एक का उपयोग डिफ़ॉल्ट ऐप आइकन के रूप में किया जाएगा, जबकि अन्य दो पुश नोटिफिकेशन में कस्टम डेटा के आधार पर बदलेंगे।
## पुश नोटिफिकेशन के माध्यम से ऐप आइकन बदलना
एक और उदाहरण कि हम iOS में पुश नोटिफिकेशन का उपयोग कैसे कर सकते हैं, वह है ऐप आइकन बदलना।
सबसे पहले, चलिए एसेट्स में तीन अलग-अलग आइकन जोड़ते हैं। एक का उपयोग डिफ़ॉल्ट ऐप आइकन के रूप में किया जाएगा, जबकि अन्य दो पुश नोटिफिकेशन में कस्टम डेटा के आधार पर बदलेंगे।
 अपने iOS एप्लिकेशन में वैकल्पिक ऐप आइकन सक्षम करने के लिए, आपको `Info.plist` फ़ाइल में आवश्यक कॉन्फ़िगरेशन जोड़ना होगा। ऐसा करने के लिए यहां चरण दिए गए हैं:
```xml
CFBundleIcons
CFBundleAlternateIcons
AppIcon-2
CFBundleIconFiles
Icon-2
UIPrerenderedIcon
AppIcon-3
CFBundleIconFiles
Icon-3
UIPrerenderedIcon
CFBundlePrimaryIcon
CFBundleIconFiles
Icon-1
UIPrerenderedIcon
```
`pushwoosh(_ pushwoosh: Pushwoosh, onMessageOpened message: PWMessage)` कॉलबैक में, आप पुश नोटिफिकेशन में प्राप्त कस्टम डेटा के आधार पर ऐप आइकन बदलने के लिए कोड जोड़ सकते हैं। यहां बताया गया है कि आप इसे कैसे लागू कर सकते हैं:
```swift
func pushwoosh(_ pushwoosh: Pushwoosh, onMessageOpened message: PWMessage) {
// MARK: - Change the app icon dynamically
guard let customDataJson = message.customData,
let appIcon = customDataJson["i"] as? String else {
return
}
UIApplication.shared.setAlternateIconName(appIcon) { error in
if let error = error {
print(error.localizedDescription)
} else {
print("Success!")
}
}
}
```
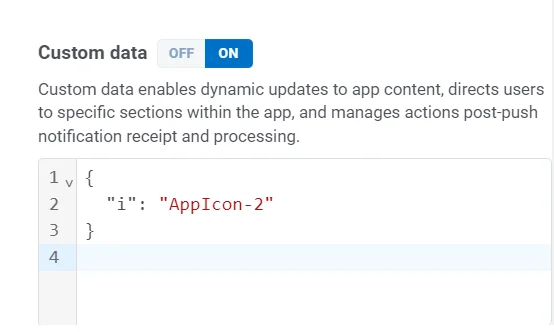
JSON कोड जोड़ें:
```
{
"i": "AppIcon-2"
}
```
अपने iOS एप्लिकेशन में वैकल्पिक ऐप आइकन सक्षम करने के लिए, आपको `Info.plist` फ़ाइल में आवश्यक कॉन्फ़िगरेशन जोड़ना होगा। ऐसा करने के लिए यहां चरण दिए गए हैं:
```xml
CFBundleIcons
CFBundleAlternateIcons
AppIcon-2
CFBundleIconFiles
Icon-2
UIPrerenderedIcon
AppIcon-3
CFBundleIconFiles
Icon-3
UIPrerenderedIcon
CFBundlePrimaryIcon
CFBundleIconFiles
Icon-1
UIPrerenderedIcon
```
`pushwoosh(_ pushwoosh: Pushwoosh, onMessageOpened message: PWMessage)` कॉलबैक में, आप पुश नोटिफिकेशन में प्राप्त कस्टम डेटा के आधार पर ऐप आइकन बदलने के लिए कोड जोड़ सकते हैं। यहां बताया गया है कि आप इसे कैसे लागू कर सकते हैं:
```swift
func pushwoosh(_ pushwoosh: Pushwoosh, onMessageOpened message: PWMessage) {
// MARK: - Change the app icon dynamically
guard let customDataJson = message.customData,
let appIcon = customDataJson["i"] as? String else {
return
}
UIApplication.shared.setAlternateIconName(appIcon) { error in
if let error = error {
print(error.localizedDescription)
} else {
print("Success!")
}
}
}
```
JSON कोड जोड़ें:
```
{
"i": "AppIcon-2"
}
```
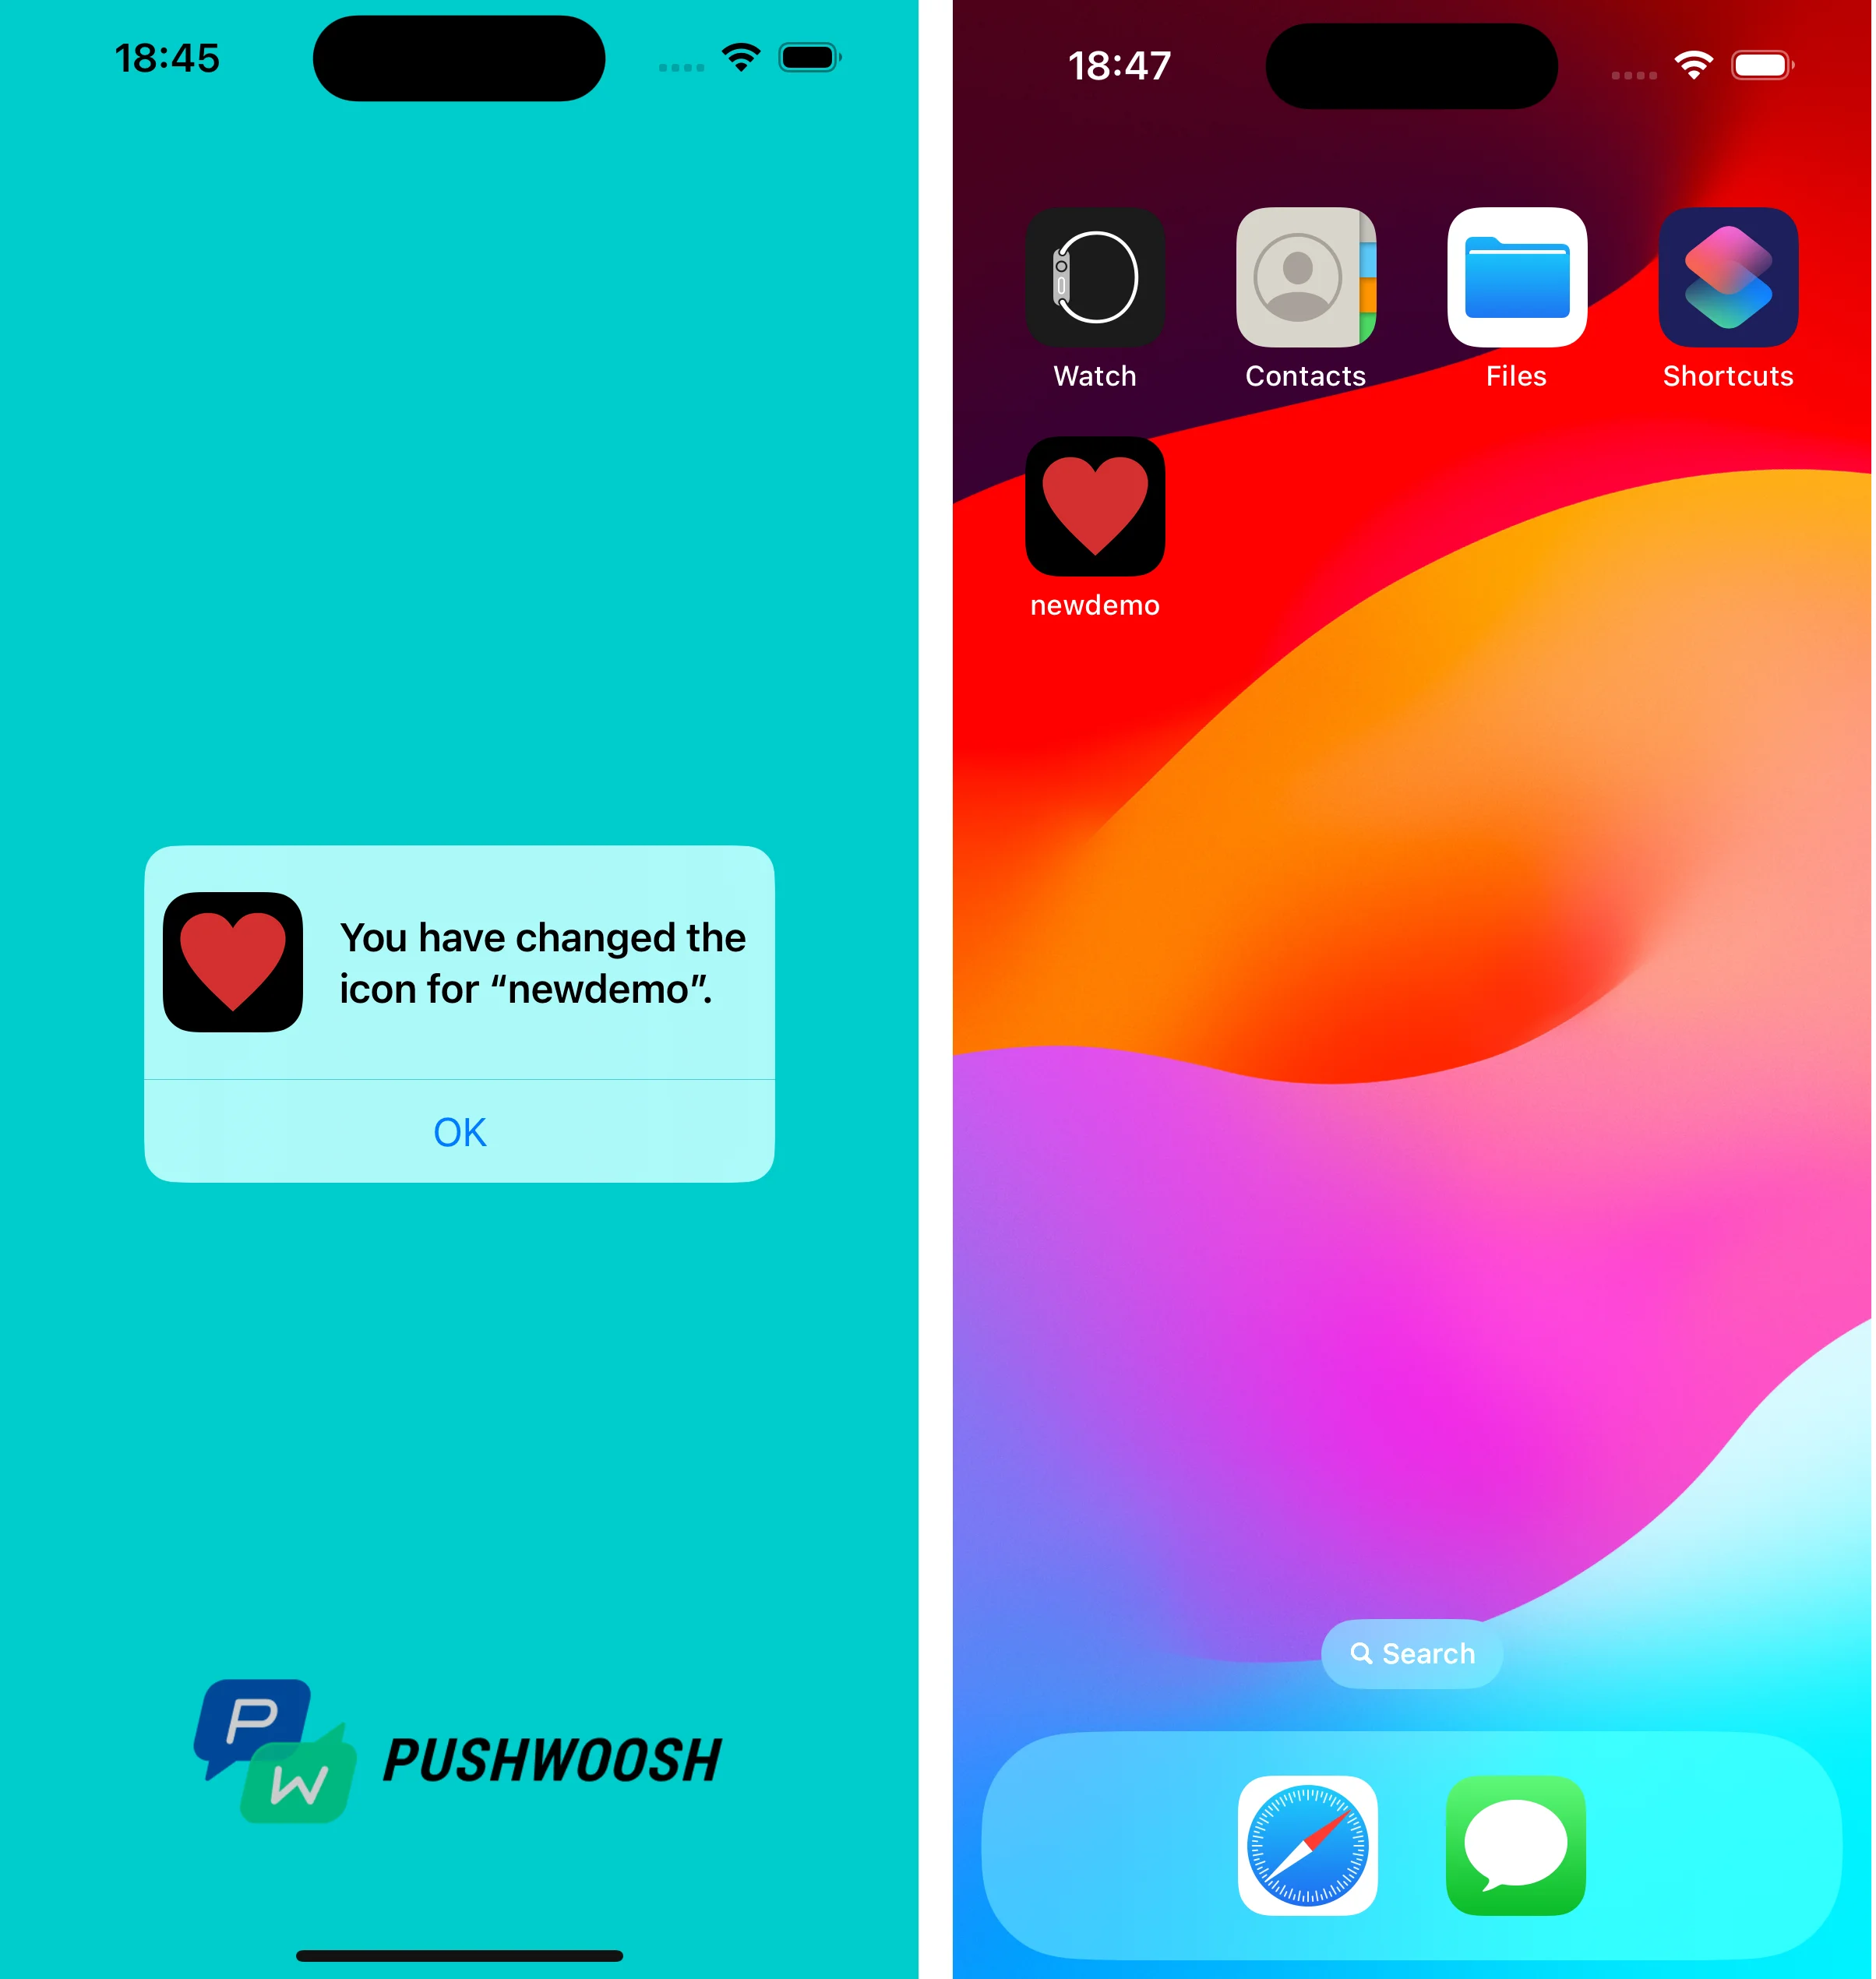
 पुश नोटिफिकेशन पर टैप करने पर, सिस्टम आपको डिवाइस पर ऐप आइकन बदलने के लिए संकेत देगा।
 आप [GitHub](https://github.com/Pushwoosh/pushwoosh-quickstart-ios/tree/main/customdata/newdemo) पर कस्टम डेटा का उपयोग करने वाला प्रोजेक्ट पा सकते हैं।