iOS SDK basic integration guide
This section contains information on how to integrate the Pushwoosh SDK into your iOS application.
Prerequisites
Anchor link toTo integrate the Pushwoosh iOS SDK into your app, you will need the following:
Integration steps
Anchor link to1. Installation
Anchor link toYou can integrate the Pushwoosh SDK into your application using either Swift Package Manager or CocoaPods.
Swift Package Manager
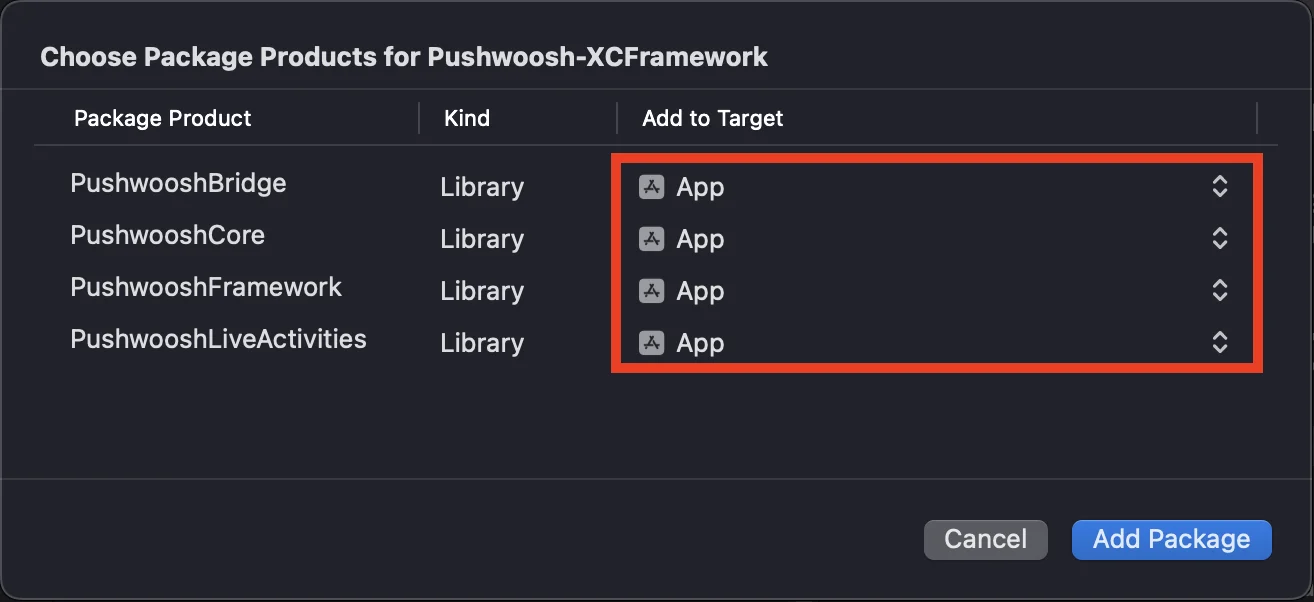
Anchor link toIn the Package Dependencies section, add the following package:
https://github.com/Pushwoosh/Pushwoosh-XCFrameworkTo use the Pushwoosh iOS SDK, make sure to add the following four frameworks to your app target when integrating via Swift Package Manager:
PushwooshFrameworkPushwooshCorePushwooshBridgePushwooshLiveActivities
CocoaPods
Anchor link toOpen your Podfile and add the dependency:
# Uncomment the next line to define a global platform for your project# platform :ios, '9.0'
target 'MyApp' do  # Comment the next line if you don't want to use dynamic frameworks  use_frameworks!
  pod 'PushwooshXCFramework'
end
Then, in the terminal, run the following command to install dependencies:
pod install2. Capabilities
Anchor link toTo enable Push Notifications in your project, you need to add certain capabilities.
In the Signing & Capabilities section, add the following capabilities:
Push NotificationsBackground Modes. After adding this capability, check the box forRemote notifications.
If you intend to use Time Sensitive Notifications (iOS 15+), also add the Time Sensitive Notifications capability.
3. Initialization code
Anchor link toAppDelegate
Anchor link toAdd the following code to your AppDelegate class:
import SwiftUIimport PushwooshFramework
@mainstruct MyApp: App {    // Register AppDelegate as UIApplicationDelegate    @UIApplicationDelegateAdaptor(AppDelegate.self) var appDelegate
    var body: some Scene {        WindowGroup {            ContentView()        }    }}
class AppDelegate: NSObject, UIApplicationDelegate, PWMessagingDelegate {
    func application(_ application: UIApplication, didFinishLaunchingWithOptions launchOptions: [UIApplication.LaunchOptionsKey: Any]?) -> Bool {        // Initialization code        // Set custom delegate for push handling        Pushwoosh.sharedInstance().delegate = self
        // Register for push notifications        Pushwoosh.sharedInstance().registerForPushNotifications()
        return true    }
    // Handle token received from APNS    func application(_ application: UIApplication, didRegisterForRemoteNotificationsWithDeviceToken deviceToken: Data) {        Pushwoosh.sharedInstance().handlePushRegistration(deviceToken)    }
    // Handle token receiving error    func application(_ application: UIApplication, didFailToRegisterForRemoteNotificationsWithError error: Error) {        Pushwoosh.sharedInstance().handlePushRegistrationFailure(error)    }
    //for silent push notifications    func application(_ application: UIApplication, didReceiveRemoteNotification userInfo: [AnyHashable: Any], fetchCompletionHandler completionHandler: @escaping (UIBackgroundFetchResult) -> Void) {        Pushwoosh.sharedInstance().handlePushReceived(userInfo)        completionHandler(.noData)    }
    // Fired when a push is received    func pushwoosh(_ pushwoosh: Pushwoosh, onMessageReceived message: PWMessage) {        print("onMessageReceived: ", message.payload!.description)    }
    // Fired when a user taps the notification    func pushwoosh(_ pushwoosh: Pushwoosh, onMessageOpened message: PWMessage) {        print("onMessageOpened: ", message.payload!.description)    }}
struct ContentView: View {    var body: some View {        Text("Pushwoosh with SwiftUI")            .padding()    }}
import PushwooshFramework
@UIApplicationMainclass AppDelegate: UIResponder, UIApplicationDelegate, PWMessagingDelegate {
var window: UIWindow?
func application(_ application: UIApplication, didFinishLaunchingWithOptions launchOptions: [UIApplication.LaunchOptionsKey: Any]?) -> Bool { //initialization code //set custom delegate for push handling, in our case AppDelegate Pushwoosh.sharedInstance().delegate = self;
//register for push notifications Pushwoosh.sharedInstance().registerForPushNotifications()
return true }
//handle token received from APNS func application(_ application: UIApplication, didRegisterForRemoteNotificationsWithDeviceToken deviceToken: Data) { Pushwoosh.sharedInstance().handlePushRegistration(deviceToken) }
//handle token receiving error func application(_ application: UIApplication, didFailToRegisterForRemoteNotificationsWithError error: Error) { Pushwoosh.sharedInstance().handlePushRegistrationFailure(error); }
//for silent push notifications func application(_ application: UIApplication, didReceiveRemoteNotification userInfo: [AnyHashable : Any], fetchCompletionHandler completionHandler: @escaping (UIBackgroundFetchResult) -> Void) { Pushwoosh.sharedInstance().handlePushReceived(userInfo) completionHandler(.noData) }
//this event is fired when the push gets received func pushwoosh(_ pushwoosh: Pushwoosh, onMessageReceived message: PWMessage) { print("onMessageReceived: ", message.payload!.description) }
// Fired when a user taps the notification func pushwoosh(_ pushwoosh: Pushwoosh, onMessageOpened message: PWMessage) { print("onMessageOpened: ", message.payload!.description) }}#import <PushwooshFramework/PushwooshFramework.h>
@implementation AppDelegate
- (BOOL)application:(UIApplication *)application didFinishLaunchingWithOptions:(NSDictionary *)launchOptions { //-----------PUSHWOOSH PART-----------
// set custom delegate for push handling, in our case AppDelegate [Pushwoosh sharedInstance].delegate = self;
//register for push notifications! [[Pushwoosh sharedInstance] registerForPushNotifications];
return YES;}
//handle token received from APNS- (void)application:(UIApplication *)application didRegisterForRemoteNotificationsWithDeviceToken:(NSData *)deviceToken { [[Pushwoosh sharedInstance] handlePushRegistration:deviceToken];}
//handle token receiving error- (void)application:(UIApplication *)application didFailToRegisterForRemoteNotificationsWithError:(NSError *)error { [[Pushwoosh sharedInstance] handlePushRegistrationFailure:error];}
//for silent push notifications- (void)application:(UIApplication *)application didReceiveRemoteNotification:(NSDictionary *)userInfo fetchCompletionHandler:(void (^)(UIBackgroundFetchResult))completionHandler { [[Pushwoosh sharedInstance] handlePushReceived:userInfo]; completionHandler(UIBackgroundFetchResultNoData);}
//this event is fired when the push gets received- (void)pushwoosh:(Pushwoosh *)pushwoosh onMessageReceived:(PWMessage *)message { NSLog(@"onMessageReceived: %@", message.payload);}
//this event is fired when user taps the notification- (void)pushwoosh:(Pushwoosh *)pushwoosh onMessageOpened:(PWMessage *)message { NSLog(@"onMessageOpened: %@", message.payload);}
@endInfo.plist
Anchor link toIn your Info.plist:
- set the
Pushwoosh_APPIDkey to the Pushwoosh Application Code. - set the
Pushwoosh_API_TOKENkey to the Pushwoosh Device API Token
4. Message delivery tracking
Anchor link toPushwoosh supports tracking delivery events for push notifications via the Notification Service Extension
Add Notification Service Extension
Anchor link to- In Xcode, Select File > New > Target…
- Choose Notification Service Extension and press Next.
- Enter the target name and press Finish.
- When prompted for activation, press Cancel.
Dependencies for the Notification Service Extension (CocoaPods only)
Anchor link toNote: If you’re using Swift Package Manager to manage dependencies, you can skip this step, as the dependencies are added automatically.
Open your Podfile and add the dependency for the target:
# Uncomment the next line to define a global platform for your project# platform :ios, '9.0'
target 'MyApp' do  # Comment the next line if you don't want to use dynamic frameworks  use_frameworks!
  pod 'PushwooshXCFramework'
end
target 'MyAppNotificationExtension' do  use_frameworks!
  pod 'PushwooshXCFramework'
end
Run the following command in the terminal to update the dependencies:
pod updateAdd Pushwoosh SDK to Notification Service Extension
Anchor link toThis code allows you to intercept and process notifications within your notification extension.
import UserNotificationsimport PushwooshFramework
class NotificationService: UNNotificationServiceExtension {
    var contentHandler: ((UNNotificationContent) -> Void)?    var bestAttemptContent: UNMutableNotificationContent?
    override func didReceive(_ request: UNNotificationRequest, withContentHandler contentHandler: @escaping (UNNotificationContent) -> Void) {        // Pushwoosh **********        PWNotificationExtensionManager.shared().handle(request, contentHandler: contentHandler)        // ********************
        self.contentHandler = contentHandler        bestAttemptContent = (request.content.mutableCopy() as? UNMutableNotificationContent)
        if let bestAttemptContent = bestAttemptContent {            // Modify the notification content here...            contentHandler(bestAttemptContent)        }    }
    override func serviceExtensionTimeWillExpire() {        // Called just before the extension will be terminated by the system.        // Use this as an opportunity to deliver your "best attempt" at modified content, otherwise the original push payload will be used.        if let contentHandler = contentHandler, let bestAttemptContent =  bestAttemptContent {            contentHandler(bestAttemptContent)        }    }
}
#import "PWNotificationExtensionManager.h"
@interface NotificationService : UNNotificationServiceExtension
@end
@implementation NotificationService
- (void)didReceiveNotificationRequest:(UNNotificationRequest *)request withContentHandler:(void (^)(UNNotificationContent * _Nonnull))contentHandler { // Pushwoosh ********** [[PWNotificationExtensionManager sharedManager] handleNotificationRequest:request contentHandler:contentHandler]; //*********************}
@endInfo.plist
Anchor link toIn your Notification Service Extension’s Info.plist, add:
Pushwoosh_APPID- Your Application Code.
5. Run the project
Anchor link to- Build and run the project.
- Go to the Pushwoosh Control Panel and send a push notification.
- You should see the notification in the app.
Extended Pushwoosh iOS integration
Anchor link toAt this stage, you have already integrated the SDK and can send and receive push notifications. Now, let’s explore the core functionality
Push notifications
Anchor link toIn the Pushwoosh SDK, there are two callbacks designed for handling push notifications:
onMessageReceived: This method is invoked when a push notification is received.onMessageOpened: This method is called when the user interacts with (opens) the notification
These callbacks enable developers to manage the reception and user interaction with push notifications within their applications
import PushwooshFramework
class AppDelegate: NSObject, UIApplicationDelegate, PWMessagingDelegate {
    func application(_ application: UIApplication, didFinishLaunchingWithOptions launchOptions: [UIApplication.LaunchOptionsKey : Any]? = nil) -> Bool {        Pushwoosh.sharedInstance().delegate = self;    }
    func pushwoosh(_ pushwoosh: Pushwoosh, onMessageOpened message: PWMessage) {        if let payload = message.payload {            print("onMessageOpened: \(payload)")        }    }
    func pushwoosh(_ pushwoosh: Pushwoosh, onMessageReceived message: PWMessage) {        if let payload = message.payload {            print("onMessageReceived: \(payload)")        }    }}
#import <PushwooshFramework/PushwooshFramework.h>
@interface AppDelegate () <PWMessagingDelegate>
@end
@implementation AppDelegate
- (BOOL)application:(UIApplication *)application didFinishLaunchingWithOptions:(NSDictionary *)launchOptions { [[Pushwoosh sharedInstance] setDelegate:self]; return YES;}
- (void)pushwoosh:(Pushwoosh *)pushwoosh onMessageOpened:(PWMessage *)message { if (message.payload) { NSLog(@"onMessageOpened: %@", message.payload); }}
- (void)pushwoosh:(Pushwoosh *)pushwoosh onMessageReceived:(PWMessage *)message { if (message.payload) { NSLog(@"onMessageReceived: %@", message.payload); }}@endUser configuration
Anchor link toBy focusing on individual user behavior and preferences, you can deliver personalized content, leading to increased user satisfaction and loyalty
import PushwooshFramework
class Registration {
    func afterUserLogin(user: User) {        let pushwoosh = Pushwoosh.sharedInstance()        // set user ID        if let userId = user.userId {            pushwoosh.setUserId(userId)        }
        // set user email        if let userEmail = user.email {            pushwoosh.setEmail(userEmail)        }
        // set user SMS number        if let userSmsNumber = user.SmsNumber {            pushwoosh.registerSmsNumber(userSmsNumber)        }
        // set user WhatsApp number        if let userWhatsAppNumber = user.WhatsAppNumber {            pushwoosh.registerSmsNumber(userWhatsAppNumber)        }
        // setting additional user information as tags for Pushwoosh        if let age = user.userDetails.age,            let name = user.userDetails.userName,            let lastLogin = user.userDetails.lastLoginDate {            pushwoosh.setTags([                "age": age,                "name": name,                "last_login": lastLogin            ])        }    }}
#import <PushwooshFramework/PushwooshFramework.h>
@implementation Registration
- (void)afterUserLogin:(User *)user { Pushwoosh *pushwoosh = [Pushwoosh sharedInstance];
// set user ID if (user.userId) { [pushwoosh setUserId:user.userId]; }
// set user email if (user.email) { [pushwoosh setEmail:user.email]; }
// setting additional user information as tags for Pushwoosh if (user.userDetails.age && user.userDetails.userName && user.userDetails.lastLoginDate) { NSDictionary *tags = @{ @"age": user.userDetails.age, @"name": user.userDetails.userName, @"last_login": user.userDetails.lastLoginDate }; [pushwoosh setTags:tags]; }}
@endTags
Anchor link toTags are key-value pairs assigned to users or devices, allowing segmentation based on attributes like preferences or behavior, enabling targeted messaging.
import PushwooshFramework
class UpdateUser {    func afterUserUpdateProfile(user: User) {        let pushwoosh = Pushwoosh.sharedInstance()
        // set list of favorite categories        pushwoosh.setTags(["favorite_categories" : user.getFavoriteCategories()])
        // set payment information        pushwoosh.setTags([            "is_subscribed": user.isSubscribed(),            "payment_status": user.getPaymentStatus(),            "billing_address": user.getBillingAddress()        ])    }}
#import <PushwooshFramework/PushwooshFramework.h>
@implementation UpdateUser
- (void)afterUserUpdateProfile:(User *)user { Pushwoosh *pushwoosh = [Pushwoosh sharedInstance];
// set list of favorite categories [pushwoosh setTags:@{@"favorite_categories" : user.getFavoriteCategories}];
// set payment information NSDictionary *tags = @{ @"is_subscribed": @(user.isSubscribed), @"payment_status": user.getPaymentStatus, @"billing_address": user.getBillingAddress }; [pushwoosh setTags:tags];}
@endEvents
Anchor link toEvents are specific user actions or occurrences within the app that can be tracked to analyze behavior and trigger corresponding messages or actions
import PushwooshFramework
class Registration {
    func afterUserLogin(user: User) {        if let userName = user.getUserName(), let lastLogin = user.getLastLoginDate() {            PWInAppManager.shared().postEvent("login", withAttributes: [                "name": userName,                "last_login": lastLogin            ])        }    }
    func afterUserPurchase(user: User, product: Product) {        let pushwoosh = Pushwoosh.sharedInstance()
        // Track purchase event        PWInAppManager.shared().postEvent("purchase", withAttributes: [            "product_id": product.getId(),            "product_name": product.getName(),            "price": product.getPrice(),            "quantity": product.getQuantity()        ])
        // Set user tags        let lastPurchaseDate = Date().timeIntervalSince1970        let lifetimeSpend = getCurrentLifetimeSpend() + product.getPrice()
        pushwoosh.setTags([            "last_purchase_date": lastPurchaseDate,            "lifetime_spend": lifetimeSpend        ])    }}
#import <PushwooshFramework/PushwooshFramework.h>#import <PushwooshFramework/PWInAppManager.h>
@implementation Registration
- (void)afterUserLogin:(User *)user { NSString *userName = [user getUserName]; NSDate *lastLogin = [user getLastLoginDate];
if (userName && lastLogin) { [[PWInAppManager sharedManager] postEvent:@"login" withAttributes:@{ @"name": userName, @"last_login": lastLogin }]; }}
- (void)afterUserPurchase:(User *)user product:(Product *)product { Pushwoosh *pushwoosh = [Pushwoosh sharedInstance];
// Track purchase event [[PWInAppManager sharedManager] postEvent:@"purchase" withAttributes:@{ @"product_id": [product getId], @"product_name": [product getName], @"price": @([product getPrice]), @"quantity": @([product getQuantity]) }];
// Set user tags NSTimeInterval lastPurchaseDate = [[NSDate date] timeIntervalSince1970]; double lifetimeSpend = /* fetch current lifetime spend */ + [product getPrice];
NSDictionary *tags = @{ @"last_purchase_date": @(lastPurchaseDate), @"lifetime_spend": @(lifetimeSpend) };
[pushwoosh setTags:tags];}
@endRich Media
Anchor link toRich media refers to interactive and multimedia content, such as images, videos, or HTML, used in notifications and in-app messages to enhance user engagement
import PushwooshFramework
class ViewController: UIViewController, PWRichMediaPresentingDelegate {
    override func viewDidLoad() {        super.viewDidLoad()        let richMediaConfiguration = PWModalWindowConfiguration.shared()
        PWRichMediaManager.shared().delegate = self        richMediaConfiguration.configureModalWindow(with: .PWModalWindowPositionBottom,                                                                 present: .PWAnimationPresentFromBottom,                                                                 dismiss: .PWAnimationDismissDown)    }
    func richMediaManager(_ richMediaManager: PWRichMediaManager!, shouldPresent richMedia: PWRichMedia!) -> Bool {        print("Rich media will be presented with: \(richMedia.pushPayload!)")        return true    }
    func richMediaManager(_ richMediaManager: PWRichMediaManager!, didPresent richMedia: PWRichMedia!) {        print("Rich media has been presented with: \(richMedia.pushPayload!)")    }
    func richMediaManager(_ richMediaManager: PWRichMediaManager!, didClose richMedia: PWRichMedia!) {        print("Rich media has been closed with: \(richMedia.pushPayload!)")    }
    func richMediaManager(_ richMediaManager: PWRichMediaManager!, presentingDidFailFor richMedia: PWRichMedia!, withError error: (any Error)!) {        print("Failed to present rich media with: \(richMedia.pushPayload!). Error: \(error.localizedDescription)")    }}
#import "ViewController.h"#import <PushwooshFramework/PushwooshFramework.h>#import <PushwooshFramework/PWRichMediaManager.h>#import <PushwooshFramework/PWModalWindowConfiguration.h>
@interface ViewController () <PWRichMediaPresentingDelegate>
@end
@implementation ViewController
- (void)viewDidLoad { [super viewDidLoad];
[[PWRichMediaManager sharedManager] setDelegate:self]; [[PWModalWindowConfiguration shared] configureModalWindowWith:PWModalWindowPositionBottom presentAnimation:PWAnimationPresentFromBottom dismissAnimation:PWAnimationDismissDown];}
- (BOOL)richMediaManager:(PWRichMediaManager *)richMediaManager shouldPresentRichMedia:(PWRichMedia *)richMedia { NSLog(@"Rich media will be presented with: %@", richMedia.pushPayload); return YES;}
- (void)richMediaManager:(PWRichMediaManager *)richMediaManager didPresentRichMedia:(PWRichMedia *)richMedia { NSLog(@"Rich media has been presented with: %@", richMedia.pushPayload);}
- (void)richMediaManager:(PWRichMediaManager *)richMediaManager didCloseRichMedia:(PWRichMedia *)richMedia { NSLog(@"Rich media has been closed with:: %@", richMedia.pushPayload);}
- (void)richMediaManager:(PWRichMediaManager *)richMediaManager presentingDidFailForRichMedia:(PWRichMedia *)richMedia withError:(NSError *)error { NSLog(@"Failed to present rich media with: %@. Error: %@", richMedia.pushPayload, error.localizedDescription);}
@endTroubleshooting
Anchor link toFailed to build module ‘PushwooshFramework’
Anchor link toWhen building your project, you may encounter an error similar to:
Failed to build module 'PushwooshFramework'; this SDK is not supported by the compiler(the SDK is built with 'Apple Swift version 5.10 (swiftlang-5.10.0.13 clang-1500.3.9.4)',while this compiler is 'Apple Swift version 6.1.2 effective-5.10 (swiftlang-6.1.2.1.2 clang-1700.0.13.5)')Cause: This error is not related to Swift compiler version incompatibility. Starting from Pushwoosh iOS SDK version 6.8.0, the SDK is modularized into several components that interact with each other. The error occurs when not all required frameworks are added to your project.
Solution: Ensure that all four required frameworks are added to your app target when integrating via Swift Package Manager:
PushwooshFrameworkPushwooshCorePushwooshBridgePushwooshLiveActivities
To verify this in Xcode:
- Select your project in the Project Navigator
- Select your app target
- Go to General > Frameworks, Libraries, and Embedded Content
- Confirm all four frameworks are listed
If you encounter any issues during the integration process, please refer to the support and community section.