# iOS rich notifications integration
Starting with iOS 10, you can attach a static or animated image or even a video to push notifications. It will be displayed right in the notification when the user force-taps it.
Enabling this functionality is very simple, with very little coding involved. Let's do it!
## 1. Creating Notification Service Extension
First create a [Notification Service Extension](https://developer.apple.com/reference/usernotifications/unnotificationserviceextension). This extension downloads the content that will be shown to the user.
Add new target to your project (File -> New -> Target) and create _Notification Service Extension_.
## 2. Notification Service Extension code
The code downloads the attachment and calls the notification content handler.\
Just Copy & Paste it to your extension.
```swift
import UserNotifications
import PushwooshFramework
class NotificationService: UNNotificationServiceExtension {
var contentHandler: ((UNNotificationContent) -> Void)?
var bestAttemptContent: UNMutableNotificationContent?
override func didReceive(_ request: UNNotificationRequest, withContentHandler contentHandler: @escaping (UNNotificationContent) -> Void) {
PWNotificationExtensionManager.shared().handle(request, contentHandler: contentHandler)
}
}
```
```objective-c
#import "PWNotificationExtensionManager.h"
@interface NotificationService : UNNotificationServiceExtension
@end
@implementation NotificationService
- (void)didReceiveNotificationRequest:(UNNotificationRequest *)request withContentHandler:(void (^)(UNNotificationContent * _Nonnull))contentHandler {
[[PWNotificationExtensionManager sharedManager] handleNotificationRequest:request contentHandler:contentHandler];
}
@end
```
## 3. Allowing non-secure attachment URL's
Notification Service Extension is a separate binary and **has its own Info.plist** file.\
Add **App Transport Security Settings** with **Allow Arbitrary Loads** flag set to ```true``` to **extension's Info.plist** file.
**Info.plist**:
```xml
NSAppTransportSecurityNSAllowsArbitraryLoads
```
## 4. Sending a rich notification
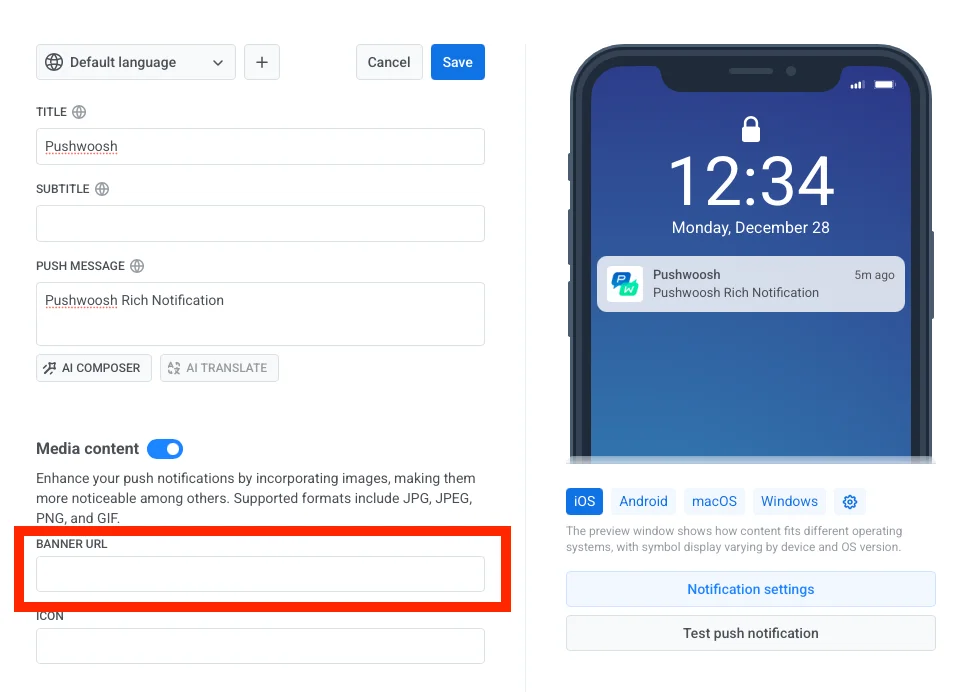
In order to send a rich notification just specify the file's URL in the **BANNER URL** field
Woosh! Force-tap the notification and you are all done!
## Share your feedback with us
Your feedback helps us create a better experience, so we would love to hear from you if you have any issues during the SDK integration process. If you face any difficulties, please do not hesitate to share your thoughts with us [via this form](https://docs.google.com/forms/d/e/1FAIpQLSd\_0b8jwn-V\_JmoPLIxIFYbHACCQhrzidOZV3ELywoQPXRSxw/viewform).
 ## 2. Notification Service Extension code
The code downloads the attachment and calls the notification content handler.\
Just Copy & Paste it to your extension.
## 2. Notification Service Extension code
The code downloads the attachment and calls the notification content handler.\
Just Copy & Paste it to your extension.
 Woosh! Force-tap the notification and you are all done!
## Share your feedback with us
Your feedback helps us create a better experience, so we would love to hear from you if you have any issues during the SDK integration process. If you face any difficulties, please do not hesitate to share your thoughts with us [via this form](https://docs.google.com/forms/d/e/1FAIpQLSd\_0b8jwn-V\_JmoPLIxIFYbHACCQhrzidOZV3ELywoQPXRSxw/viewform).
Woosh! Force-tap the notification and you are all done!
## Share your feedback with us
Your feedback helps us create a better experience, so we would love to hear from you if you have any issues during the SDK integration process. If you face any difficulties, please do not hesitate to share your thoughts with us [via this form](https://docs.google.com/forms/d/e/1FAIpQLSd\_0b8jwn-V\_JmoPLIxIFYbHACCQhrzidOZV3ELywoQPXRSxw/viewform).