# iOS SDK FAQ
### iOS integration FAQ
#### Q: How can I install the Pushwoosh SDK into my iOS project?
You can integrate the Pushwoosh SDK using either Swift Package Manager or CocoaPods.
#### Q: How do I install the Pushwoosh SDK using Swift Package Manager?
In Xcode, navigate to the **Package Dependencies** section and add the package using the following URL: `https://github.com/Pushwoosh/Pushwoosh-XCFramework`.
#### Q: How do I install the Pushwoosh SDK using CocoaPods?
Open your project's `Podfile` and add the line `pod 'PushwooshXCFramework'`. Then, run the command `pod install` in the terminal.
#### Q: What capabilities do I need to add to my project to enable Push Notifications?
In the Signing & Capabilities section of your project settings, you need to add the `Push Notifications` and `Background Modes` capabilities. When adding `Background Modes`, ensure you check the box for `Remote notifications`.
#### Q: What additional capability is required for Time Sensitive Notifications?
If you intend to use Time Sensitive Notifications (iOS 15+), you also need to add the `Time Sensitive Notifications` capability.
#### Q: Where do I need to add the Pushwoosh initialization code?
The initialization code needs to be added to your `AppDelegate` class.
#### Q: What initialization code should I add in SwiftUI's AppDelegate?
Please refer to the [provided Swift code example for integrating Pushwoosh in a SwiftUI project](/developer/pushwoosh-sdk/ios-sdk/setting-up-pushwoosh-ios-sdk/basic-integration-guide/#appdelegate).
#### Q: What initialization code should I add in a standard Swift AppDelegate?
Please refer to the [provided Swift code example for integrating Pushwoosh in a standard Swift project](/developer/pushwoosh-sdk/ios-sdk/setting-up-pushwoosh-ios-sdk/basic-integration-guide/#appdelegate).
#### Q: What initialization code should I add in an Objective-C AppDelegate?
Please refer to the [provided Objective-C code example for integrating Pushwoosh in an Objective-C project](/developer/pushwoosh-sdk/ios-sdk/setting-up-pushwoosh-ios-sdk/basic-integration-guide/#appdelegate).
#### Q: What keys do I need to add to my Info.plist file?
You need to add the `Pushwoosh_APPID` key set to your Application Code and the `PW_API_TOKEN` key set to your API Token in your app's `Info.plist` file.
#### Q: What is the purpose of message delivery tracking?
Pushwoosh supports tracking delivery events for push notifications using the Notification Service Extension.
#### Q: How do I add a Notification Service Extension to my project?
In Xcode, go to **File** > **New** > **Target...**, choose **Notification Service Extension**, and press **Next**. Enter a target name and press **Finish**. When prompted to activate, press **Cancel**.
#### Q: How do I add the Pushwoosh SDK to the Notification Service Extension?
Add the [provided Swift or Objective-C code snippet](/developer/pushwoosh-sdk/ios-sdk/setting-up-pushwoosh-ios-sdk/basic-integration-guide/#add-pushwoosh-sdk-to-notification-service-extension) to your Notification Service Extension's main `.swift` or `.m` file. This code utilizes `PWNotificationExtensionManager` to handle the notification request.
#### Q: What is the purpose of App Groups?
App Groups capability is required to allow the Notification Service Extension to communicate with the main application.
#### Q: How do I enable App Groups for my main target and Notification Service Extension?
For both targets, go to **Signing & Capabilities**, add the **App Groups** capability, and create a new group by pressing the + button. Ensure the group name starts with `group.` and use the same group name for both targets.
#### Q: What keys do I need to add to my main target's Info.plist for App Groups?
In your main target's `Info.plist`, add the `PW_APP_GROUPS_NAME` key and set its value to the name of your App Groups group.
#### Q: What keys do I need to add to my Notification Service Extension's Info.plist?
In your Notification Service Extension's `Info.plist`, add the `PW_APP_GROUPS_NAME` key (set to your App Groups name) and the `Pushwoosh_APPID` key (set to your Application Code).
#### Q: How do I verify the Pushwoosh integration?
After building and running your project, go to the Pushwoosh Control Panel and send a push notification to your application. You should see the notification appear on your device.
#### Q: What are the two main callbacks for handling push notifications in the Pushwoosh SDK?
The two main callbacks are `onMessageReceived` and `onMessageOpened`.
#### Q: When is the `onMessageReceived` callback invoked?
The `onMessageReceived` method is called when a push notification is received by the application.
#### Q: When is the `onMessageOpened` callback invoked?
The `onMessageOpened` method is called when the user interacts with and opens a push notification.
#### Q: How can I access the payload of a received or opened push notification?
The payload of a `PWMessage` object (passed to the `onMessageReceived` and `onMessageOpened` callbacks) can be accessed through its `payload` property.
#### Q: How can I set a user ID in Pushwoosh?
Use the `setUserId(_:)` method of the `Pushwoosh.sharedInstance()` object, passing the user's ID as an argument.
#### Q: How can I set a user's email address in Pushwoosh?
Use the `setEmail(_:)` method of the `Pushwoosh.sharedInstance()` object, providing the user's email.
#### How can I set additional user information as tags in Pushwoosh?
Use the `setTags(_:)` method of the `Pushwoosh.sharedInstance()` object, passing a dictionary where keys are tag names and values are the corresponding tag values.
#### How can I track a user event with additional attributes?
Use the `postEvent(_:withAttributes:)` method of `PWInAppManager.shared()`, providing the event name (e.g., `"login"`) and a dictionary of attributes (e.g., `"name"`, `"last_login"`).
#### Q: How can I track a user purchase event with product details?
Use the `postEvent(_:withAttributes:)` method of `PWInAppManager.shared()` with the event name `"purchase"` and a dictionary containing product details like `"product_id"`, `"product_name"`, `"price"`, and `"quantity"`.
#### Q: How do I set up a delegate to handle rich media presentation?
In your view controller or another appropriate class, conform to the `PWRichMediaPresentingDelegate` protocol and set the `delegate` property of `PWRichMediaManager.shared()` to your conforming instance.
#### Q: How can I configure the presentation style of rich media?
Use the `PWModalWindowConfiguration.shared()` object to configure properties like the modal window position and present/dismiss animations using the `configureModalWindow(with:present:dismiss:)` method.
#### Q: What information can I access in the rich media delegate methods?
The delegate methods provide access to the `PWRichMedia` object, which contains information about the rich media content, including its `pushPayload`. The `presentingDidFailForRichMedia:withError:` method also provides an `Error` object describing the failure.
### Troubleshooting
#### Q: "Your provisioning profile does not have APS entry" error
If you see the "Your provisioning profile does not have APS entry." error message, make sure your provisioning profile is push compatible and has the `aps-environment` string in it with the `production` or `development` value. The easiest way to check is to open the mobile provisioning profile in any text editor and look for the `aps-environment` string. It should be there.
If it is, and you keep receiving the error, it means that XCode still picks a "non push-compatible" profile. Please make sure you sign with the right one - sometimes if you have two profiles for the same App ID XCode messes things up and signs with the old one.
The recommended steps are:
1. [Remove](https://stackoverflow.com/questions/18923095/delete-provisioning-profile-from-xcode-5) all XCode profiles;
2. Add the one and only new profile;
3. Rebuild the app.
#### Q: What does iOS push token and hwid look like?
iOS device push tokens are strings with 64 hexadecimal symbols. Push token example:\
`03df25c845d460bcdad7802d2vf6fc1dfde97283bf75cc993eb6dca835ea2e2f`\
Make sure that iOS push tokens you use when targeting specific devices in your API requests are in **lower case**.
Pushwoosh uses IDFV as the device HWID. Note that it may change in case user re-installs all apps from a specific vendor.
`CBAF8ED1-17FB-49A3-73BD-DC79B63AEF93`
#### Q: How do I switch banner on and off when my app is running?
By default our latest iOS SDK displays the notification banner when the app is running in the foreground.\
You can control this behavior by changing the following flags in the Info.plist:
Flag `Pushwoosh_ALERT_TYPE` – string type, values are:
* `BANNER` – default value, displays banner in-app alert
* `ALERT` – alert notification
* `NONE` – do not show notifications when the app is in the foreground
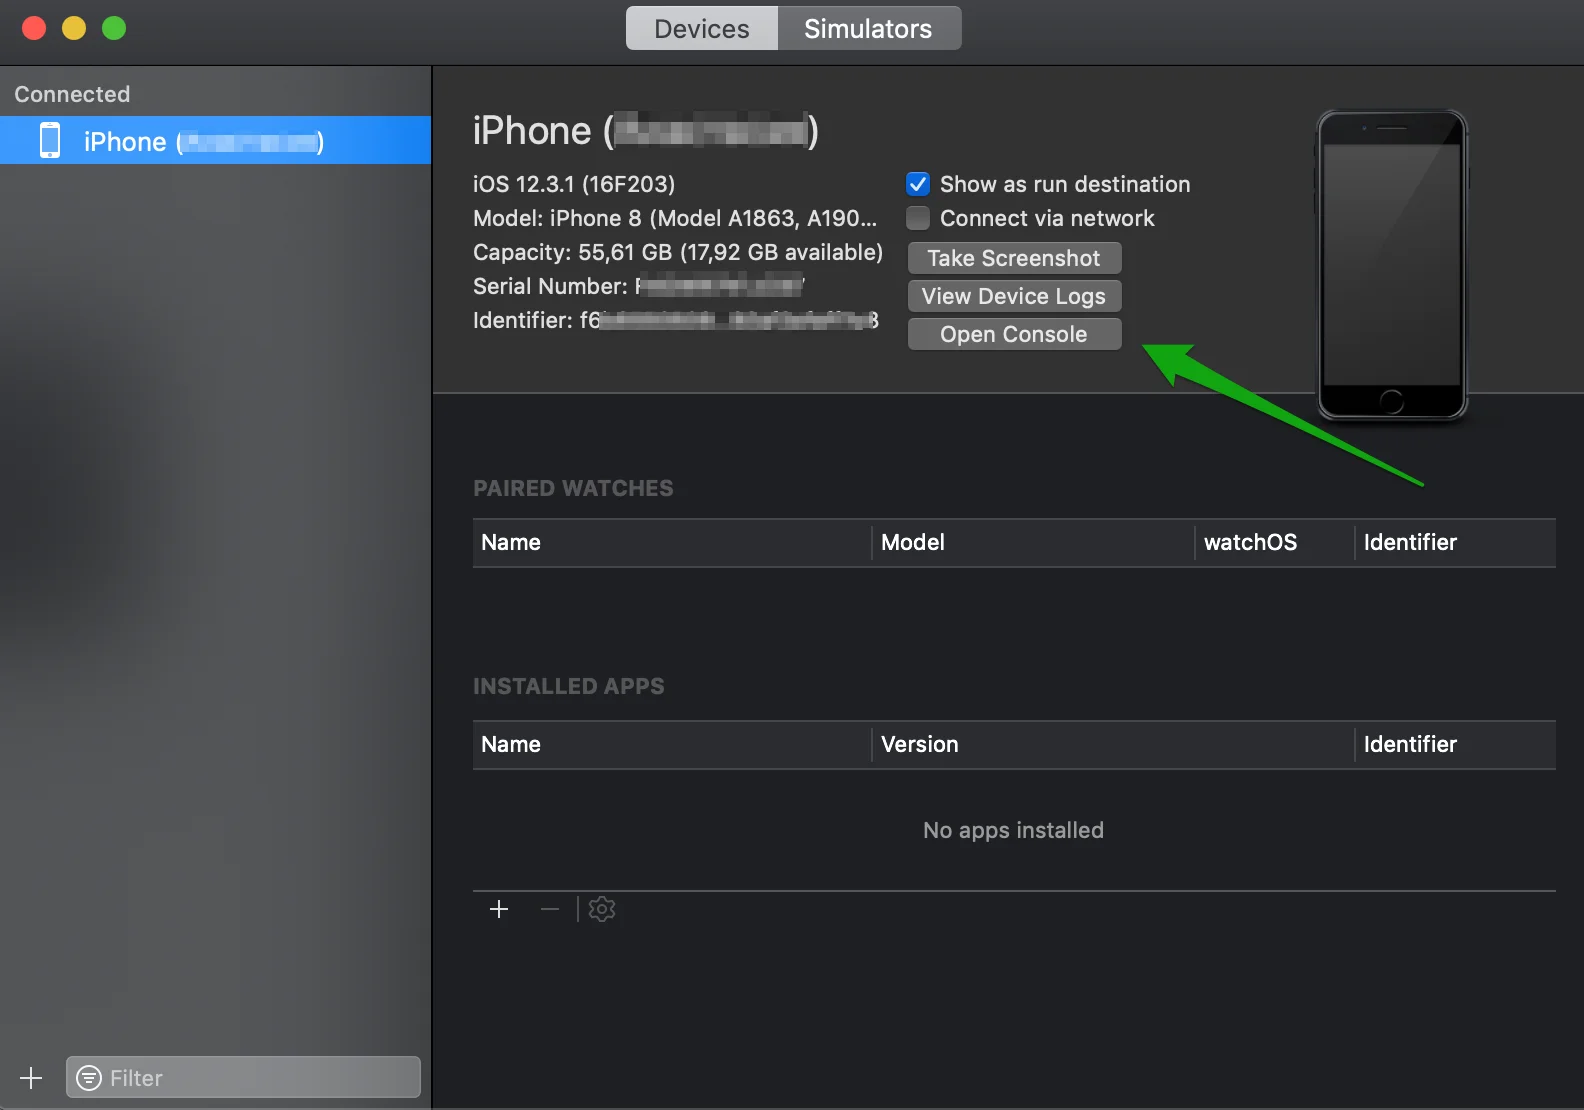
#### Q: How do I obtain my iOS device push token to use in Test Devices?
To get your iOS device push token,
1. Open Xcode => Devices & Simulators;
2. Connect the test device to your computer;
3. Select your connected device in the list of devices on the left;
4. Click the Open Console button.
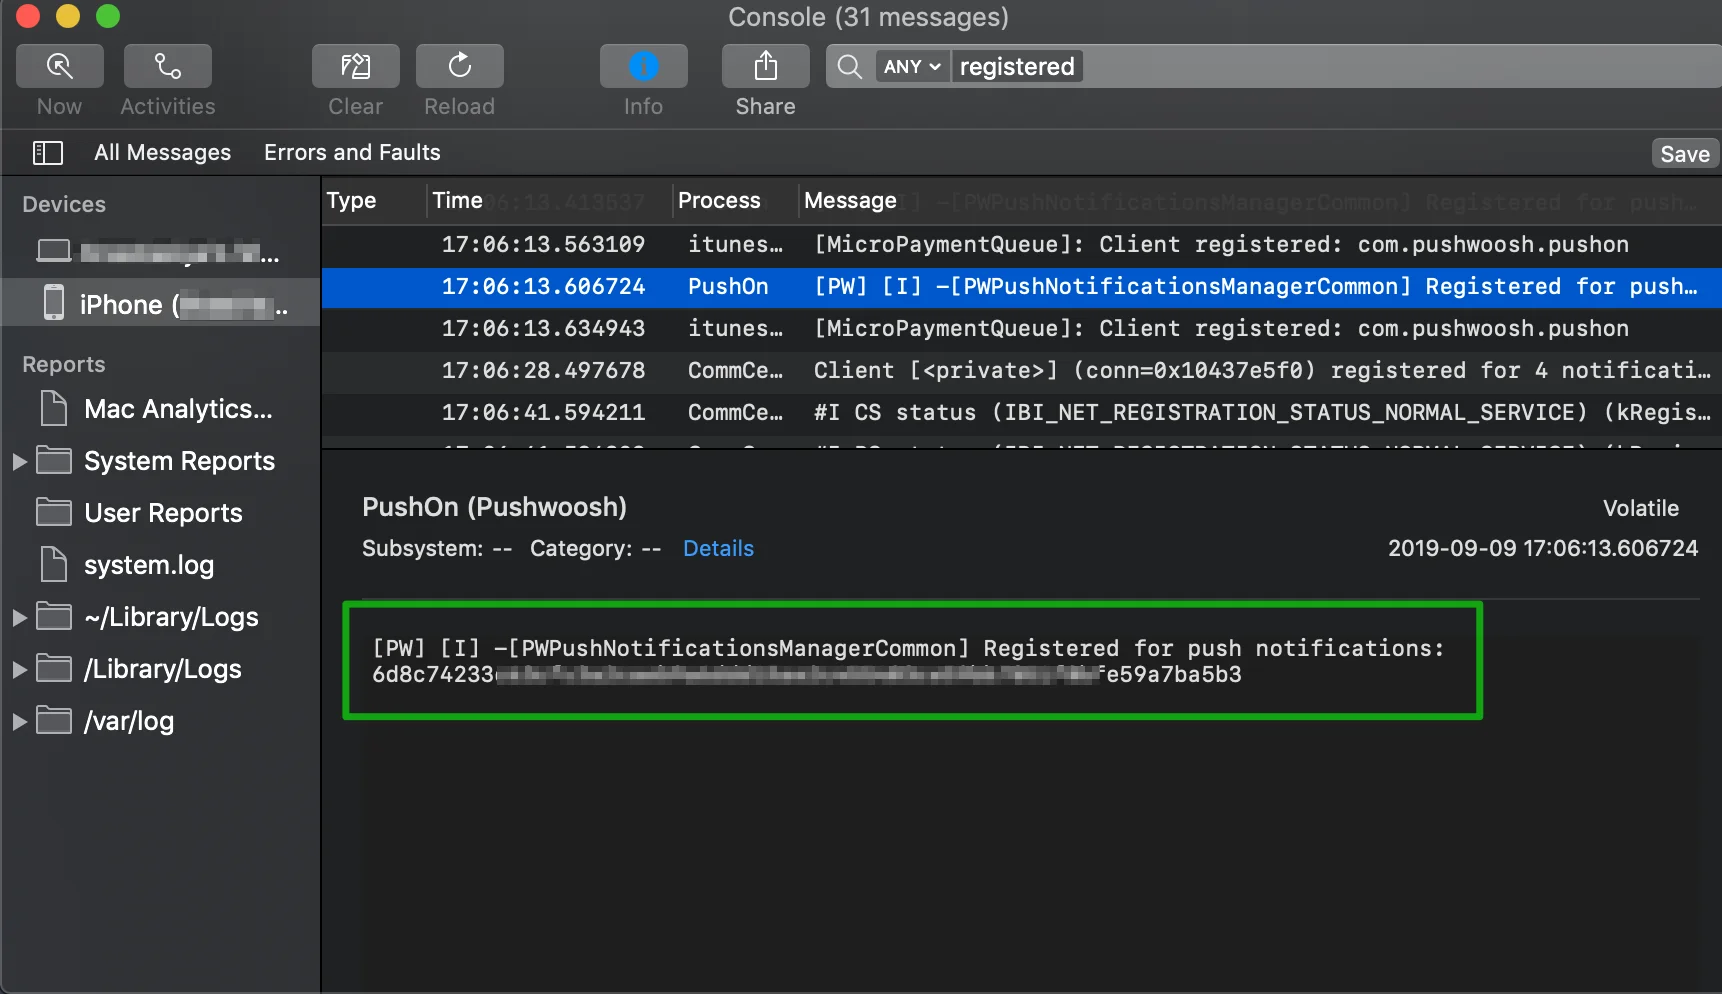
Launch the application for which you need the device push token, and locate your 64 hexadecimal characters device push token in the “Registered for push notifications” line:
#### Q: Why are badges not cleared after I uninstall my app and re-install it in a short period?
It is an expected behavior - badges are handled by iOS itself and its values are stored in application preferences, which are not instantly removed when you uninstall your app. A badge value remains there for some time in case of immediate re-installation, resulting in the same badges shown after an app is re-installed.
 Launch the application for which you need the device push token, and locate your 64 hexadecimal characters device push token in the “Registered for push notifications” line:
 #### Q: Why are badges not cleared after I uninstall my app and re-install it in a short period?
It is an expected behavior - badges are handled by iOS itself and its values are stored in application preferences, which are not instantly removed when you uninstall your app. A badge value remains there for some time in case of immediate re-installation, resulting in the same badges shown after an app is re-installed.
#### Q: Why are badges not cleared after I uninstall my app and re-install it in a short period?
It is an expected behavior - badges are handled by iOS itself and its values are stored in application preferences, which are not instantly removed when you uninstall your app. A badge value remains there for some time in case of immediate re-installation, resulting in the same badges shown after an app is re-installed.