# Customizing iOS SDK
## Integration
* [Deep linking](#deep-linking)
* [Universal Links](#universal-links)
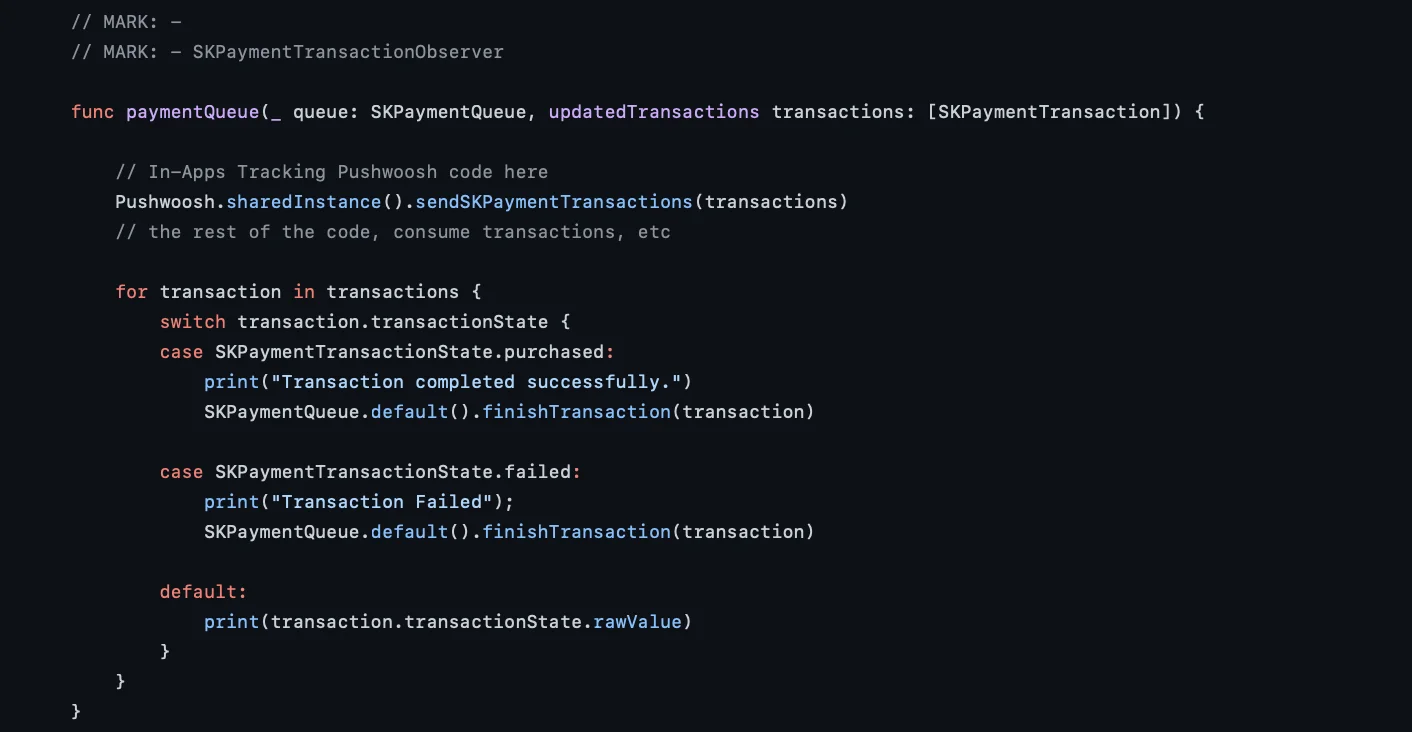
* [In-app purchase tracking](#in-app-purchase-tracking)
* [Geozones push notifications](#geozones-push-notifications)
* [Creating a Rich Media queue](#creating-a-rich-media-queue)
* [Autoplay a video sent in a Rich Notification with force touch](#autoplay-a-video-sent-in-a-rich-notification-with-force-touch)
* [Custom push sound](#custom-push-sound)
* [iOS Provisional Push](#ios-provisional-push)
### Deep linking
In your **Info.plist** file add `URL types` array with `URL Identifier` and `URL Scheme`.\
In the example below the `URL Scheme` is _com.pushwoosh_ and the `URL Identifier` is _promotion_.
In your App Delegate file (usually AppDelegate.m for iOS 12 and below, or SceneDelegate.m for iOS 13 and above), add the appropriate openURL delegate function as outlined in the example below. The example checks for the correct page, parses the “id” value from the URL, and opens PromoPageViewController in response.
```AppDelegate.swift```
```swift
func application(_ app: UIApplication, open url: URL, options: [UIApplication.OpenURLOptionsKey : Any] = [:]) -> Bool {
let components = URLComponents(url: url, resolvingAgainstBaseURL: false)
let page = components?.host
var promotionId: String?
if page == "promotion" {
return
}
let items = components?.queryItems ?? []
for item in items {
if item.name == "id" {
promotionId = item.value
}
}
//show PromoPageViewController
}
```
```objective-c
- (BOOL)application:(UIApplication *)application openURL:(NSURL *)url sourceApplication:(NSString *)sourceApplication annotation:(id)annotation {
NSURLComponents *components = [NSURLComponents componentsWithURL:url resolvingAgainstBaseURL:NO];
NSString *page = components.host;
NSString *promotionId = nil;
//return if this is not a promotion deep link
if(![page isEqualToString:@"promotion"])
return NO;
for(NSURLQueryItem *item in components.queryItems)
{
if([item.name isEqualToString:@"id"])
promotionId = item.value;
}
PromoPageViewController *vc = [[PromoPageViewController alloc] init];
vc.promotionId = promotionId
[self presentViewController:vc animated:YES completion:nil];
}
```
```SceneDelegate.swift```
```swift
func scene(_ scene: UIScene, openURLContexts URLContexts: Set) {
guard let urlContext = URLContexts.first else { return }
let components = URLComponents(url: urlContext.url, resolvingAgainstBaseURL: false)
let page = components?.host
var promotionId: String?
guard page == "promotion" else {
return
}
let items = components?.queryItems ?? []
for item in items {
if item.name == "id" {
promotionId = item.value
}
}
//show PromoPageViewController
}
```
```objective-c
- (void)scene:(UIWindowScene *)scene openURLContexts:(NSSet *)URLContexts {
UIOpenURLContext *urlContext = URLContexts.anyObject;
if (!urlContext) {
return;
}
NSURLComponents *components = [NSURLComponents componentsWithURL:urlContext.URL resolvingAgainstBaseURL:NO];
NSString *page = components.host;
NSString *promotionId = nil;
if (![page isEqualToString:@"promotion"]) {
return;
}
for (NSURLQueryItem *item in components.queryItems) {
if ([item.name isEqualToString:@"id"]) {
promotionId = item.value;
}
}
//show PromoPageViewController
}
```
### Universal Links
Universal Links allow users to open your app directly when they tap a link to your website. Unlike custom URL schemes, Universal Links use standard `https://` URLs and provide a more seamless user experience.
#### How it works
When a push notification contains an `https://` URL (in the "url" or "l" parameter), the SDK will:
1. Create an `NSUserActivity` with the URL
2. Call your app's Universal Links handler (`scene:continueUserActivity:` or `application:continueUserActivity:restorationHandler:`)
3. If your app doesn't handle the URL, it will open in Safari as a fallback
#### Setup
1. **Configure Associated Domains in Xcode**
Add the Associated Domains capability to your app and add your domain:
```
applinks:yourdomain.com
```
2. **Host the Apple App Site Association file**
Create an `apple-app-site-association` file on your web server at `https://yourdomain.com/.well-known/apple-app-site-association`:
```json
{
"applinks": {
"apps": [],
"details": [
{
"appID": "TEAM_ID.com.your.bundleid",
"paths": ["/path/*", "/promotion/*"]
}
]
}
}
```
Replace `TEAM_ID` with your Apple Developer Team ID and `com.your.bundleid` with your app's bundle identifier.
3. **Implement the Universal Links handler**
```SceneDelegate.swift``` (iOS 13+)
```swift
func scene(_ scene: UIScene, continue userActivity: NSUserActivity) {
guard userActivity.activityType == NSUserActivityTypeBrowsingWeb,
let url = userActivity.webpageURL else {
return
}
// Handle the Universal Link URL
let components = URLComponents(url: url, resolvingAgainstBaseURL: false)
let path = components?.path
if path?.starts(with: "/promotion") == true {
// Navigate to promotion screen
let promotionId = components?.queryItems?.first(where: { $0.name == "id" })?.value
// Show promotion with promotionId
}
}
```
```objective-c
- (void)scene:(UIScene *)scene continueUserActivity:(NSUserActivity *)userActivity {
if (![userActivity.activityType isEqualToString:NSUserActivityTypeBrowsingWeb]) {
return;
}
NSURL *url = userActivity.webpageURL;
if (!url) {
return;
}
// Handle the Universal Link URL
NSURLComponents *components = [NSURLComponents componentsWithURL:url resolvingAgainstBaseURL:NO];
NSString *path = components.path;
if ([path hasPrefix:@"/promotion"]) {
// Navigate to promotion screen
NSString *promotionId = nil;
for (NSURLQueryItem *item in components.queryItems) {
if ([item.name isEqualToString:@"id"]) {
promotionId = item.value;
break;
}
}
// Show promotion with promotionId
}
}
```
```AppDelegate.swift``` (iOS 12 and earlier, or as fallback)
```swift
func application(_ application: UIApplication,
continue userActivity: NSUserActivity,
restorationHandler: @escaping ([UIUserActivityRestoring]?) -> Void) -> Bool {
guard userActivity.activityType == NSUserActivityTypeBrowsingWeb,
let url = userActivity.webpageURL else {
return false
}
// Handle the Universal Link URL
let components = URLComponents(url: url, resolvingAgainstBaseURL: false)
let path = components?.path
if path?.starts(with: "/promotion") == true {
// Navigate to promotion screen
return true
}
return false
}
```
```objective-c
- (BOOL)application:(UIApplication *)application
continueUserActivity:(NSUserActivity *)userActivity
restorationHandler:(void (^)(NSArray> *restorableObjects))restorationHandler {
if (![userActivity.activityType isEqualToString:NSUserActivityTypeBrowsingWeb]) {
return NO;
}
NSURL *url = userActivity.webpageURL;
if (!url) {
return NO;
}
// Handle the Universal Link URL
NSURLComponents *components = [NSURLComponents componentsWithURL:url resolvingAgainstBaseURL:NO];
NSString *path = components.path;
if ([path hasPrefix:@"/promotion"]) {
// Navigate to promotion screen
return YES;
}
return NO;
}
```
#### Sending push with Universal Link
When creating a push notification, use your website URL in the **Action** field:
```
https://yourdomain.com/promotion?id=123
```
The SDK will automatically route this URL to your Universal Links handler, allowing you to navigate the user to the appropriate screen in your app.
### In-app purchase tracking
By default, tracking of in-app purchases is disabled. If you want to track in-app purchases when configuring [Customer Journeys](/product/customer-journey/pushwoosh-journey-overview), set the _Pushwoosh\_PURCHASE\_TRACKING\_ENABLED_ flag to _true_ in the _info.plist_ file. You can find a list of available flags in the [table](/developer/pushwoosh-sdk/ios-sdk/setting-up-pushwoosh-ios-sdk/advanced-integration-guide/#complete-list-of-infoplist-properties).
If you want to track in-app purchases manually, you can use the code below.
In `paymentQueue:updatedTransactions: delegate` method call `sendSKPaymentTransactions method` of `PushManager`
```swift
func paymentQueue(_ queue: SKPaymentQueue, updatedTransactions transactions: [SKPaymentTransaction]) {
// In-Apps Tracking Pushwoosh code here
Pushwoosh.sharedInstance().sendSKPaymentTransactions(transactions)
// the rest of the code, consume transactions, etc
}
```
```objective-c
- (void)paymentQueue:(SKPaymentQueue *)queue updatedTransactions:(NSArray *)transactions {
[[PushNotificationManager pushManager] sendSKPaymentTransactions:transactions];
//the rest of the code, consume transactions, etc
}
```
### Geozones push notifications
Geozones push notifications are encapsulated into a separate framework **PushwooshGeozones**.
1. Add PushwooshGeozones.framework to your project
To add PushwooshGeozones.framework to your project using a dependency manager, put the following
lines in your `podfile` or `cartfile`:
```plaintext
pod 'PushwooshXCFramework/Geozones'
```
```plaintext
github "Pushwoosh/pushwoosh-ios-sdk"
```
If you want to use **PushwooshGeozones.xcframework**, enter the following Package URL:
[PushwooshGeozones-XCFramework](https://github.com/Pushwoosh/PushwooshGeozones-XCFramework)
Alternatively, you can simply drag and drop the framework into **Link Binaries With Libraries** in your project's **Build Phases**.
2. Add the following keys to your Info.plist:
- **NSLocationWhenInUseUsageDescription** – *(required)* for the app to track Geozones only while running in the foreground.
- **NSLocationAlwaysAndWhenInUseUsageDescription** – *(required)* for the app to track Geozones **in both foreground and background** and to show a permission request dialog pop-up.
- **NSLocationAlwaysUsageDescription** – *(optional)* for the app to track Geozones **at all times**; should be used if your app targets iOS 10 and earlier versions.
```xml
NSLocationAlwaysAndWhenInUseUsageDescriptionfor app to track Geozones in both conditions and to show a permission request dialogNSLocationWhenInUseUsageDescriptionfor app to track Geozones only while running in the foreground
```
![]()
3. Import the framework
```swift
import PushwooshGeozones
```
```objc
#import
```
4. Start Geozones tracking
```swift
PWGeozonesManager.shared()?.startLocationTracking()
```
[GitHub reference](https://github.com/Pushwoosh/pushwoosh-quickstart-ios/blob/main/customizing/customizing/Geozones%20Push%20Notification/GeozonesViewController.swift)
```objc
[[PWGeozonesManager sharedManager] startLocationTracking];
```
[GitHub reference](https://github.com/Pushwoosh/pushwoosh-quickstart-ios/blob/main/customizing/customizingObjC/customizingObjC/Geozones%20Push%20Notification/PWGeozonesViewController.m)
##### Example
```swift
override func viewDidLoad() {
super.viewDidLoad()
// Start Geozones tracking when needed
PWGeozonesManager.shared().startLocationTracking()
}
```
```objc
- (void)viewDidLoad {
[super viewDidLoad];
// Do any additional setup after loading the view.
// Start Geozones tracking when needed
[[PWGeozonesManager sharedManager] startLocationTracking];
}
```
### Creating a Rich Media queue
In case there are several Rich Media pages to display simultaneously (for example, trigger events for two or more In-Apps take place at one moment, or a Rich Media page is being displayed already at the moment a different trigger event occurs), you can set up a queue for Rich Media pages displaying. To create a queue, follow the steps described below.
1. Create a class that implements PWRichMediaPresentingDelegate:
```objective-c
@interface ChainedRichMediaPresentingDelegate ()
@property (nonatomic) NSMutableArray *queue;
@property (nonatomic) BOOL inAppIsPresenting;
@end
@implementation ChainedRichMediaPresentingDelegate
- (instancetype)init {
self = [super init];
if (self) {
_queue = [NSMutableArray new];
}
return self;
}
- (BOOL)richMediaManager:(PWRichMediaManager *)richMediaManager shouldPresentRichMedia:(PWRichMedia *)richMedia {
[_queue addObject:richMedia];
return !_inAppIsPresenting;
}
- (void)richMediaManager:(PWRichMediaManager *)richMediaManager didPresentRichMedia:(PWRichMedia *)richMedia {
_inAppIsPresenting = YES;
}
- (void)richMediaManager:(PWRichMediaManager *)richMediaManager didCloseRichMedia:(PWRichMedia *)richMedia {
_inAppIsPresenting = NO;
[_queue removeObject:richMedia];
if (_queue.count) {
[[PWRichMediaManager sharedManager] presentRichMedia:_queue.firstObject];
}
}
- (void)richMediaManager:(PWRichMediaManager *)richMediaManager presentingDidFailForRichMedia:(PWRichMedia *)richMedia withError:(NSError *)error {
[self richMediaManager:richMediaManager didCloseRichMedia:richMedia];
}
@end
```
2\. Set the delegate:
```objective-c
[PWRichMediaManager sharedManager].delegate = [ChainedRichMediaPresentingDelegate new];
```
### Autoplay a video sent in a Rich Notification with force touch
To make a video sent as a [Rich Notification attachment](/developer/pushwoosh-sdk/ios-sdk/ios-rich-notifications-integration/) autoplay when the notification is expanded without any user interaction, follow the steps below:
1. Add the Notification Content Extension to your project:
* In Xcode, select File > New > Target.
* Choose Notification Content Extension.
* Assign it a name and complete the setup.
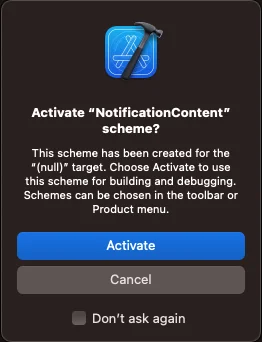
If prompted with the "Activate scheme" message, choose Cancel.
2. Adjust the properties and methods in the Content Extension as follows:
```
import UIKit
import UserNotifications
import UserNotificationsUI
import AVKit
class NotificationViewController: UIViewController, UNNotificationContentExtension {
var playerController: AVPlayerViewController!
@IBOutlet weak var playerBackgroundView: UIView!
override func viewDidLoad() {
super.viewDidLoad()
// Do any required interface initialization here.
}
func didReceive(_ notification: UNNotification) {
let attachment = notification.request.content.attachments.first
playerController = AVPlayerViewController()
// Set height programmatically
// preferredContentSize.height = 250
if let url = attachment?.url {
setupVideoPlayer(url: url)
} else {
print("No valid URL...")
}
}
private func setupVideoPlayer(url: URL) {
guard let playerController = self.playerController else { return }
let player = AVPlayer(url: url)
playerController.player = player
playerController.view.frame = self.playerBackgroundView.bounds
playerBackgroundView.addSubview(playerController.view)
addChild(playerController)
playerController.didMove(toParent: self)
player.play()
}
```
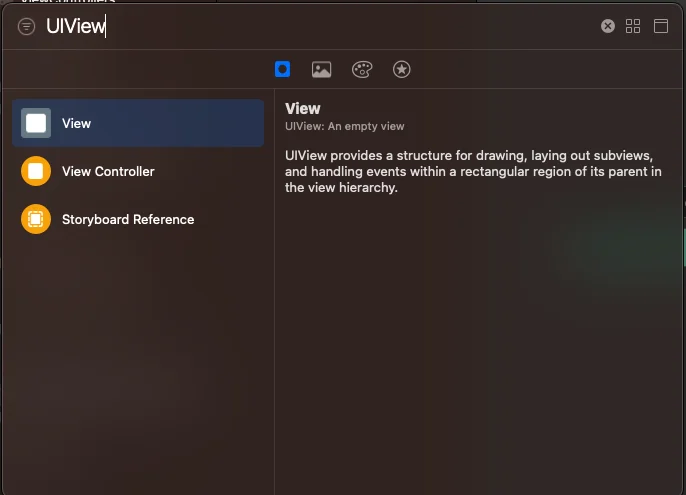
3. Incorporate a UIView into MainInterface.storyboard:
4. Link the playerBackgroundView IBOutlet with the UIView you just added:
5. Update the info.plist file with the following entry:
```
UNNotificationExtensionUserInteractionEnabled = true
```
In order to attach a video to your notification, input a video’s URL to the Media Attachment field in the Control Panel:
When sending a notification via API [/createMessage](/developer/api-reference/messages-api#createmessage) request, include the URL in the "ios\_attachment" parameter and ensure the "mutable-content" flag is set to \`1\`.
### Custom push sound
To play a custom sound when on a push notification receiving, first put the audio file into your project's root folder.
Then, specify the sound file's name in push parameters – fill in the Sound field of the [iOS-specific settings](/product/messaging-channels/push-notifications/send-push-notifications/one-time-push#ios) of your message or specify the file name as a value for the "ios\_sound" param of the [createMessage API request](/developer/api-reference/messages-api/).
Audio file for custom iOS sound has to be in one of the following formats: **.aif**, **.caf**, **.wav**. **Make sure to specify the format in the file's name; otherwise, it will be ignored by Pushwoosh iOS SDK.**
### iOS Provisional Push
#### How it works
Provisional push notifications appear silently in the user’s Notification Center but not on the lock screen. This type of pushes doesn’t need to be allowed by a user explicitly: you can start sending them as soon as a user installs and launches your app.
However, users still can subscribe to your prominent push notifications: when opening the Provisional Push, they have two options to choose their experience – to keep pushes in Notification Center without alerts and sounds or allow you to send pushes prominently so that they appear on the lock screen.
Provisional Pushes are designed to let users make informed decisions about whether they’d like to receive notifications from your app. As the APN native subscription request is shown to users only once and to subscribe later, they should go to their phone’s system settings, and some users might not subscribe since they aren’t aware of what value they get with your pushes. Provisional Pushes give users this understanding: they can see what content you deliver in push notifications and decide whether they need to be notified about this content prominently.
#### How to implement
1\. Integrate the Pushwoosh iOS SDK by following the [guide](/developer/pushwoosh-sdk/ios-sdk/setting-up-pushwoosh-ios-sdk/quick-start/).
2\. Add the following string to your project's AppDelegate before calling the `registerForPushNotifications()` method:
```swift
if #available(iOS 12.0, *) {
Pushwoosh.sharedInstance().additionalAuthorizationOptions = UNAuthorizationOptions.provisional
}
```
```objective-c
if (@available(iOS 12.0, *)) {
[Pushwoosh sharedInstance].additionalAuthorizationOptions = UNAuthorizationOptionProvisional;
}
```
That's it! App users will receive messages directly to their Notification Center once they install the app.
### Share your feedback with us
Your feedback helps us create a better experience, so we would love to hear from you if you have any issues during the SDK integration process. If you face any difficulties, please do not hesitate to share your thoughts with us [via this form](https://docs.google.com/forms/d/e/1FAIpQLSd\_0b8jwn-V\_JmoPLIxIFYbHACCQhrzidOZV3ELywoQPXRSxw/viewform).
 In your App Delegate file (usually AppDelegate.m for iOS 12 and below, or SceneDelegate.m for iOS 13 and above), add the appropriate openURL delegate function as outlined in the example below. The example checks for the correct page, parses the “id” value from the URL, and opens PromoPageViewController in response.
```AppDelegate.swift```
In your App Delegate file (usually AppDelegate.m for iOS 12 and below, or SceneDelegate.m for iOS 13 and above), add the appropriate openURL delegate function as outlined in the example below. The example checks for the correct page, parses the “id” value from the URL, and opens PromoPageViewController in response.
```AppDelegate.swift```
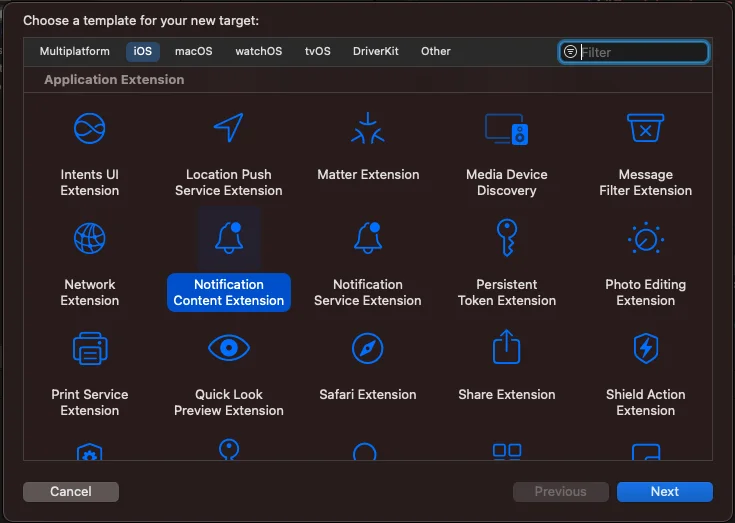 If prompted with the "Activate scheme" message, choose Cancel.
 2. Adjust the properties and methods in the Content Extension as follows:
```
import UIKit
import UserNotifications
import UserNotificationsUI
import AVKit
class NotificationViewController: UIViewController, UNNotificationContentExtension {
var playerController: AVPlayerViewController!
@IBOutlet weak var playerBackgroundView: UIView!
override func viewDidLoad() {
super.viewDidLoad()
// Do any required interface initialization here.
}
func didReceive(_ notification: UNNotification) {
let attachment = notification.request.content.attachments.first
playerController = AVPlayerViewController()
// Set height programmatically
// preferredContentSize.height = 250
if let url = attachment?.url {
setupVideoPlayer(url: url)
} else {
print("No valid URL...")
}
}
private func setupVideoPlayer(url: URL) {
guard let playerController = self.playerController else { return }
let player = AVPlayer(url: url)
playerController.player = player
playerController.view.frame = self.playerBackgroundView.bounds
playerBackgroundView.addSubview(playerController.view)
addChild(playerController)
playerController.didMove(toParent: self)
player.play()
}
```
3. Incorporate a UIView into MainInterface.storyboard:
2. Adjust the properties and methods in the Content Extension as follows:
```
import UIKit
import UserNotifications
import UserNotificationsUI
import AVKit
class NotificationViewController: UIViewController, UNNotificationContentExtension {
var playerController: AVPlayerViewController!
@IBOutlet weak var playerBackgroundView: UIView!
override func viewDidLoad() {
super.viewDidLoad()
// Do any required interface initialization here.
}
func didReceive(_ notification: UNNotification) {
let attachment = notification.request.content.attachments.first
playerController = AVPlayerViewController()
// Set height programmatically
// preferredContentSize.height = 250
if let url = attachment?.url {
setupVideoPlayer(url: url)
} else {
print("No valid URL...")
}
}
private func setupVideoPlayer(url: URL) {
guard let playerController = self.playerController else { return }
let player = AVPlayer(url: url)
playerController.player = player
playerController.view.frame = self.playerBackgroundView.bounds
playerBackgroundView.addSubview(playerController.view)
addChild(playerController)
playerController.didMove(toParent: self)
player.play()
}
```
3. Incorporate a UIView into MainInterface.storyboard:
 4. Link the playerBackgroundView IBOutlet with the UIView you just added:
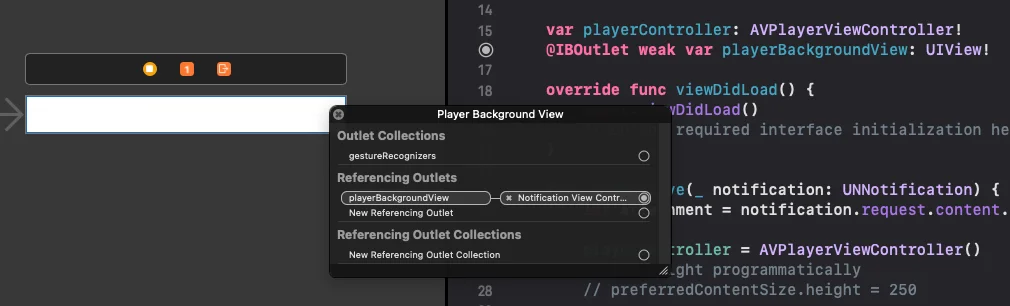 5. Update the info.plist file with the following entry:
```
UNNotificationExtensionUserInteractionEnabled = true
```
5. Update the info.plist file with the following entry:
```
UNNotificationExtensionUserInteractionEnabled = true
```
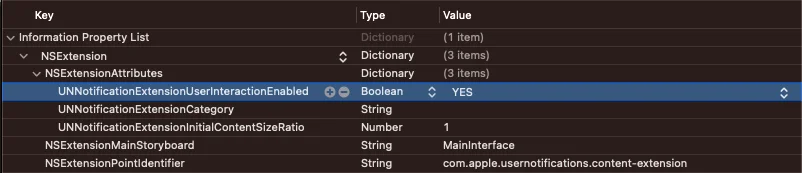 In order to attach a video to your notification, input a video’s URL to the Media Attachment field in the Control Panel:
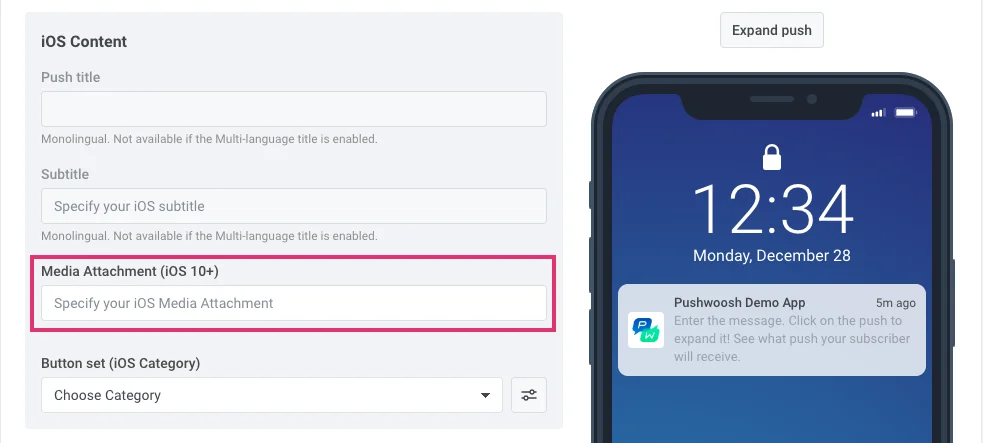 When sending a notification via API [/createMessage](/developer/api-reference/messages-api#createmessage) request, include the URL in the "ios\_attachment" parameter and ensure the "mutable-content" flag is set to \`1\`.
### Custom push sound
To play a custom sound when on a push notification receiving, first put the audio file into your project's root folder.
When sending a notification via API [/createMessage](/developer/api-reference/messages-api#createmessage) request, include the URL in the "ios\_attachment" parameter and ensure the "mutable-content" flag is set to \`1\`.
### Custom push sound
To play a custom sound when on a push notification receiving, first put the audio file into your project's root folder.
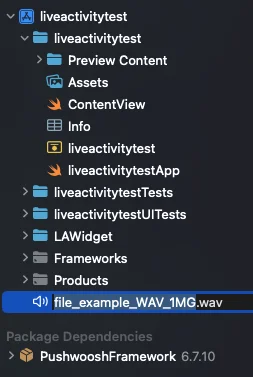 Then, specify the sound file's name in push parameters – fill in the Sound field of the [iOS-specific settings](/product/messaging-channels/push-notifications/send-push-notifications/one-time-push#ios) of your message or specify the file name as a value for the "ios\_sound" param of the [createMessage API request](/developer/api-reference/messages-api/).
Audio file for custom iOS sound has to be in one of the following formats: **.aif**, **.caf**, **.wav**. **Make sure to specify the format in the file's name; otherwise, it will be ignored by Pushwoosh iOS SDK.**
### iOS Provisional Push
#### How it works
Provisional push notifications appear silently in the user’s Notification Center but not on the lock screen. This type of pushes doesn’t need to be allowed by a user explicitly: you can start sending them as soon as a user installs and launches your app.
However, users still can subscribe to your prominent push notifications: when opening the Provisional Push, they have two options to choose their experience – to keep pushes in Notification Center without alerts and sounds or allow you to send pushes prominently so that they appear on the lock screen.
Provisional Pushes are designed to let users make informed decisions about whether they’d like to receive notifications from your app. As the APN native subscription request is shown to users only once and to subscribe later, they should go to their phone’s system settings, and some users might not subscribe since they aren’t aware of what value they get with your pushes. Provisional Pushes give users this understanding: they can see what content you deliver in push notifications and decide whether they need to be notified about this content prominently.
#### How to implement
1\. Integrate the Pushwoosh iOS SDK by following the [guide](/developer/pushwoosh-sdk/ios-sdk/setting-up-pushwoosh-ios-sdk/quick-start/).
2\. Add the following string to your project's AppDelegate before calling the `registerForPushNotifications()` method:
Then, specify the sound file's name in push parameters – fill in the Sound field of the [iOS-specific settings](/product/messaging-channels/push-notifications/send-push-notifications/one-time-push#ios) of your message or specify the file name as a value for the "ios\_sound" param of the [createMessage API request](/developer/api-reference/messages-api/).
Audio file for custom iOS sound has to be in one of the following formats: **.aif**, **.caf**, **.wav**. **Make sure to specify the format in the file's name; otherwise, it will be ignored by Pushwoosh iOS SDK.**
### iOS Provisional Push
#### How it works
Provisional push notifications appear silently in the user’s Notification Center but not on the lock screen. This type of pushes doesn’t need to be allowed by a user explicitly: you can start sending them as soon as a user installs and launches your app.
However, users still can subscribe to your prominent push notifications: when opening the Provisional Push, they have two options to choose their experience – to keep pushes in Notification Center without alerts and sounds or allow you to send pushes prominently so that they appear on the lock screen.
Provisional Pushes are designed to let users make informed decisions about whether they’d like to receive notifications from your app. As the APN native subscription request is shown to users only once and to subscribe later, they should go to their phone’s system settings, and some users might not subscribe since they aren’t aware of what value they get with your pushes. Provisional Pushes give users this understanding: they can see what content you deliver in push notifications and decide whether they need to be notified about this content prominently.
#### How to implement
1\. Integrate the Pushwoosh iOS SDK by following the [guide](/developer/pushwoosh-sdk/ios-sdk/setting-up-pushwoosh-ios-sdk/quick-start/).
2\. Add the following string to your project's AppDelegate before calling the `registerForPushNotifications()` method: