# Customize Android SDK

<Aside type="note">
Make sure you've integrated Pushwoosh Android SDK into your project:

* [Firebase Integration](/developer/pushwoosh-sdk/android-sdk/firebase-integration/quick-start/)
* [Amazon Integration](/developer/pushwoosh-sdk/android-sdk/amazon/)
</Aside>

## Deep linking

In your activity that will handle the deep link, add \<data> tag with the scheme, host, and pathPrefix parameters.

```txt
<activity
          android:name=".PromoActivity"
          android:label="PromoActivity">
    <intent-filter>
        <action android:name="android.intent.action.VIEW" />
        <category android:name="android.intent.category.DEFAULT" />
        <category android:name="android.intent.category.BROWSABLE" />

        <data android:scheme="com.pushwoosh"
          android:host="promotion"
          android:pathPrefix="" />
    </intent-filter>
</activity>
```

<Aside type="note">
Deep link page name (_promotion_ in the example given) goes to the **host** field, **not pathPrefix**.
</Aside>

In the example above, the deep link will open PromoActivity. The basic implementation below displays alert with promo id value for the sake of simplicity. In your application it could definitely do something useful!

```java
public class PromoActivity extends Activity
{
		@Override
		protected void onCreate(Bundle savedInstanceState)
		{
				super.onCreate(savedInstanceState);

				setContentView(R.layout.deep_link);
				setTitle("Deep link activity");

				Intent intent = getIntent();
	  	  String action = intent.getAction();
	    	Uri data = intent.getData();

		    if (TextUtils.equals(action, Intent.ACTION_VIEW))
		    {
	  		  	openUrl(data);
		    }
		}

		private void openUrl(Uri uri)
		{
				String promoId = uri.getQueryParameter("id");
				Toast.makeText(getApplicationContext(), promoId, Toast.LENGTH_LONG).show();
		}
}
```

## In-app purchase tracking

If you want to track in-app purchases in [Customer Journeys](/product/customer-journey/pushwoosh-journey-overview), configure sending purchase information to Pushwoosh by calling this method:


```java
Pushwoosh.getInstance().sendInappPurchase(@NonNull String sku, @NonNull BigDecimal price, @NonNull String currency);
```
## Geozones push notification  

To use Geozone pushes, add the `com.pushwoosh:pushwoosh-location` library and call:  

```java
PushwooshLocation.startLocationTracking();
```

In your **AndroidManifest.xml**, include the necessary permissions:


```xml
<manifest ... >
  <!-- Required for geolocation-based push notifications -->
  <uses-permission android:name="android.permission.ACCESS_COARSE_LOCATION" />

  <!-- Required for precise location tracking -->
  <uses-permission android:name="android.permission.ACCESS_FINE_LOCATION" />

  <!-- Required for background location access on Android 10 (API level 29) and higher -->
  <uses-permission android:name="android.permission.ACCESS_BACKGROUND_LOCATION" />
</manifest>
```

## Using local notifications with Pushwoosh

If you use Pushwoosh Local Notifications API, add RECEIVE\_BOOT\_COMPLETED permission to your AndroidManifest.xml:

```txt title="AndroidManifest.xml"
<uses-permission android:name="android.permission.RECEIVE_BOOT_COMPLETED"/>x
```


## Using badge number on Android

Pushwoosh supports setting badge number on the app icon shortcut for the following Android launchers:\
Sony, Samsung, LG, HTC, ASUS, ADW, APEX, NOVA, HUAWEI, ZUK, OPPO.\
To use this functionality, simply add `com.pushwoosh:pushwoosh-badge` library to your application.

## Opening custom activity

If you want to start a particular activity in response to push notifications, add the following intent-filter to that activity:

```txt title="AndroidManifest.xml"
<activity android:name="YourActivity">
    <intent-filter>
        <action android:name="${applicationId}.MESSAGE"/>
        <category android:name="android.intent.category.DEFAULT"/>
    </intent-filter>
</activity>
```

## Controlling Log Level

In order to assist with debugging and integration, SDK will print all the requests to the console by default. When you are ready for the production build, add `com.pushwoosh.log_level` meta-data with value "ERROR" to the AndroidManifest.xml. This way only information about errors will go to the console. Other option could be one of the following:

_NONE_ - No logs from the SDK\
_ERROR_ - Display only errors in the console\
_WARN_ - Display also a warnings\
_INFO_ - Display informational messages\
_DEBUG_ - Even debug information is displayed now\
_NOISE_ - Everything SDK can print and more

```txt title="AndroidManifest.xml"
<meta-data android:name="com.pushwoosh.log_level" android:value="ERROR" />
```

## Using Proguard

When using Proguard, add the following options:

```txt title="proguard-rules.pro"
-keep class com.pushwoosh.** { *; }
-dontwarn com.pushwoosh.**
```

See **Google Play Services** library requirements regarding Proguard here:\
[https://developers.google.com/android/guides/setup](https://developers.google.com/android/guides/setup)

## Customising notification open behaviour

If you need to programmatically select which activity to display as a result of push notification, you can create custom [NotificationServiceExtension](https://github.com/Pushwoosh/pushwoosh-android-sdk/blob/master/Documentation/notification/NotificationServiceExtension.md) and include fully qualified class name of your NotificationServiceExtension in metadata under `com.pushwoosh.notification_service_extension` value.

```txt title="AndroidManifest.xml"
<meta-data
    android:name="com.pushwoosh.notification_service_extension"
    android:value="com.your.package.YourNotificationServiceExtension" />
```

```java title="YourNotificationServiceExtension.java"
public class YourNotificationServiceExtension extends NotificationServiceExtension {
    @Override
    protected void startActivityForPushMessage(PushMessage message) {
      // super.startActivityForPushMessage() starts default launcher activity
      // or activity marked with ${applicationId}.MESSAGE action.
      // Simply do not call it to override this behaviour.
        // super.startActivityForPushMessage(message);

        // start your activity instead:
        Intent launchIntent  = new Intent(getApplicationContext(), YourActivity.class);
        launchIntent.setFlags(Intent.FLAG_ACTIVITY_NEW_TASK | Intent.FLAG_ACTIVITY_RESET_TASK_IF_NEEDED);

        // (Optional) pass notification data to Activity
        launchIntent.putExtra(Pushwoosh.PUSH_RECEIVE_EVENT, message.toJson().toString());

        context.startActivity(launchIntent);
    }
}
```

<Aside type="note">
**Important**

If you use proguard in production builds, make sure your custom NotificationServiceExtension is not obfuscated ( by adding `-keep class` rule), otherwise it will lead to ClassNotFoundException.
</Aside>

## Customizing push notifications

To customize the view of push notifications, you need to create a custom Factory, you can create custom [NotificationFactory](https://pushwoosh.github.io/pushwoosh-android-sdk/pushwoosh/com.pushwoosh.notification/-notification-factory/index.html) and include fully qualified class name of your NotificationFactory in metadata under `com.pushwoosh.notification_factory` value.

```txt title="AndroidManifest.xml"
<meta-data
    android:name="com.pushwoosh.notification_factory"
    android:value="com.your.package.YourNotificationFactory" />
```

```java title="YourNotificationFactory"
public class YourNotificationFactory extends PushwooshNotificationFactory {
	@Override
	public Notification onGenerateNotification(@NonNull PushMessage pushMessage) {
		if (customNotification) {
       // TODO: generate and return custom notification
    }

    // return default Pushwoosh notification
		return super.onGenerateNotification(pushMessage);
	}
}
```

## Customizing group summary

To customize the appearance of a [group summary](https://developer.android.com/training/notify-user/group#set\_a\_group\_summary), create a custom Factory. You can create custom SummaryNotificationFactory and include fully qualified class name of your SummaryNotificationFactory in metadata under com.pushwoosh.summary\_notification\_factory value.

```java title="AndroidManifest.xml"
<meta-data
    android:name="com.pushwoosh.summary_notification_factory"
    android:value="com.your.package.YourSummaryNotificationFactory" />
```

```java title="YourSummaryNotificationFactory"
public class YourSummaryNotificationFactory extends PushwooshSummaryNotificationFactory {
    @Override
    public String summaryNotificationMessage(int notificationsAmount) {
	      // return the message you want
        return super.summaryNotificationMessage(notificationsAmount);
    }
    @Override
    public int summaryNotificationIconResId() {
	      // return the icon resource id you want
        return super.summaryNotificationIconResId();
    }
}
```

## Private endpoint URL

<Aside>
For **Custom Plan** subscriptions only. For more details, please contact our [Sales team](https://www.pushwoosh.com/demo/?utm\_source=docs\&utm\_medium=post\&utm\_campaign=customizing-android-sdk).
</Aside>

Pushwoosh provides Private endpoints for customers with Custom Plan subscriptions. To set up Private endpoint for Android SDK, you need to add the following to your **AndroidManifest.xml** file:

```txt title="AndroidManifest.xml"
<meta-data android:name="com.pushwoosh.base_url" android:value="PUSHWOOSH_PRIVATE_ENDPOINT_URL_PROVIDED" />
```

## Creating a Rich Media queue

In case there are several Rich Media pages to display simultaneously (for example, trigger events for two or more In-Apps take place at one moment, or a Rich Media page is being displayed already at the moment a different trigger event occurs), you can set up a queue for Rich Media pages displaying. To create a queue, add the following code to your project: 

```java title="Application.java"
package com.pushwoosh.testingapp;

import com.pushwoosh.RichMediaManager;
import com.pushwoosh.exception.PushwooshException;
import com.pushwoosh.richmedia.RichMediaPresentingDelegate;
import com.pushwoosh.richmedia.RichMedia;
import com.pushwoosh.internal.utils.PWLog;

import java.util.ArrayDeque;
import java.util.concurrent.locks.ReentrantLock;

public class DefaultRichMediaPresentingDelegate implements RichMediaPresentingDelegate {
    private final String TAG = DefaultRichMediaPresentingDelegate.class.getSimpleName();
    private ArrayDeque<RichMedia> richMediaQueue = new ArrayDeque<>();
    private RichMedia currentRichMedia = null;
    private ReentrantLock reentrantLock;

    public DefaultRichMediaPresentingDelegate() {
        PWLog.noise(TAG, "new DefaultRichMediaPresentingDelegate:" + this);
        reentrantLock = new ReentrantLock();
    }

    @Override
    public boolean shouldPresent(RichMedia richMedia) {
        PWLog.noise(TAG, "shouldPresent:" + richMedia);
        if (currentRichMedia == null) {
            PWLog.noise(TAG, "currentRichMedia is null");
        }
        if (richMedia.isLockScreen()) {
            PWLog.noise(TAG, "isLockScreen is true");
            return true;
        }
        try {
            reentrantLock.lock();
            if (currentRichMedia == null) {
                PWLog.noise(TAG, "show:" + richMedia);
                currentRichMedia = richMedia;
                return true;
            } else {
                PWLog.noise(TAG, "add to queue:" + richMedia);
                richMediaQueue.add(richMedia);
                return false;
            }
        } finally {
            reentrantLock.unlock();
        }
    }

    @Override
    public void onPresent(RichMedia richMedia) {
        PWLog.noise(TAG, "onPresent" + richMedia);
    }

    @Override
    public void onError(RichMedia richMedia, PushwooshException pushwooshException) {
        PWLog.error(TAG, pushwooshException + " richMedia:"+richMedia.toString());
        tryShowNextRichMediaThreadSafety();
    }

    @Override
    public void onClose(RichMedia richMedia) {
        PWLog.noise(TAG, "onClose:" + richMedia);
        tryShowNextRichMediaThreadSafety();
    }

    private void tryShowNextRichMediaThreadSafety() {
        try {
            reentrantLock.lock();
            tryShowNextRichMedia();
        } finally {
            reentrantLock.unlock();
        }
    }

    private void tryShowNextRichMedia() {
        if (!richMediaQueue.isEmpty()) {
			currentRichMedia = richMediaQueue.poll();
			PWLog.noise(TAG, "try manual show:" + currentRichMedia);
			RichMediaManager.present(currentRichMedia);
		} else {
			PWLog.noise(TAG, "richMediaQueue is empty");
			currentRichMedia = null;
		}
    }
}
```

<Aside type="caution" title="Important">
We strongly recommend to set up a queue in **Application** instead of **Activity**. Otherwise, it may create several queues.
</Aside>

<Aside type="note">
Each [postEvent](/developer/api-reference/user-centric-api/#postevent) method call only allows one In-App to be displayed, and each Push can only be associated with one Rich Media. If you want to show multiple In-Apps, call the [postEvent](/developer/api-reference/user-centric-api/#postevent) method the required number of times.
</Aside>

## Custom sound push

<Aside>
Available for Android 8+ devices. 
</Aside>

1. Put your audio file in the proper folder. For the native Android framework, your files should be placed in the `/app/src/main/res/raw` folder. 

<Aside type="note">
Please refer to the corresponding guides to find where to place the audio file in projects built in other frameworks. 
</Aside>

2\. Create a [Notification Channel.](/developer/pushwoosh-sdk/android-sdk/notification-channels/)

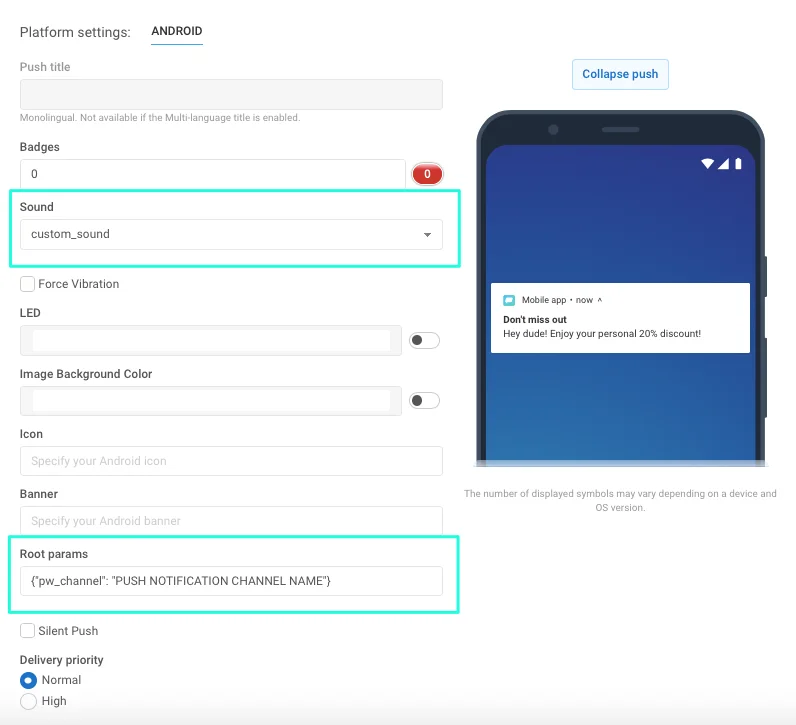
3\. Select a sound while configuring a push message.

<img src="/android-push-notifications-customizing-android-sdk-5.0-1.webp" alt=""/>

4\. Set the Notification Channel the message will belong to. To do so, specify the following in the “Android root params” field:`{"pw_channel": "PUSH NOTIFICATION CHANNEL NAME"} //`` `_`here you need to specify the name for your channel with custom sound`_

In case of using remote API, set the parameters as follows within your /createMessage API request:

```java
"android_root_params": {"pw_channel": "push"} // here you need to specify the name for your channel with custom sound, for example, "push" for the notifications with push.wav sound.
"android_sound": "push" // here you should specify the file name without extension
```

Once you send the push with those params specified, the Notification Channel with the selected sound is created for all devices with Android 8+. 

Now, to send the push with a custom sound, you have to specify only the channel associated with that sound.

### Proguard rules for custom notification sounds

If your app uses proguard for code and resource shrinking, it is important to keep your sound files intact and available for external libraries. If you use **`minifyEnabled = true`** property to your **build.gradle,** add the following rules to your **proguard-rules.pro**:

```
-keep public class your.package.name.R$raw {
 *;
}
```

If you shrink resources of your app on top of code shrinking by using **`shrinkResources=true`** property, you should additionally specify what resources you want to keep. To do that, create a new XML file with any name, save it somewhere in your project (for example, in res/xml), and specify the resource names under the **`tools:keep`** parameter in the **`resources`** tag:

```
<?xml version="1.0" encoding="utf-8"?>
<resources xmlns:tools="http://schemas.android.com/tools"
 tools:keep="@raw/*"
/>
```

## Complete list of Android SDK meta-data flags

To set up a flag, you need to add the meta-data block to your **AndroidManifest.xml** file inside the **application** tag. For example, if you want to set the Pushwoosh application ID, add the following code to your **AndroidManifest.xml** file:

```txt title="AndroidManifest.xml"
<meta-data
    android:name="com.pushwoosh.appid"
    android:value="XXXXX-XXXXX" />
```

<table><thead><tr><th width="262.33243208828077" align="center">Flag</th><th width="284" align="center">Description</th><th align="center">Possible values</th></tr></thead><tbody><tr><td align="center">com.pushwoosh.appid</td><td align="center">Sets the Pushwoosh application ID.</td><td align="center">XXXXX-XXXXX</td></tr><tr><td align="center">com.pushwoosh.log_level</td><td align="center">Sets logging level. For details, refer to <a href="#controlling-log-level">Controlling Log Level</a>. </td><td align="center">NONE / ERROR / WARN / INFO / <strong>DEBUG</strong> (<em>default</em>) / NOISE</td></tr><tr><td align="center">com.pushwoosh.base_url</td><td align="center">Overrides the Pushwoosh server base url.</td><td align="center"><a href="https://cp.pushwoosh.com/json/1.3/">https://cp.pushwoosh.com/json/1.3/</a> (<em>default</em>)</td></tr><tr><td align="center">com.pushwoosh.notification_service_extension</td><td align="center">Custom NotificationServiceExtension. For details, refer to <a href="#customising-notification-open-behaviour">Customising Notification Open Behavior</a>.  </td><td align="center">com.myapp.MyNotificationServiceExtension</td></tr><tr><td align="center">com.pushwoosh.notification_factory</td><td align="center"><p>Custom NotificationFactory.</p><p>For details, refer to <a href="#customizing-push-notifications">Customizing Push Notifications</a>. </p></td><td align="center">com.myapp.MyNotificationFactory</td></tr><tr><td align="center">com.pushwoosh.summary_notification_factory</td><td align="center">Custom SummaryNotificationFactory.</td><td align="center">com.myapp.MySummaryNotificationFactory</td></tr><tr><td align="center">com.pushwoosh.multi_notification_mode</td><td align="center">If true, notification will be grouped. If false, the last received notification will be displayed only.</td><td align="center">true / <strong>false</strong> (<em>default</em>)</td></tr><tr><td align="center">com.pushwoosh.allow_server_communication</td><td align="center">If true, the SDK is allowed to send network requests to Pushwoosh servers.</td><td align="center"><strong>true</strong> (<em>default</em>) / false</td></tr><tr><td align="center">com.pushwoosh.handle_notifications_using_workmanager</td><td align="center">If true, the WorkManager is set to handle notifications.</td><td align="center">true / <strong>false</strong> (<em>default</em>)</td></tr><tr><td align="center">com.pushwoosh.notification_icon</td><td align="center">Custom notification (small) icon resource name. If null, default application icon will be used. </td><td align="center">res/drawable-xxhdpi-v11/notification_small_icon.png / null</td></tr><tr><td align="center">com.pushwoosh.notification_icon_color</td><td align="center">Notification (small) icon background color.</td><td align="center">#FFFFFF</td></tr><tr><td align="center">com.pushwoosh.allow_collecting_device_data</td><td align="center">If true, the SDK is allowed to collect and to send device data to Pushwoosh.</td><td align="center"><strong>true</strong> (<em>default</em>) / false</td></tr><tr><td align="center">com.pushwoosh.allow_collecting_device_os_version</td><td align="center">If true, the SDK is allowed to collect and to send device OS version to Pushwoosh.</td><td align="center"><strong>true</strong> (<em>default</em>) / false</td></tr><tr><td align="center">com.pushwoosh.allow_collecting_device_locale</td><td align="center">If true, the SDK is allowed to collect and to send device locale to Pushwoosh.</td><td align="center"><strong>true</strong> (<em>default</em>) / false</td></tr><tr><td align="center">com.pushwoosh.allow_collecting_device_model</td><td align="center">If true, the SDK is allowed to collect and to send device model to Pushwoosh.</td><td align="center"><strong>true</strong> (<em>default</em>) / false</td></tr><tr><td align="center">com.pushwoosh.in_app_business_solutions_capping</td><td align="center">Limits the number of times the <em>push-unregister</em> In-App can be shown in a day.</td><td align="center"><strong>1</strong> (<em>default</em>), 2, ..., n</td></tr><tr><td align="center">com.pushwoosh.start_foreground_service</td><td align="center">If true, Foreground Service is launched along with the PushwooshLocation.startLocationTracking() call</td><td align="center">true / <strong>false</strong> (<em>default</em>)</td></tr><tr><td align="center">com.pushwoosh.foreground_service_notification_text</td><td align="center">Sets the text of a notification created when the Foreground Service is launched for the “com.pushwoosh.start_foreground_service” key.</td><td align="center"><strong>Work in progress</strong> (<em>default</em>)</td></tr><tr><td align="center">com.pushwoosh.foreground_service_notification_channel_name</td><td align="center">Sets the channel name for the notification created when the Foreground Service is launched for the “com.pushwoosh.start_foreground_service” key. </td><td align="center"><strong>Foreground service</strong> (<em>default)</em></td></tr><tr><td align="center">com.pushwoosh.trusted_package_names</td><td align="center">Allows sharing Pushwoosh HWID with specified package</td><td align="center">"com.mycompany.myapp1, com.mycompany.myapp2"</td></tr></tbody></table>


## Deleting Push Notifications via TTL (Time-To-Live)

To automatically delete push notifications after a specified time period using TTL (Time-to-Live), follow these steps:

1. Create a Custom NotificationFactory. [Learn more](#customizing-push-notifications)

2. In the `onGenerateNotification()` method, create a notification using the `Notification.Builder` or `NotificationCompat.Builder` class and call the `setTimeoutAfter` method:

```java
public class YourNotificationFactory extends PushwooshNotificationFactory {

    @Override
    public Notification onGenerateNotification(@NonNull PushMessage pushMessage) {
        Notification.Builder builder = new Notification.Builder(getApplicationContext(), addChannel(pushData));

        Notification notification = builder.setContentText(pushData.getMessage())
                                           .setContentTitle(title)
                                           .setContentText(text)
                                           // rest of your notification creation code
                                           .setTimeoutAfter(timeout) // time in milliseconds before the notification is canceled
                                           .build();
    }
}

```

## Share Your Feedback with Us

Your feedback helps us create a better experience, so we would love to hear from you if you have any issues during the SDK integration process. If you face any difficulties, please do not hesitate to share your thoughts with us via [this form](https://docs.google.com/forms/d/e/1FAIpQLSd_0b8jwn-V_JmoPLIxIFYbHACCQhrzidOZV3ELywoQPXRSxw/viewform).