# FAQ on Pushwoosh Android SDK
* [What does Android push token and HWID look like?](#what-does-android-push-token-and-hwid-look-like)
* [How can I obtain my Android device push token?](#how-can-i-obtain-my-android-device-push-token)
* [What permissions are necessary and what are optional?](#what-permissions-are-necessary-and-what-are-optional)
* [How do I set a UserID?](#how-do-i-set-a-userid)
* [How accurate is the total number of Android subscribers?](#how-accurate-is-the-total-number-of-android-subscribers)
* [Can I use HTML tags in pushes sent to Android?](#can-i-use-html-tags-in-pushes-sent-to-android)
* [How to set a notification icon in Android Lollipop (and later versions)?](#how-to-set-a-notification-icon-in-android-lollipop-and-later-versions)
* [Using Pushwoosh SDK with other FCM services](#using-pushwoosh-sdk-with-other-fcm-services)
* [Using Pushwoosh with LeakCanary or AppMetrica libraries](#using-pushwoosh-with-leakcanary-or-appmetrica-libraries)
* [Deleting a received notification from a device](#deleting-particular-received-notifications-from-a-device)
### What does Android push token and HWID look like?
Android device push tokens differ in length (less than 255 characters) and start with **APA91b**, for example:
`APA91bFoi3lMMre9G3XzR1LrF4ZT82_15MsMdEICogXSLB8-MrdkRuRQFwNI5u8Dh0cI90ABD3BOKnxkEla8cGdisbDHl5cVIkZah5QUhSAxzx4Roa7b4xy9tvx9iNSYw-eXBYYd8k1XKf8Q_Qq1X9-x-U-Y79vdPq`
Tokens often contain a colon-separated prefix before **APA91b**, for example: `eQnyCE6ULAQ:APA91bGrh4ya3b_owo9tshZNVAGhZdGMGb3sA5HbM...`
Pushwoosh uses UUID as HWIDs, i.e. randomly generated strings of 32 alphanumerical characters: `123e4567-e89b-12d3-a456-426655440000`
### How can I obtain my Android device push token?
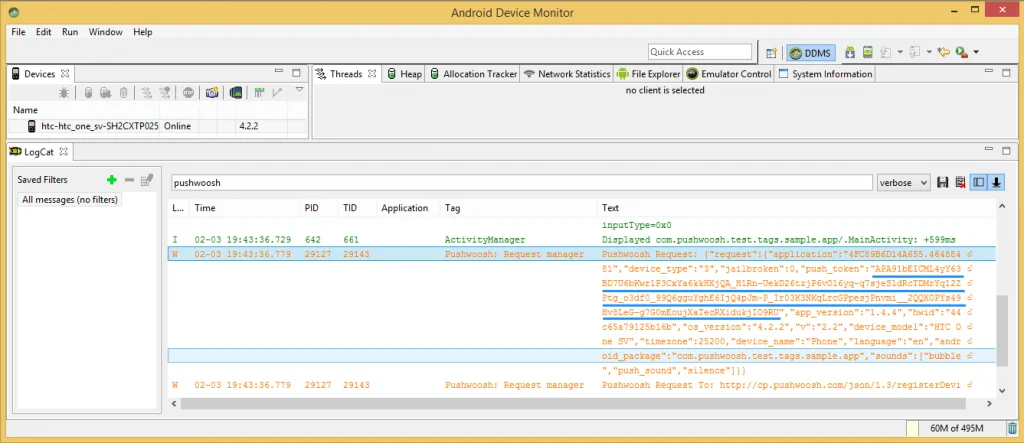
You can obtain your Android device push token in the console log. Use the logcat tool in [Android Studio](https://developer.android.com/studio).
Open **monitor.bat** in `%USERPROFILE%\AppData\Local\Android\sdk\tools\monitor.bat`, connect your device to PC and allow USB debugging in Android settings. Run your application on the device. Locate `/registerDevice`, find the push token for your device to use in Test Devices later on.
 ### What permissions are necessary and what are optional?
When installed on an Android device, the application will ask for the following permissions in connection with Pushwoosh SDK:
```java
```
Our SDK doesn’t ask for permission to access images, device contacts, etc.
### How do I set a UserID?
You can set a [User identifier (UserID)](/developer/first-steps/collecting-user-ids/), which could be a Facebook ID, username, email, or any other unique user ID. This allows you to match data and events across multiple devices associated with the same user. To set the UserID, call the **setUserId** method.
**Example**
```
Pushwoosh.getInstance().setUserId("testUser");
```
### How accurate is the total number of Android subscribers?
Pushwoosh clears unsubscribed Android devices from the database upon receiving the "NotRegistered" response from FCM, which can be returned after the second attempt to reach a specific device. This means that you have to send 2 pushes to an unsubscribed device to have it removed from the database.
The following is the most common scenario described in the [FCM documentation](https://firebase.google.com/docs/cloud-messaging/):
1. Your subscriber uninstalls the app.
2. Pushwoosh sends a message to FCM server.
3. The FCM server sends the message to your user’s device.
4. The FCM client on the device receives the message and detects that your application has been uninstalled; the detection details depend on the platform on which the app is running.
5. The FCM client on the device informs the FCM server that the app was uninstalled.
6. The FCM server marks the registration ID for deletion.
7. Pushwoosh sends another message to FCM.
8. The FCM returns a NotRegistered message.
9. Pushwoosh removes the push token from your userbase.
It might take a while for registration ID to be completely removed from FCM. Thus it is possible a message sent in step 7 above gets a valid message ID as response, even though the message will not be delivered to the client app.
### Can I use HTML tags in pushes sent to Android?
Yes, in Android you may use the following HTML tags in order to modify the appearance of a push:
```txt
Hello world!
Hello hi hey
```
Place these HTML tags in the **Message** input field, and use them in the API request as well. Some Android devices may fail to process these HTML tags properly, but most devices display formatting correctly.
### How to set a notification icon in Android Lollipop (and later versions)?
In Android Lollipop icons were changed to be white only. Therefore, if you select **targetSdkVersion >= 21** in your **AndroidManifest.xml** file, Android will only use alpha-channel of the icon.\
See more on the behavior in [Android documentation](https://developer.android.com/docs).
The system ignores all non-alpha channels in action icons and in the main notification icon. Assume these icons will be alpha-only. The system draws notification icons in white and action icons in dark gray. _This is beyond Pushwoosh SDK control_.
**1.** Create the notification icon according to the [Android guidelines](https://material.io/design/platform-guidance/android-notifications.html#style). As per [documentation](https://developer.android.com/about/versions/lollipop/android-5.0-changes), the system will ignore all the colors.
**2.** Name the icon as `pw_notification.png` and put it in **res/drawable** folder. Pushwoosh SDK will use this icon as default for notifications.
**3.** Alternatively, you can use Remote API and set the `"android_icon"` parameter value to the icon image (without file extension).
### Using Pushwoosh SDK with other FCM services
You can use Pushwoosh alongside other SDKs that use FCM for push messaging. To do that, create a router service to distribute events between the services. First, add the **pushwoosh-firebase** dependency alongside the main Pushwoosh module:
```groovy title="build.gradle"
implementation 'com.pushwoosh:pushwoosh-firebase:6.0.3'
```
Create the routing class:
```kotlin
import com.pushwoosh.firebase.PushwooshFcmHelper;
class FirebaseMessagingRouterService : FirebaseMessagingService() {
override fun onNewToken(token: String?) {
super.onNewToken(token)
PushwooshFcmHelper.onTokenRefresh(token)
sendTokenToAnotherService(token)
}
override fun onMessageReceived(remoteMessage: RemoteMessage) {
if (PushwooshFcmHelper.isPushwooshMessage(remoteMessage)) {
//this is a Pushwoosh push, SDK will handle it automatically
PushwooshFcmHelper.onMessageReceived(this, remoteMessage)
} else {
//this is not a Pushwoosh push, you should handle it by yourself
dispatchNonPushwooshMessage(remoteMessage);
}
}
private fun dispatchNonPushwooshMessage(remoteMessage: RemoteMessage) {
// Implement your push handling logics here
}
}
```
```java
import com.pushwoosh.firebase.PushwooshFcmHelper;
public class FirebaseMessagingRouterService extends FirebaseMessagingService {
@Override
public void onNewToken(String token) {
super.onNewToken(token);
PushwooshFcmHelper.onTokenRefresh(token);
sendTokenToAnotherService(token);
}
@Override
public void onMessageReceived(RemoteMessage remoteMessage) {
if (PushwooshFcmHelper.isPushwooshMessage(remoteMessage)) {
//this is a Pushwoosh push, SDK will handle it automatically
PushwooshFcmHelper.onMessageReceived(this, remoteMessage);
} else {
//this is not a Pushwoosh push, you should handle it by yourself
dispatchNonPushwooshMessage(remoteMessage);
}
}
private void dispatchNonPushwooshMessage(RemoteMessage remoteMessage) {
// Implement your push handling logics here
}
}
```
Register the routers in your AndroidManifest.xml:
```txt title="AndroidManifest.xml"
```
### Using Pushwoosh with LeakCanary or AppMetrica libraries
When you integrate analytics tools such as LeakCanary, AppMetrica or others, these libraries start a new process, creating new instance of the app. Since you can't listen for the push notifications in another process, this results in `java.lang.NullPointerException` being thrown.
If you call `registerForPushNotifications` inside `Application.onCreate()`, you should check if you are in the application's main process. Use the following code to perform this check:
```java
List runningAppProcesses = ((ActivityManager) getSystemService(Context.ACTIVITY_SERVICE)).getRunningAppProcesses();
if (runningAppProcesses != null && runningAppProcesses.size() != 0) {
for (ActivityManager.RunningAppProcessInfo runningAppProcessInfo : runningAppProcesses) {
boolean isCurrentProcess = runningAppProcessInfo.pid == android.os.Process.myPid();
boolean isMainProcessName = getPackageName().equals(runningAppProcessInfo.processName);
if (isCurrentProcess && isMainProcessName) {
Pushwoosh.getInstance().registerForPushNotifications(...);
break;
}
}
}
```
### Deleting particular received notifications from a device locally
If you want to remove a non-relevant push when performing a specific action inside your application, you can use the following approach:
```java title="MainActivity.java"
public class MainActivity extends AppCompatActivity {
List savedPushes = new ArrayList<>();
@Override
protected void onCreate(Bundle savedInstanceState) {
super.onCreate(savedInstanceState);
setContentView(R.layout.activity_main);
Pushwoosh.getInstance().registerForPushNotifications();
PushwooshNotificationSettings.setMultiNotificationMode(true);
findViewById(R.id.clear_button).setOnClickListener( v -> {
cancelPushes();
});
EventBus.subscribe(NotificationCreatedEvent.class, event -> {
try {
if (event.getMessage().getCustomData() == null)
return;
//cancel pushes only with a specific flag
if (new JSONObject(event.getMessage().getCustomData()).getBoolean("cancel")) {
savedPushes.add(event);
}
} catch (JSONException e) {
}
});
}
private void cancelPushes() {
NotificationManager manager = (NotificationManager)getSystemService(Context.NOTIFICATION_SERVICE);
if (manager == null) {
return;
}
for (NotificationCreatedEvent event : savedPushes) {
manager.cancel(event.getMessageTag(), event.getMessageId());
}
}
}
```
## Share your feedback with us
Your feedback helps us create a better experience. If you face any difficulties during the SDK integration process, share your thoughts with us [via this form](https://docs.google.com/forms/d/e/1FAIpQLSd_0b8jwn-V_JmoPLIxIFYbHACCQhrzidOZV3ELywoQPXRSxw/viewform).
### What permissions are necessary and what are optional?
When installed on an Android device, the application will ask for the following permissions in connection with Pushwoosh SDK:
```java
```
Our SDK doesn’t ask for permission to access images, device contacts, etc.
### How do I set a UserID?
You can set a [User identifier (UserID)](/developer/first-steps/collecting-user-ids/), which could be a Facebook ID, username, email, or any other unique user ID. This allows you to match data and events across multiple devices associated with the same user. To set the UserID, call the **setUserId** method.
**Example**
```
Pushwoosh.getInstance().setUserId("testUser");
```
### How accurate is the total number of Android subscribers?
Pushwoosh clears unsubscribed Android devices from the database upon receiving the "NotRegistered" response from FCM, which can be returned after the second attempt to reach a specific device. This means that you have to send 2 pushes to an unsubscribed device to have it removed from the database.
The following is the most common scenario described in the [FCM documentation](https://firebase.google.com/docs/cloud-messaging/):
1. Your subscriber uninstalls the app.
2. Pushwoosh sends a message to FCM server.
3. The FCM server sends the message to your user’s device.
4. The FCM client on the device receives the message and detects that your application has been uninstalled; the detection details depend on the platform on which the app is running.
5. The FCM client on the device informs the FCM server that the app was uninstalled.
6. The FCM server marks the registration ID for deletion.
7. Pushwoosh sends another message to FCM.
8. The FCM returns a NotRegistered message.
9. Pushwoosh removes the push token from your userbase.
It might take a while for registration ID to be completely removed from FCM. Thus it is possible a message sent in step 7 above gets a valid message ID as response, even though the message will not be delivered to the client app.
### Can I use HTML tags in pushes sent to Android?
Yes, in Android you may use the following HTML tags in order to modify the appearance of a push:
```txt
Hello world!
Hello hi hey
```
Place these HTML tags in the **Message** input field, and use them in the API request as well. Some Android devices may fail to process these HTML tags properly, but most devices display formatting correctly.
### How to set a notification icon in Android Lollipop (and later versions)?
In Android Lollipop icons were changed to be white only. Therefore, if you select **targetSdkVersion >= 21** in your **AndroidManifest.xml** file, Android will only use alpha-channel of the icon.\
See more on the behavior in [Android documentation](https://developer.android.com/docs).
The system ignores all non-alpha channels in action icons and in the main notification icon. Assume these icons will be alpha-only. The system draws notification icons in white and action icons in dark gray. _This is beyond Pushwoosh SDK control_.
**1.** Create the notification icon according to the [Android guidelines](https://material.io/design/platform-guidance/android-notifications.html#style). As per [documentation](https://developer.android.com/about/versions/lollipop/android-5.0-changes), the system will ignore all the colors.
**2.** Name the icon as `pw_notification.png` and put it in **res/drawable** folder. Pushwoosh SDK will use this icon as default for notifications.
**3.** Alternatively, you can use Remote API and set the `"android_icon"` parameter value to the icon image (without file extension).
### Using Pushwoosh SDK with other FCM services
You can use Pushwoosh alongside other SDKs that use FCM for push messaging. To do that, create a router service to distribute events between the services. First, add the **pushwoosh-firebase** dependency alongside the main Pushwoosh module:
```groovy title="build.gradle"
implementation 'com.pushwoosh:pushwoosh-firebase:6.0.3'
```
Create the routing class:
```kotlin
import com.pushwoosh.firebase.PushwooshFcmHelper;
class FirebaseMessagingRouterService : FirebaseMessagingService() {
override fun onNewToken(token: String?) {
super.onNewToken(token)
PushwooshFcmHelper.onTokenRefresh(token)
sendTokenToAnotherService(token)
}
override fun onMessageReceived(remoteMessage: RemoteMessage) {
if (PushwooshFcmHelper.isPushwooshMessage(remoteMessage)) {
//this is a Pushwoosh push, SDK will handle it automatically
PushwooshFcmHelper.onMessageReceived(this, remoteMessage)
} else {
//this is not a Pushwoosh push, you should handle it by yourself
dispatchNonPushwooshMessage(remoteMessage);
}
}
private fun dispatchNonPushwooshMessage(remoteMessage: RemoteMessage) {
// Implement your push handling logics here
}
}
```
```java
import com.pushwoosh.firebase.PushwooshFcmHelper;
public class FirebaseMessagingRouterService extends FirebaseMessagingService {
@Override
public void onNewToken(String token) {
super.onNewToken(token);
PushwooshFcmHelper.onTokenRefresh(token);
sendTokenToAnotherService(token);
}
@Override
public void onMessageReceived(RemoteMessage remoteMessage) {
if (PushwooshFcmHelper.isPushwooshMessage(remoteMessage)) {
//this is a Pushwoosh push, SDK will handle it automatically
PushwooshFcmHelper.onMessageReceived(this, remoteMessage);
} else {
//this is not a Pushwoosh push, you should handle it by yourself
dispatchNonPushwooshMessage(remoteMessage);
}
}
private void dispatchNonPushwooshMessage(RemoteMessage remoteMessage) {
// Implement your push handling logics here
}
}
```
Register the routers in your AndroidManifest.xml:
```txt title="AndroidManifest.xml"
```
### Using Pushwoosh with LeakCanary or AppMetrica libraries
When you integrate analytics tools such as LeakCanary, AppMetrica or others, these libraries start a new process, creating new instance of the app. Since you can't listen for the push notifications in another process, this results in `java.lang.NullPointerException` being thrown.
If you call `registerForPushNotifications` inside `Application.onCreate()`, you should check if you are in the application's main process. Use the following code to perform this check:
```java
List runningAppProcesses = ((ActivityManager) getSystemService(Context.ACTIVITY_SERVICE)).getRunningAppProcesses();
if (runningAppProcesses != null && runningAppProcesses.size() != 0) {
for (ActivityManager.RunningAppProcessInfo runningAppProcessInfo : runningAppProcesses) {
boolean isCurrentProcess = runningAppProcessInfo.pid == android.os.Process.myPid();
boolean isMainProcessName = getPackageName().equals(runningAppProcessInfo.processName);
if (isCurrentProcess && isMainProcessName) {
Pushwoosh.getInstance().registerForPushNotifications(...);
break;
}
}
}
```
### Deleting particular received notifications from a device locally
If you want to remove a non-relevant push when performing a specific action inside your application, you can use the following approach:
```java title="MainActivity.java"
public class MainActivity extends AppCompatActivity {
List savedPushes = new ArrayList<>();
@Override
protected void onCreate(Bundle savedInstanceState) {
super.onCreate(savedInstanceState);
setContentView(R.layout.activity_main);
Pushwoosh.getInstance().registerForPushNotifications();
PushwooshNotificationSettings.setMultiNotificationMode(true);
findViewById(R.id.clear_button).setOnClickListener( v -> {
cancelPushes();
});
EventBus.subscribe(NotificationCreatedEvent.class, event -> {
try {
if (event.getMessage().getCustomData() == null)
return;
//cancel pushes only with a specific flag
if (new JSONObject(event.getMessage().getCustomData()).getBoolean("cancel")) {
savedPushes.add(event);
}
} catch (JSONException e) {
}
});
}
private void cancelPushes() {
NotificationManager manager = (NotificationManager)getSystemService(Context.NOTIFICATION_SERVICE);
if (manager == null) {
return;
}
for (NotificationCreatedEvent event : savedPushes) {
manager.cancel(event.getMessageTag(), event.getMessageId());
}
}
}
```
## Share your feedback with us
Your feedback helps us create a better experience. If you face any difficulties during the SDK integration process, share your thoughts with us [via this form](https://docs.google.com/forms/d/e/1FAIpQLSd_0b8jwn-V_JmoPLIxIFYbHACCQhrzidOZV3ELywoQPXRSxw/viewform).