# Understanding device identifiers in Pushwoosh
There are two ways to identify a particular device registered with Pushwoosh – a hardware ID (HWID) and a push token.
## HWID
HWID (or Hardware ID) is a key identifier assigned to the device by Pushwoosh SDK.
#### Android HWID
For Android devices, HWID is a random set of letters and digits generated by the first app with the Pushwoosh SDK installed on the device. It's later shared with other apps that contain Pushwoosh SDK so that all such apps will have the same HWID as a result.
However, if a user deletes all the apps with Pushwoosh SDK and then re-installs some, a new HWID will be generated once again.
Android HWID example: `5dcaed99-e1e0-44dc-bde2-b96188b99e9e`
#### iOS HWID
For iOS devices, IDFV ([Identifier for Vendor](https://developer.apple.com/documentation/uikit/uidevice/1620059-identifierforvendor)) is being used as a HWID of the device. It won't change as long as there is at least one app from the same vendor installed on the device.
iOS HWID example (upper case only!): `CBAF8ED1-17FB-49A3-73BD-DC79B63AEF93`
## Push token
Push token (device token) is a unique key for the app-device combination issued by the Apple or Google push notification gateways. It allows gateways and push notification providers to route messages and ensure the notification is delivered to the unique app-device combination for which it is intended.
#### iOS push token
iOS device push tokens are strings with 64 hexadecimal symbols. iOS push token example: `03df25c845d460bcdad7802d2vf6fc1dfde97283bf75cc993eb6dca835ea2e2f`
#### Android push token
Android device push tokens can differ in length (usually below 255 characters) and typically start with APA91b…; however, it might also have a colon-separated prefix. Android push token example: `APA91bFoi3lMMre9G3XzR1LrF4ZT82_15MsMdEICogXSLB8-MrdkRuRQFwNI5u8Dh0cI90ABD3BOKnxkEla8cGdisbDHl5cVIkZah5QUhSAxzx4Roa7b4xy9tvx9iNSYw-eXBYYd8k1XKf8Q_Qq1X9-x-U-Y79vdPq`
## Collecting logs, HWID, and push token from a device
### iOS
First, if you have access to your app’s source code, make sure that `Pushwoosh_LOG_LEVEL` in your app is set to `VERBOSE`. To do this, check the `Pushwoosh_LOG_LEVEL` string key in your `Info.plist` file. If not, skip to the next step. Here are the possible values for this key:
* `NONE` - No logs from SDK
* `ERROR` - Only display errors in the console
* `WARNING` - Also, display warnings
* `INFO` - Add informational messages
* `DEBUG` - Add debug info
* `VERBOSE` - All logs from SDK
The `VERBOSE` key value allows the Pushwoosh SDK to display important information regarding registration actions.
2. Further, connect the device to your Mac and launch Xcode. Go to Window->Device and Simulators.
3. In the window opened, select your connected device and click the up-triangle at the bottom left to see the device console:
Starting from Xcode 9.3 version, the process of obtaining the device console log is slightly changed. All you need to do is to go to your Launchpad and start the "Console" application. Select your device in the left sidebar. That’s it!
4. Next, start your app on the device and wait for the dialog window. Allow push notifications for your app.
5. After these steps, select the entire device log from the console window and copy it to any text editor.
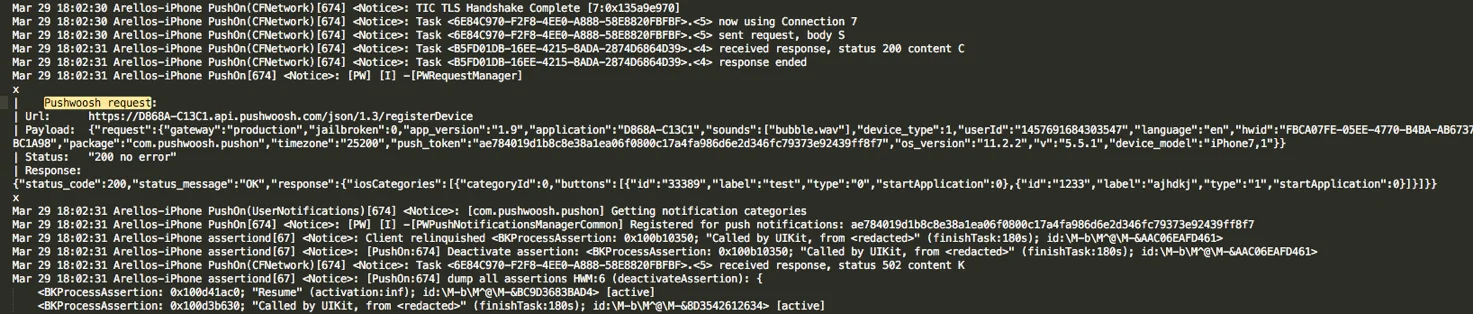
[`/registerDevice`](/developer/api-reference/device-api/) Pushwoosh API request is what you are looking for:
If the device is registered correctly, this request must contain the following parameters, including "hwid" and "push token" values:
```txt title="Example"
x
| Pushwoosh request:
| Url: https://D868A-C13C1.api.pushwoosh.com/json/1.3/registerDevice
| Payload: {"request":{"gateway":"production","jailbroken":0,"app_version":"1.9","application":"D868A-C13C1","sounds":["bubble.wav"],"device_type":1,"userId":"1457691684303547","language":"en","hwid":"FBCA07FE-05EE-4770-B4BA-AB6737BC1A98","package":"com.pushwoosh.pushon","timezone":"25200","push_token":"ae784019d1b8c8e38a1ea06f0800c17a4fa986d6e2d346fc79373e92439ff8f7","os_version":"11.2.2","v":"5.5.1","device_model":"iPhone7,1"}}
| Status: "200 no error"
| Response: {"status_code":200,"status_message":"OK","response":{"iosCategories":[{"categoryId":0,"buttons":[{"id":"33389","label":"test","type":"0","startApplication":0},{"id":"1233","label":"ajhdkj","type":"1","startApplication":0}]}]}}
x
```
The notice with a push token of your device should present as well:
```
: [PW] [I] -[PWPushNotificationsManagerCommon] Registered for push notifications: ae784019d1b8c8e38a1ea06f0800c17a4fa986d6e2d346fc79373e92439ff8f7
```
### Android
1. If you have access to the app's source code, make sure that the Pushwoosh log level is set to `NOISE`. To do so, add `com.pushwoosh.log_level` meta data with the value `NOISE` to the `AndroidManifest.xml`.
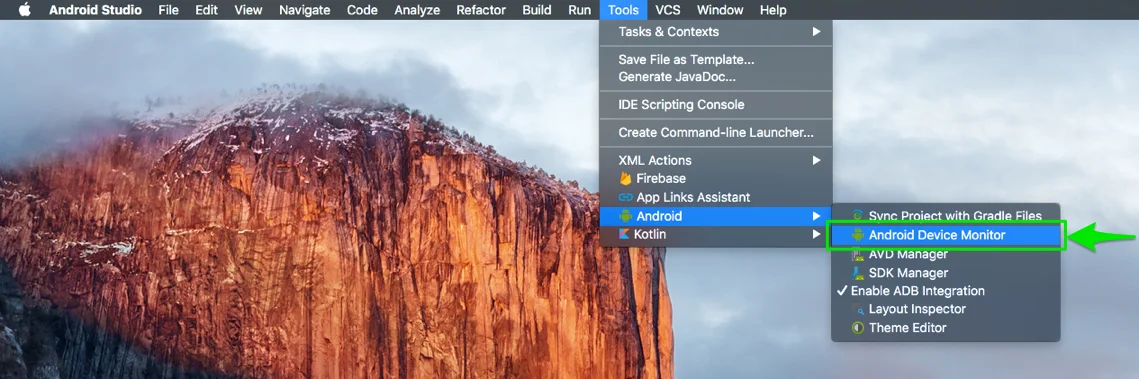
2. Next, run Android Studio on your Mac/PC and go to Tools -> Android -> Android Device Monitor.
3. Connect your device to the Mac/PC and launch the app. Wait about 30 seconds, select the entire device log from the console window and copy it to any text editor.
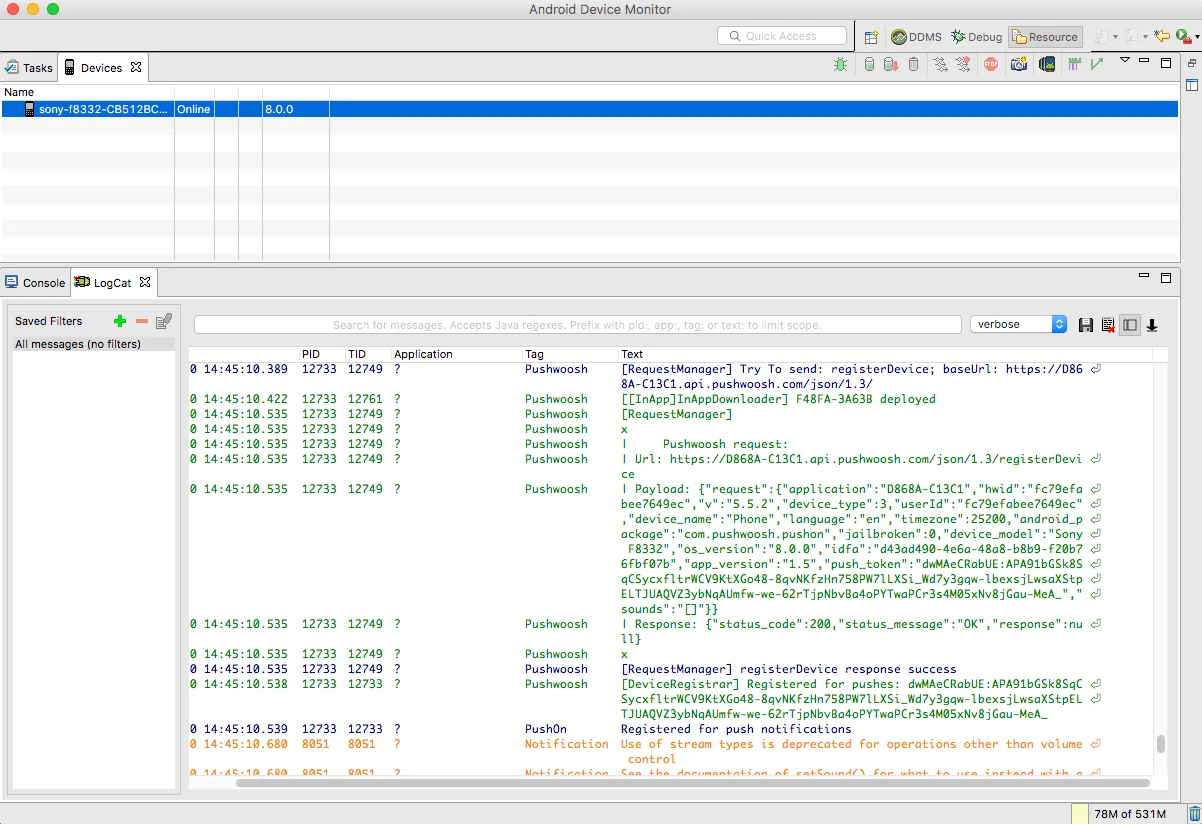
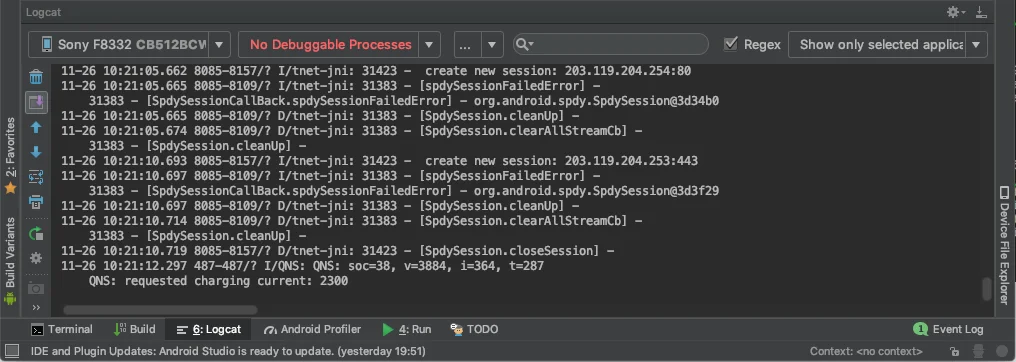
Please note that in the latest versions of Android Studio, you can also use the Logcat tool to obtain the device console log. Run Android Studio and go to View -> Tool Windows -> Logcat:
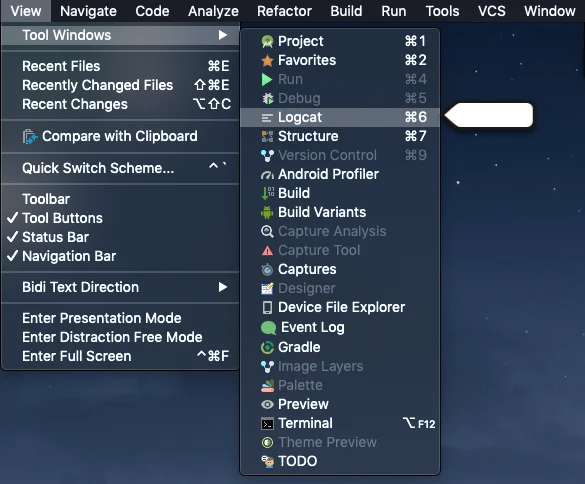
After that, you can locate the device log in the Logcat window:
Here's the example below, how the Pushwoosh /registerDevice API request looks like within the device console log:
Find the "hwid" and "push token" params value in the request:
```txt title="Example"
[RequestManager]
x
| Pushwoosh request:
| Url: https://D868A-C13C1.api.pushwoosh.com/json/1.3/registerDevice
| Payload: {"request":{"application":"D868A-C13C1","hwid":"fc79efabee7649ec","v":"5.5.2","device_type":3,"userId":"fc79efabee7649ec","device_name":"Phone","language":"en","timezone":25200,"android_package":"com.pushwoosh.pushon","jailbroken":0,"device_model":"Sony F8332","os_version":"8.0.0","idfa":"d43ad490-4e6a-48a8-b8b9-f20b76fbf07b","app_version":"1.5","push_token":"dwMAeCRabUE:APA91bGSk8SqCSycxfltrWCV9KtXGo48-8qvNKfzHn758PW7lLXSi_Wd7y3gqw-lbexsjLwsaXStpELTJUAQVZ3ybNqAUmfw-we-62rTjpNbvBa4oPYTwaPCr3s4M05xNv8jGau-MeA_","sounds":"[]"}}
| Response: {"status_code":200,"status_message":"OK","response":null}
x
[RequestManager] registerDevice response success
```
Push token is included in the device registration notice:
```
I/Pushwoosh(12733): [DeviceRegistrar] Registered for pushes: dwMAeCRabUE:APA91bGSk8SqCSycxfltrWCV9KtXGo48-8qvNKfzHn758PW7lLXSi_Wd7y3gqw-lbexsjLwsaXStpELTJUAQVZ3ybNqAUmfw-we-62rTjpNbvBa4oPYTwaPCr3s4M05xNv8jGau-MeA_
03-30 14:45:10.539: D/PushOn(12733): Registered for push notifications
```
### Chrome (desktop)
1. Go to your website.
2. Right-click anywhere on the page and press "Inspect".
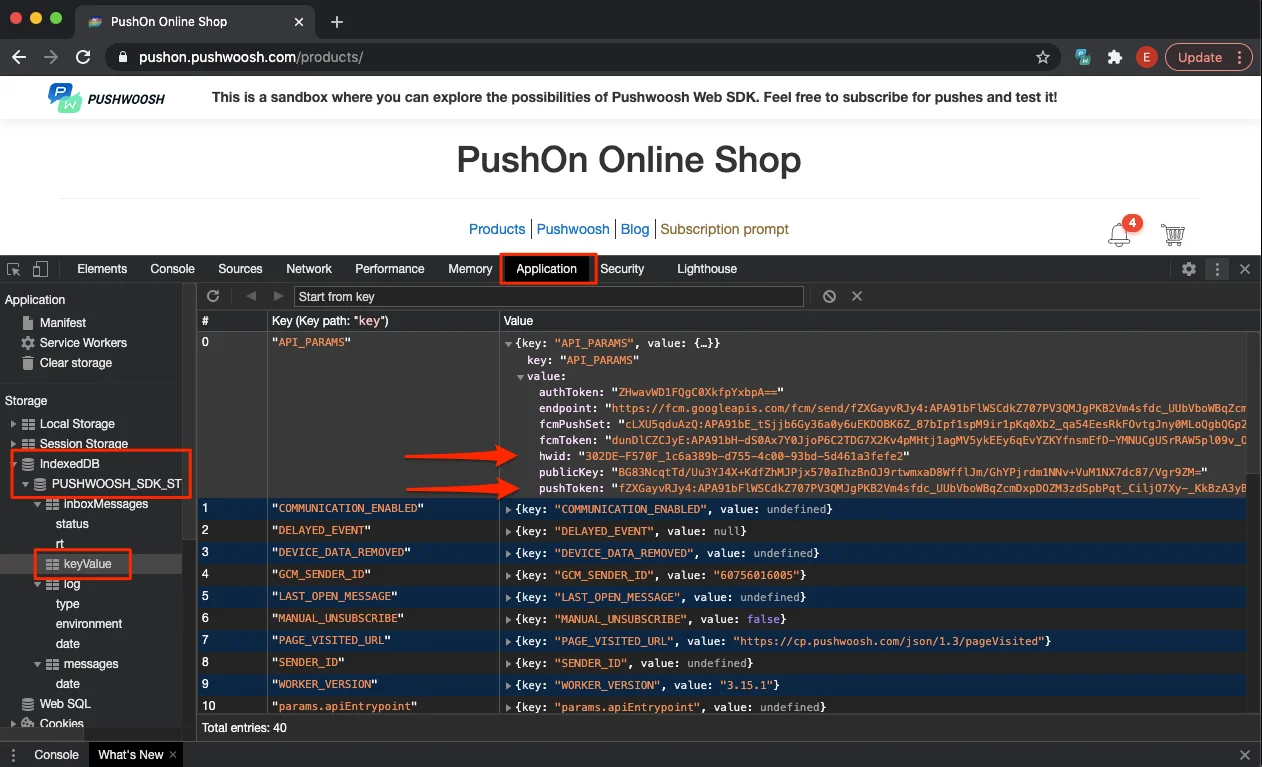
3. In the window opened, go to the "Application" tab.
4. Then, on the left sidebar, choose IndexedDB -> Pushwoosh\_SDK\_Store -> keyValue. Here, find the HWID and push token params.
### Chrome (mobile)
1. Connect your mobile device to the computer.
2. Go to chrome://inspect/#devices on your desktop Chrome.
3. Open your website on your mobile Chrome.
4. Once the website is opened on your mobile Chrome, you will see the corresponding page within the desktop Chrome page. Please take a look at the screenshot below:
5. Press the "Inspect" button highlighted in the screenshot above.
6. The following window will appear on your desktop Chrome. There, within the "Application" tab, open IndexedDB -> PUSHWOOSH\_SDK\_STORE. After this, click keyValue and open the API\_PARAMS section:
In the API\_PARAMS section, you will find the "hwid" and "push token" parameters with their values.
### Safari
1. Go to your website.
2. Right-click anywhere on the page and select Inspect Element.
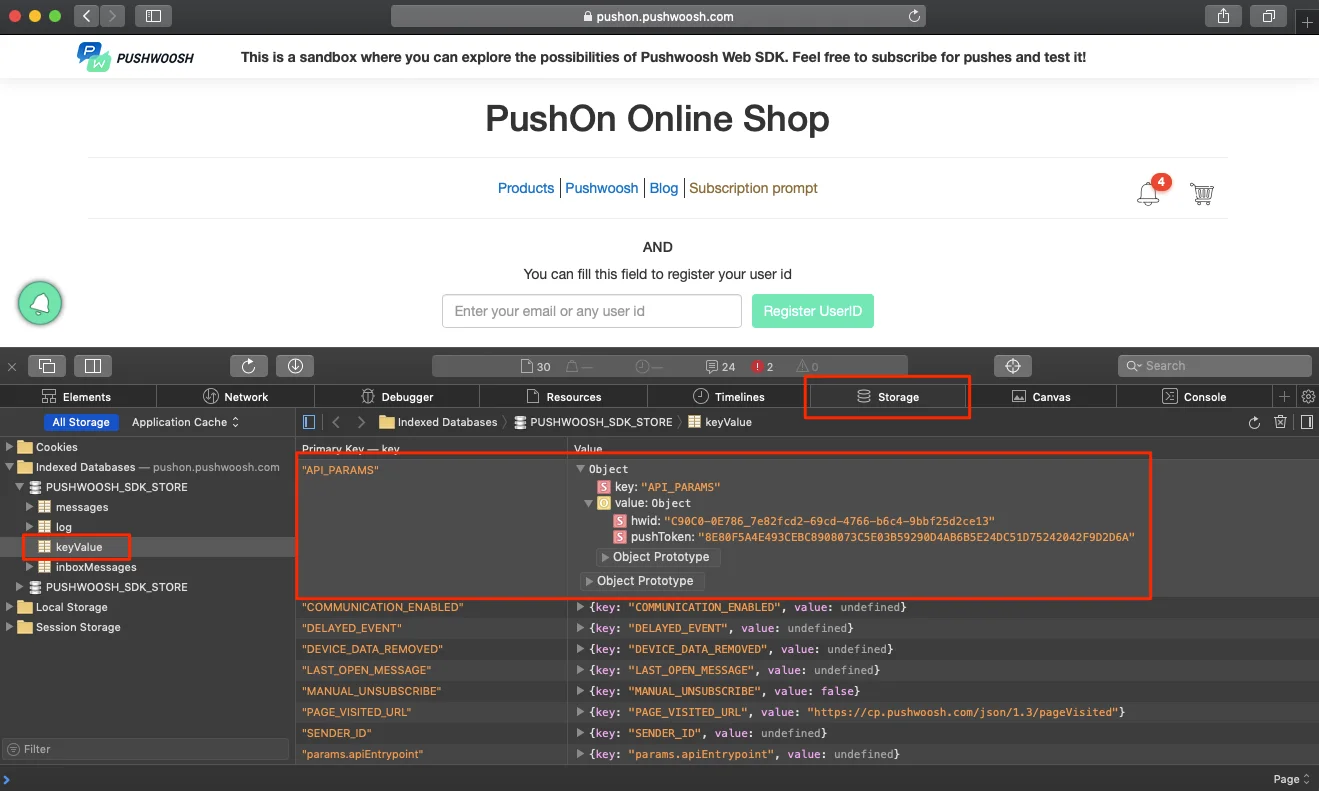
3. Go to the Storage tab -> Indexed Databases -> PUSHWOOSH\_SDK\_STORE -> keyValue.
4. Expand the API\_PARAMS and find the "hwid" and "push token" values here.
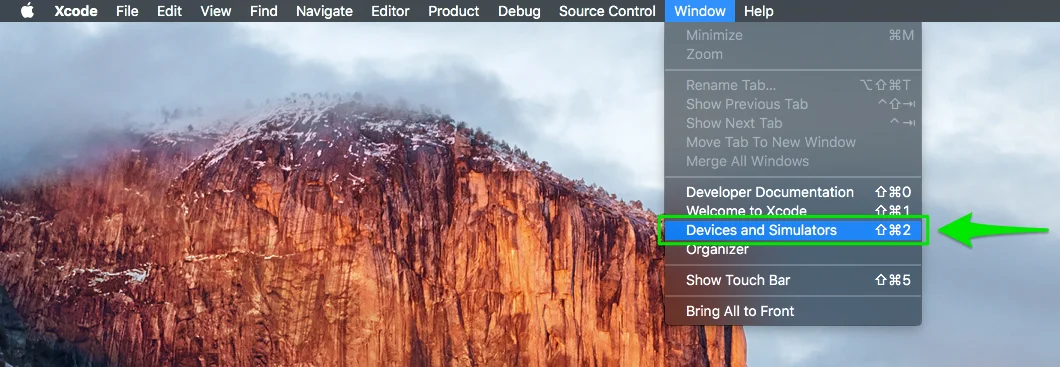 3. In the window opened, select your connected device and click the up-triangle at the bottom left to see the device console:
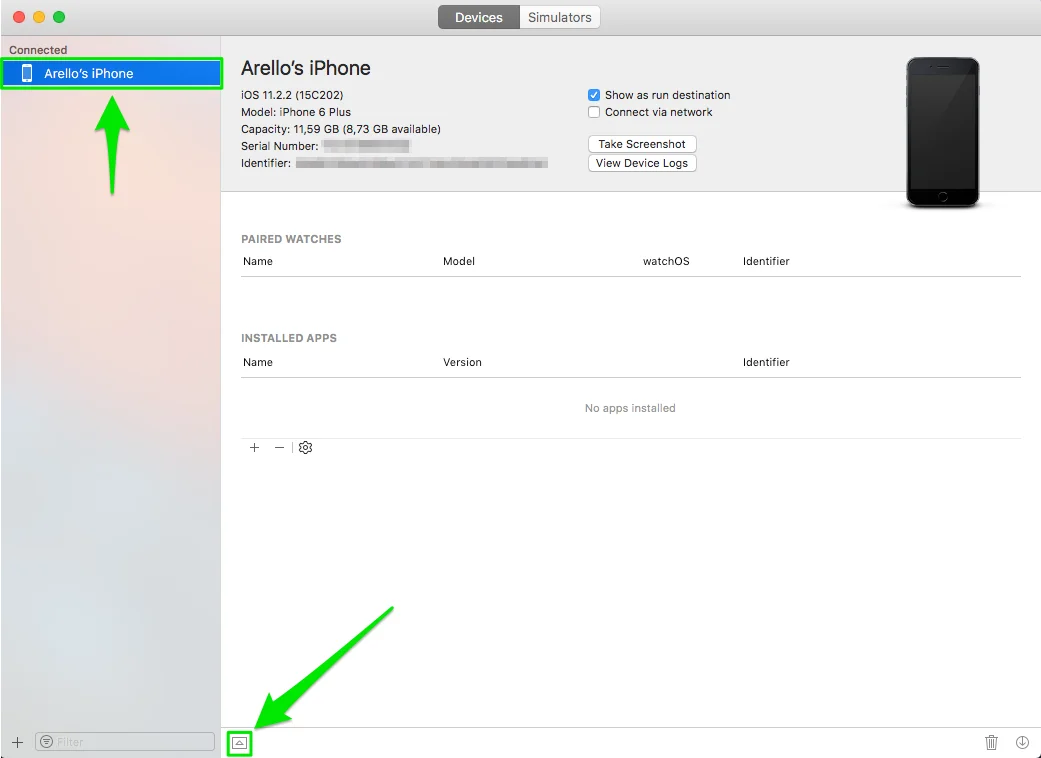 Starting from Xcode 9.3 version, the process of obtaining the device console log is slightly changed. All you need to do is to go to your Launchpad and start the "Console" application. Select your device in the left sidebar. That’s it!
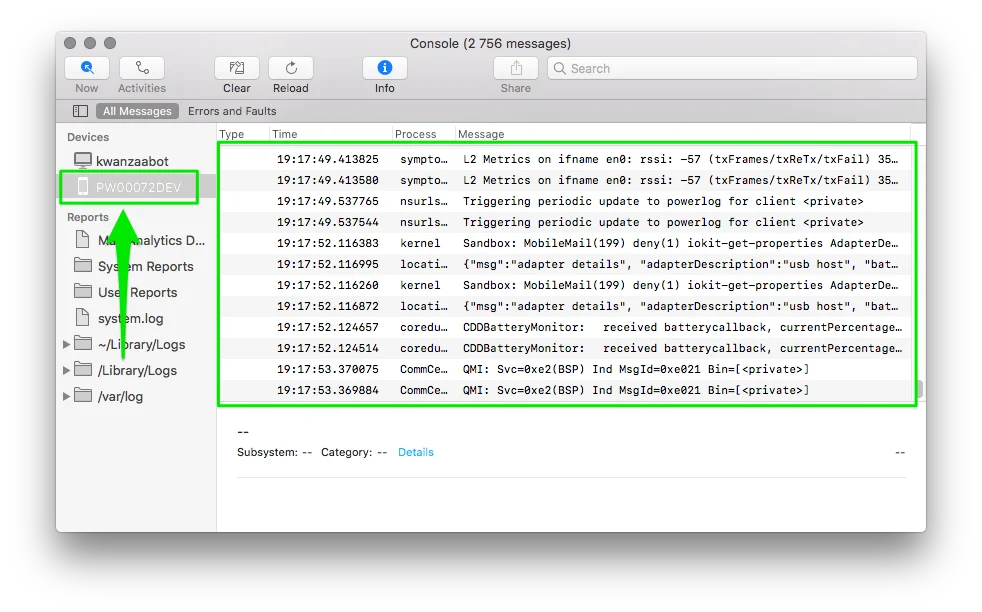 4. Next, start your app on the device and wait for the dialog window. Allow push notifications for your app.
5. After these steps, select the entire device log from the console window and copy it to any text editor.
[`/registerDevice`](/developer/api-reference/device-api/) Pushwoosh API request is what you are looking for:
4. Next, start your app on the device and wait for the dialog window. Allow push notifications for your app.
5. After these steps, select the entire device log from the console window and copy it to any text editor.
[`/registerDevice`](/developer/api-reference/device-api/) Pushwoosh API request is what you are looking for:
 If the device is registered correctly, this request must contain the following parameters, including "hwid" and "push token" values:
```txt title="Example"
x
| Pushwoosh request:
| Url: https://D868A-C13C1.api.pushwoosh.com/json/1.3/registerDevice
| Payload: {"request":{"gateway":"production","jailbroken":0,"app_version":"1.9","application":"D868A-C13C1","sounds":["bubble.wav"],"device_type":1,"userId":"1457691684303547","language":"en","hwid":"FBCA07FE-05EE-4770-B4BA-AB6737BC1A98","package":"com.pushwoosh.pushon","timezone":"25200","push_token":"ae784019d1b8c8e38a1ea06f0800c17a4fa986d6e2d346fc79373e92439ff8f7","os_version":"11.2.2","v":"5.5.1","device_model":"iPhone7,1"}}
| Status: "200 no error"
| Response: {"status_code":200,"status_message":"OK","response":{"iosCategories":[{"categoryId":0,"buttons":[{"id":"33389","label":"test","type":"0","startApplication":0},{"id":"1233","label":"ajhdkj","type":"1","startApplication":0}]}]}}
x
```
The notice with a push token of your device should present as well:
```
If the device is registered correctly, this request must contain the following parameters, including "hwid" and "push token" values:
```txt title="Example"
x
| Pushwoosh request:
| Url: https://D868A-C13C1.api.pushwoosh.com/json/1.3/registerDevice
| Payload: {"request":{"gateway":"production","jailbroken":0,"app_version":"1.9","application":"D868A-C13C1","sounds":["bubble.wav"],"device_type":1,"userId":"1457691684303547","language":"en","hwid":"FBCA07FE-05EE-4770-B4BA-AB6737BC1A98","package":"com.pushwoosh.pushon","timezone":"25200","push_token":"ae784019d1b8c8e38a1ea06f0800c17a4fa986d6e2d346fc79373e92439ff8f7","os_version":"11.2.2","v":"5.5.1","device_model":"iPhone7,1"}}
| Status: "200 no error"
| Response: {"status_code":200,"status_message":"OK","response":{"iosCategories":[{"categoryId":0,"buttons":[{"id":"33389","label":"test","type":"0","startApplication":0},{"id":"1233","label":"ajhdkj","type":"1","startApplication":0}]}]}}
x
```
The notice with a push token of your device should present as well:
```
 3. Connect your device to the Mac/PC and launch the app. Wait about 30 seconds, select the entire device log from the console window and copy it to any text editor.
 Please note that in the latest versions of Android Studio, you can also use the Logcat tool to obtain the device console log. Run Android Studio and go to View -> Tool Windows -> Logcat:
 After that, you can locate the device log in the Logcat window:
 Here's the example below, how the Pushwoosh /registerDevice API request looks like within the device console log:
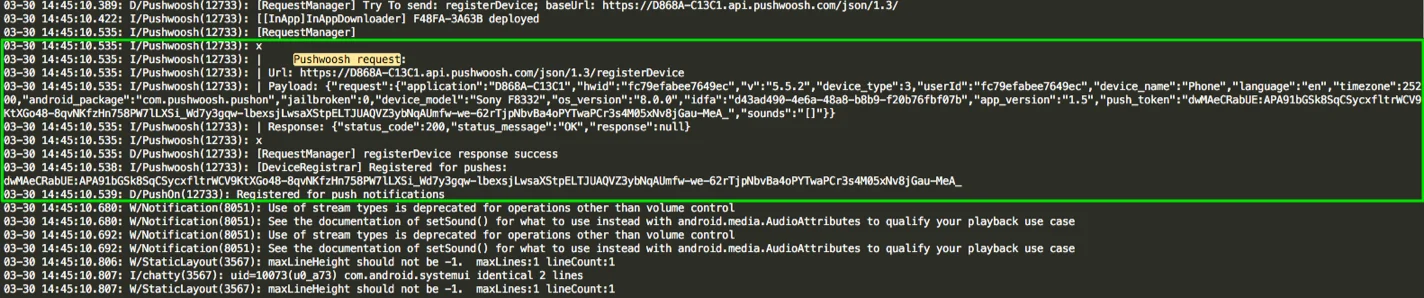 Find the "hwid" and "push token" params value in the request:
```txt title="Example"
[RequestManager]
x
| Pushwoosh request:
| Url: https://D868A-C13C1.api.pushwoosh.com/json/1.3/registerDevice
| Payload: {"request":{"application":"D868A-C13C1","hwid":"fc79efabee7649ec","v":"5.5.2","device_type":3,"userId":"fc79efabee7649ec","device_name":"Phone","language":"en","timezone":25200,"android_package":"com.pushwoosh.pushon","jailbroken":0,"device_model":"Sony F8332","os_version":"8.0.0","idfa":"d43ad490-4e6a-48a8-b8b9-f20b76fbf07b","app_version":"1.5","push_token":"dwMAeCRabUE:APA91bGSk8SqCSycxfltrWCV9KtXGo48-8qvNKfzHn758PW7lLXSi_Wd7y3gqw-lbexsjLwsaXStpELTJUAQVZ3ybNqAUmfw-we-62rTjpNbvBa4oPYTwaPCr3s4M05xNv8jGau-MeA_","sounds":"[]"}}
| Response: {"status_code":200,"status_message":"OK","response":null}
x
[RequestManager] registerDevice response success
```
Push token is included in the device registration notice:
```
I/Pushwoosh(12733): [DeviceRegistrar] Registered for pushes: dwMAeCRabUE:APA91bGSk8SqCSycxfltrWCV9KtXGo48-8qvNKfzHn758PW7lLXSi_Wd7y3gqw-lbexsjLwsaXStpELTJUAQVZ3ybNqAUmfw-we-62rTjpNbvBa4oPYTwaPCr3s4M05xNv8jGau-MeA_
03-30 14:45:10.539: D/PushOn(12733): Registered for push notifications
```
### Chrome (desktop)
1. Go to your website.
2. Right-click anywhere on the page and press "Inspect".
Find the "hwid" and "push token" params value in the request:
```txt title="Example"
[RequestManager]
x
| Pushwoosh request:
| Url: https://D868A-C13C1.api.pushwoosh.com/json/1.3/registerDevice
| Payload: {"request":{"application":"D868A-C13C1","hwid":"fc79efabee7649ec","v":"5.5.2","device_type":3,"userId":"fc79efabee7649ec","device_name":"Phone","language":"en","timezone":25200,"android_package":"com.pushwoosh.pushon","jailbroken":0,"device_model":"Sony F8332","os_version":"8.0.0","idfa":"d43ad490-4e6a-48a8-b8b9-f20b76fbf07b","app_version":"1.5","push_token":"dwMAeCRabUE:APA91bGSk8SqCSycxfltrWCV9KtXGo48-8qvNKfzHn758PW7lLXSi_Wd7y3gqw-lbexsjLwsaXStpELTJUAQVZ3ybNqAUmfw-we-62rTjpNbvBa4oPYTwaPCr3s4M05xNv8jGau-MeA_","sounds":"[]"}}
| Response: {"status_code":200,"status_message":"OK","response":null}
x
[RequestManager] registerDevice response success
```
Push token is included in the device registration notice:
```
I/Pushwoosh(12733): [DeviceRegistrar] Registered for pushes: dwMAeCRabUE:APA91bGSk8SqCSycxfltrWCV9KtXGo48-8qvNKfzHn758PW7lLXSi_Wd7y3gqw-lbexsjLwsaXStpELTJUAQVZ3ybNqAUmfw-we-62rTjpNbvBa4oPYTwaPCr3s4M05xNv8jGau-MeA_
03-30 14:45:10.539: D/PushOn(12733): Registered for push notifications
```
### Chrome (desktop)
1. Go to your website.
2. Right-click anywhere on the page and press "Inspect".
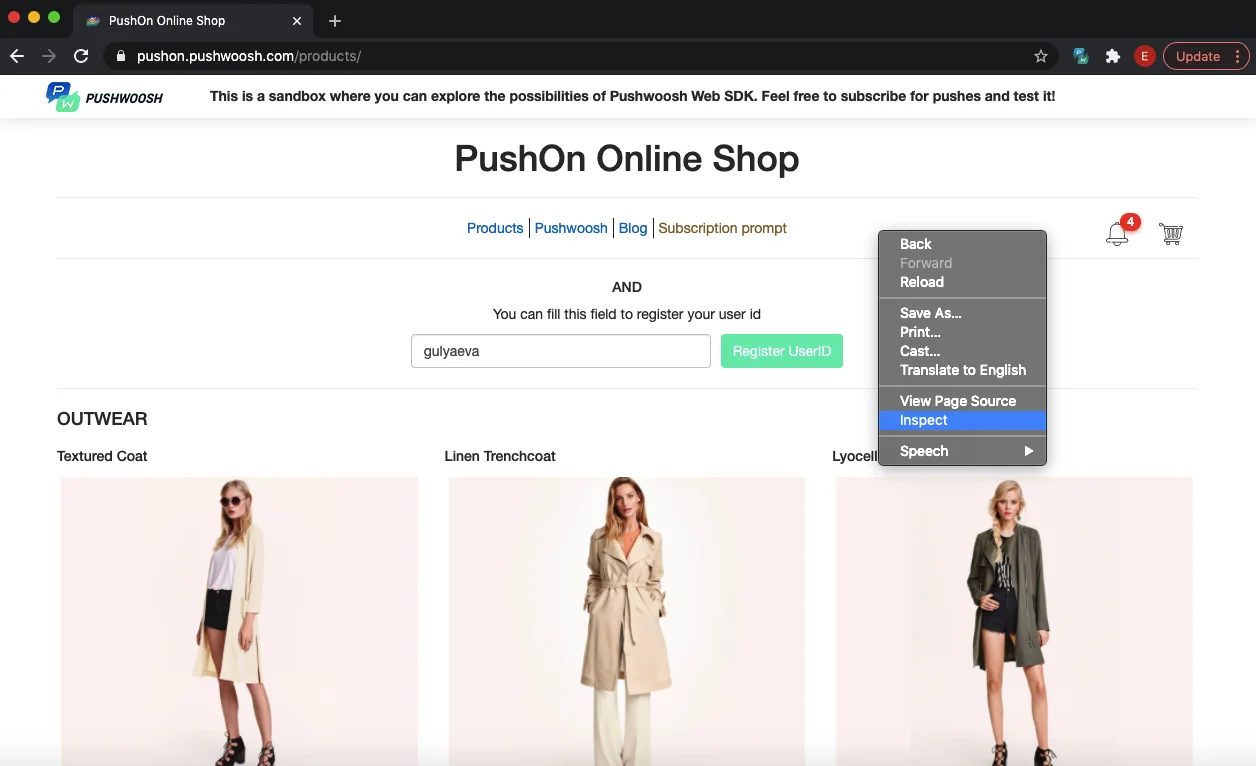 3. In the window opened, go to the "Application" tab.
4. Then, on the left sidebar, choose IndexedDB -> Pushwoosh\_SDK\_Store -> keyValue. Here, find the HWID and push token params.
3. In the window opened, go to the "Application" tab.
4. Then, on the left sidebar, choose IndexedDB -> Pushwoosh\_SDK\_Store -> keyValue. Here, find the HWID and push token params.
 ### Chrome (mobile)
1. Connect your mobile device to the computer.
2. Go to chrome://inspect/#devices on your desktop Chrome.
3. Open your website on your mobile Chrome.
4. Once the website is opened on your mobile Chrome, you will see the corresponding page within the desktop Chrome page. Please take a look at the screenshot below:
### Chrome (mobile)
1. Connect your mobile device to the computer.
2. Go to chrome://inspect/#devices on your desktop Chrome.
3. Open your website on your mobile Chrome.
4. Once the website is opened on your mobile Chrome, you will see the corresponding page within the desktop Chrome page. Please take a look at the screenshot below:
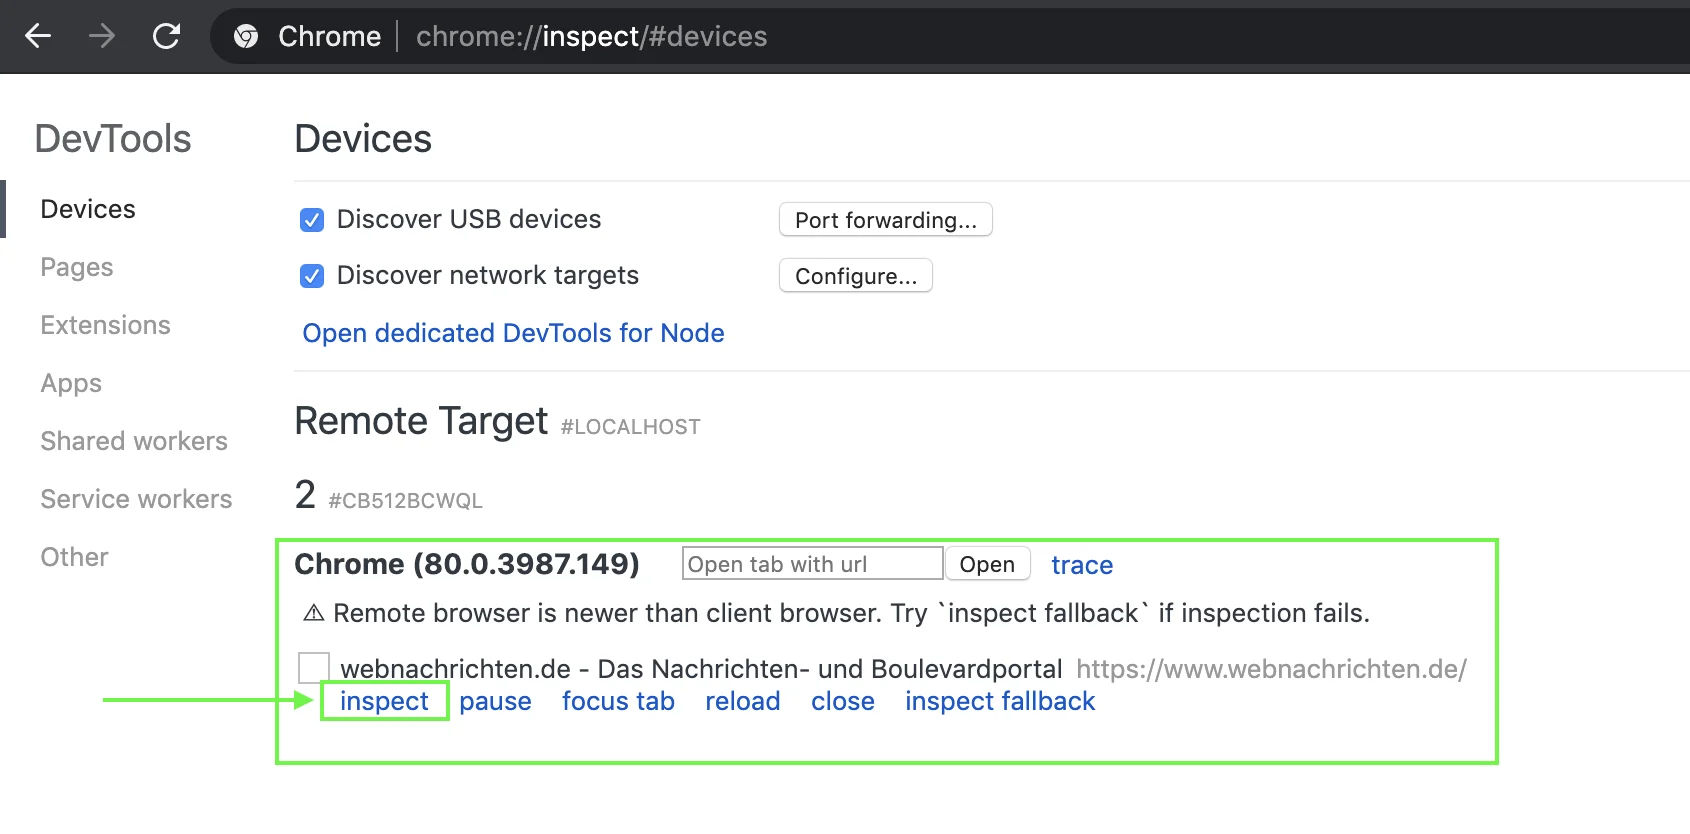 5. Press the "Inspect" button highlighted in the screenshot above.
6. The following window will appear on your desktop Chrome. There, within the "Application" tab, open IndexedDB -> PUSHWOOSH\_SDK\_STORE. After this, click keyValue and open the API\_PARAMS section:
5. Press the "Inspect" button highlighted in the screenshot above.
6. The following window will appear on your desktop Chrome. There, within the "Application" tab, open IndexedDB -> PUSHWOOSH\_SDK\_STORE. After this, click keyValue and open the API\_PARAMS section:
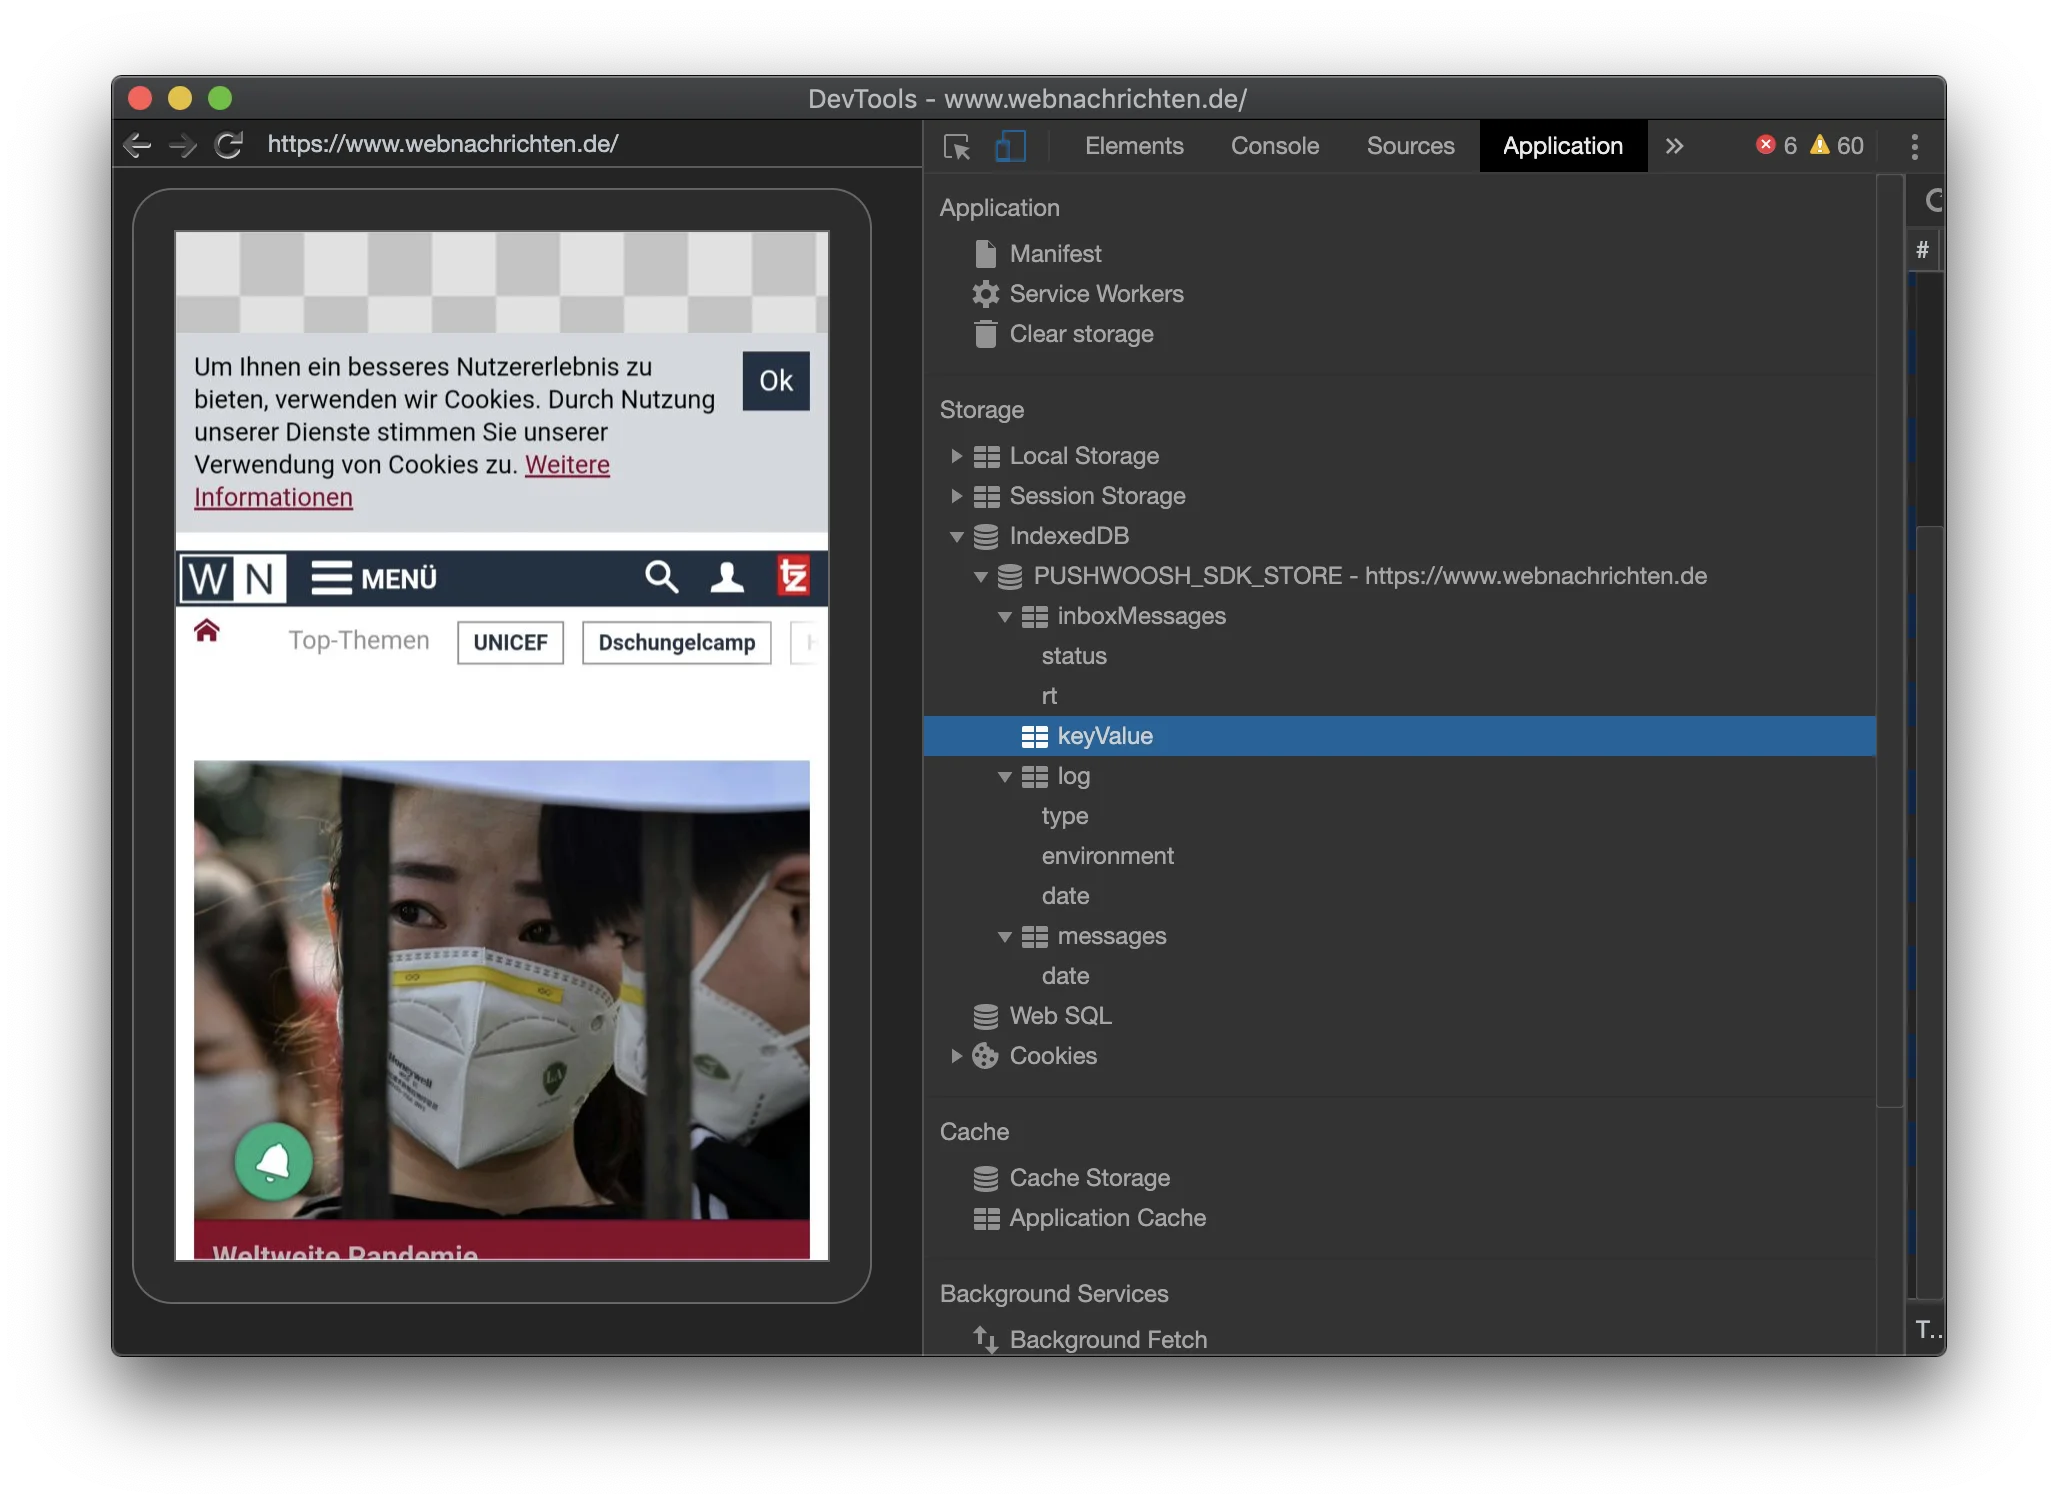 In the API\_PARAMS section, you will find the "hwid" and "push token" parameters with their values.
### Safari
1. Go to your website.
2. Right-click anywhere on the page and select Inspect Element.
3. Go to the Storage tab -> Indexed Databases -> PUSHWOOSH\_SDK\_STORE -> keyValue.
4. Expand the API\_PARAMS and find the "hwid" and "push token" values here.
In the API\_PARAMS section, you will find the "hwid" and "push token" parameters with their values.
### Safari
1. Go to your website.
2. Right-click anywhere on the page and select Inspect Element.
3. Go to the Storage tab -> Indexed Databases -> PUSHWOOSH\_SDK\_STORE -> keyValue.
4. Expand the API\_PARAMS and find the "hwid" and "push token" values here.