# Add test push devices
You can use Test Devices to preview how push notifications look on a device before sending them to the app users. In order to do that, you need to **register your device** (with your app installed) as a **Test Device**.
To add a test device:
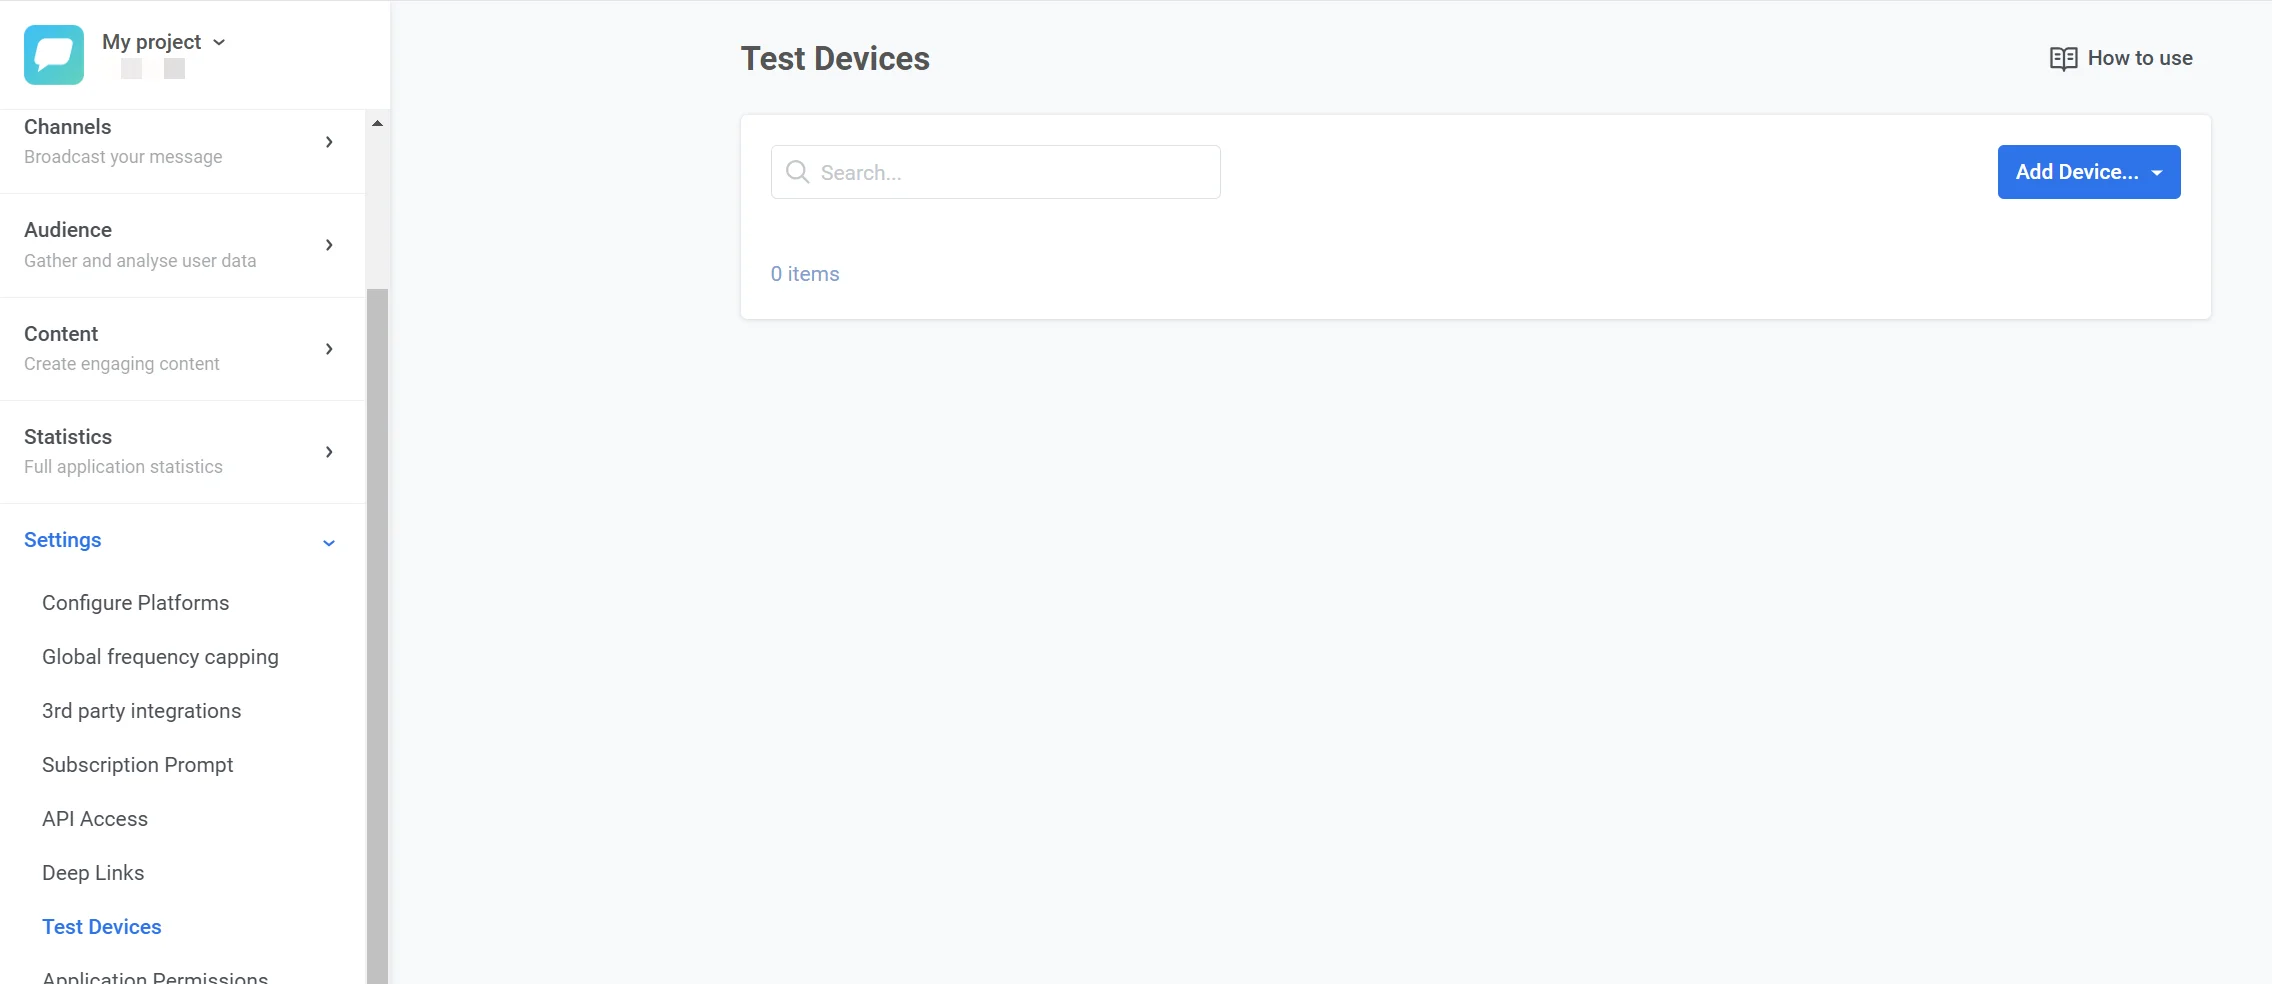
1. Navigate to the **Test devices** section in your Pushwoosh account.
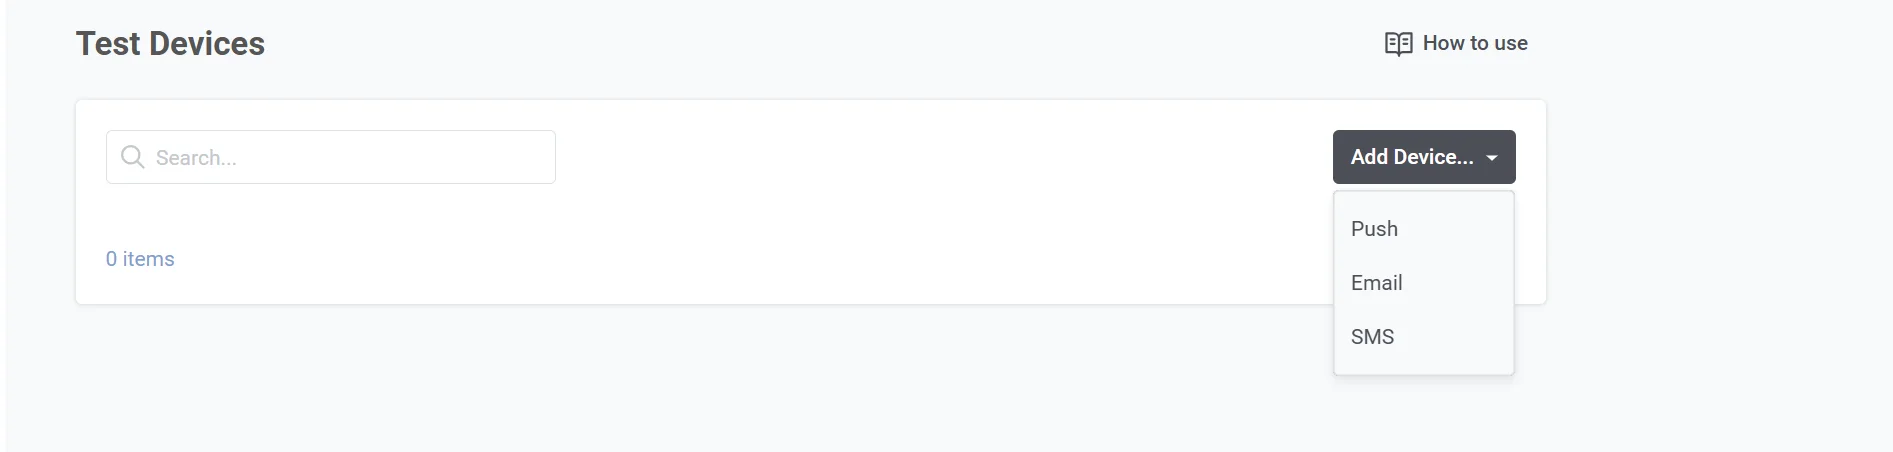
2. Click the **Create test device** dropdown button in the top-right corner and select **Push**.
You can add a push test device using one of three methods: Auto-configuration with QR code, registering from the app, or manual configuration.
## Adding test devices automatically
This method is suitable only for iOS and Android devices.
Before your first registration, add deep link handling for test devices to the app — a one-time setup, usually done together with the Pushwoosh SDK integration:
* **For Android**: Add **DeepLinkActivity** to the `AndroidManifest.xml` file.
* **For iOS**: Add the `pushwoosh-YOUR_PUSHWOOSH_APP_ID` URL scheme to the `Info.plist` file.
Follow the instructions for Android and iOS in the [Implementation section.](/developer/first-steps/test-your-integration/test-devices#implementation)
Once that's done, to register a device:
1. In the **Test Devices** section, click **Create test device** and select **Push**.
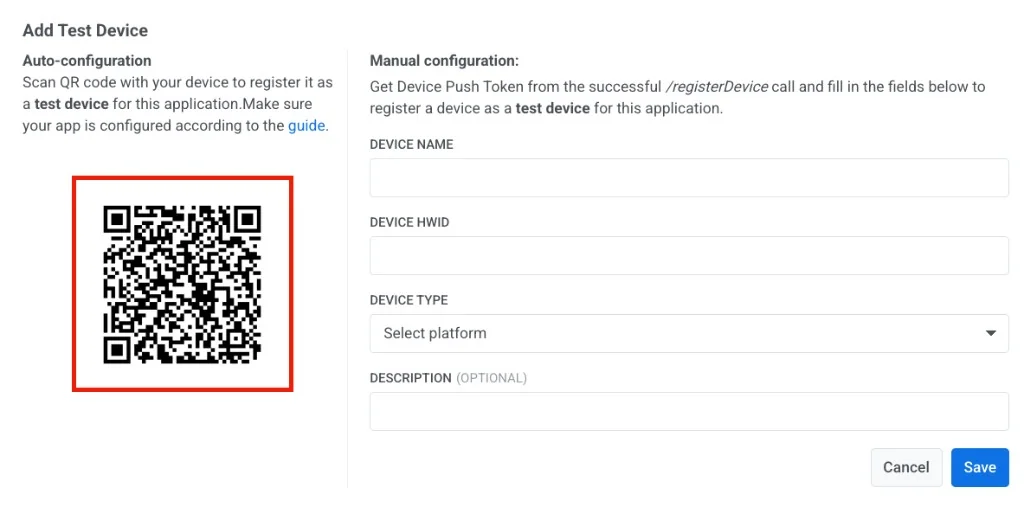
2. Scan the QR code that appears in the popup with any QR scanner app. This opens the deep link that the Pushwoosh SDK parses to register your device as a test device.
## Registering a test device from the app
Independently of the QR code method above, the Pushwoosh SDK can register the current device as a test device on its own: sending the app to the background and bringing it back to the foreground 6 times within 30 seconds. No scanning or manual entry is needed.
To prevent unintentional registrations, this only works while a 1-hour registration window is open.
1. In the [Test Devices section](/product/first-steps/start-with-your-project/test-your-integration/test-devices/#registering-a-test-device-from-the-app), turn on the **Add test devices from the app** toggle. This opens the window for 1 hour.
2. While the window is open, background and foreground the app 6 times within 30 seconds. The device is added to the **Test Devices** list.
## Adding test devices manually
If you prefer to register a test device manually, follow these steps:
1. Obtain the **Hardware ID (HWID)** of the device from a successful [`/registerDevice`](/developer/api-reference/device-api#registerdevice) API call.
2. Fill in the required fields:
* **Device Name**: A descriptive name for the test device (e.g., "John's Android").
* **Device HWID**: The unique hardware ID of the device.
* **Device Type**: Select the platform (e.g., iOS, Android, Web).
* **Description (Optional)**: Add any notes or details about the device for reference.
3. Click **Save** to register the test device.
Once registered, the test device will be available in the **Test Devices** section.
## Registering test devices via API
To provision test devices from a script or CI pipeline instead of the manual form, call [`createTestDevice`](/developer/api-reference/test-devices/#createtestdevice) with the device's [push token](/developer/api-reference/api-identifiers/#push-token) — not the HWID used in the manual form, a different identifier obtained the same way, e.g. from a successful [`/registerDevice`](/developer/api-reference/device-api#registerdevice) call. [`listTestDevices`](/developer/api-reference/test-devices/#listtestdevices) returns what's already registered for an application.
## Implementation
### Android
1. [Integrate Pushwoosh SDK](/developer/pushwoosh-sdk/android-sdk/firebase-integration/integrate-pushwoosh-android-sdk/) with your application.
2. Add **DeepLinkActivity** to your _AndroidManifest.xml_:
```txt
```
Don't forget to replace _YOUR\_PUSHWOOSH\_APP\_ID_ in the xml above with your Pushwoosh App ID.\
Example: _\_
3. Launch the application to subscribe for push notifications.
4. Scan the QR Code in **Test Devices** form using any appropriate QR Code scanner app*. A toast message will appear indicating the status of the test device registration.
\* most of the QR code scanning apps handle such deep links properly, here are just a few of them:
* [QR & Barcode Scanner, Gamma Play](https://play.google.com/store/apps/details?id=com.gamma.scan)
* [QR & Barcode Scanner, Maker, AppSourceHub](https://play.google.com/store/apps/details?id=qrcode.scanner.qrmaker)
### iOS
1. [Integrate Pushwoosh SDK](/developer/pushwoosh-sdk/ios-sdk/setting-up-pushwoosh-ios-sdk/) with your application.
2. Add _pushwoosh-YOUR\_PUSHWOOSH\_APP\_ID_ URL scheme to the _Info.plist_ file:
```xml
CFBundleURLTypesCFBundleTypeRoleEditorCFBundleURLNamecom.pushwoosh.schemeCFBundleURLSchemespushwoosh-YOUR_PUSHWOOSH_APP_ID
```
Don't forget to replace _YOUR\_PUSHWOOSH\_APP\_ID_ in the XML above with your Pushwoosh App ID.\
Example: _pushwoosh-ABCDE-EDCBA_
**Info.plist**
Add `UIApplicationSceneManifest` to your `Info.plist`.
```xml
UIApplicationSceneManifestUIApplicationSupportsMultipleScenesUISceneConfigurationsUIWindowSceneSessionRoleApplicationUISceneConfigurationNameUISceneDelegateClassName$(PRODUCT_MODULE_NAME).SceneDelegate
```
**SceneDelegate**
Add the `SceneDelegate` code as shown in the example below.
```swift
import SwiftUI
@main
struct DemoApp: App {
@UIApplicationDelegateAdaptor(AppDelegate.self) var appDelegate
var body: some Scene {
WindowGroup {
ContentView()
}
}
}
class SceneDelegate: NSObject, UIWindowSceneDelegate {
var window: UIWindow?
func scene(_ scene: UIScene, willConnectTo session: UISceneSession, options connectionOptions: UIScene.ConnectionOptions) {
guard let _ = (scene as? UIWindowScene) else { return }
}
}
class AppDelegate: NSObject, UIApplicationDelegate, PWMessagingDelegate {
func application(_ application: UIApplication, configurationForConnecting connectingSceneSession: UISceneSession, options: UIScene.ConnectionOptions) -> UISceneConfiguration {
let sceneConfig: UISceneConfiguration = UISceneConfiguration(name: nil, sessionRole: connectingSceneSession.role)
sceneConfig.delegateClass = SceneDelegate.self
return sceneConfig
}
}
```
3. Launch the application to subscribe for push notifications.
4. Scan the QR Code in the **Test Devices** form using any appropriate QR Code scanner.
 2. Click the **Create test device** dropdown button in the top-right corner and select **Push**.
 You can add a push test device using one of three methods: Auto-configuration with QR code, registering from the app, or manual configuration.
## Adding test devices automatically
This method is suitable only for iOS and Android devices.
Before your first registration, add deep link handling for test devices to the app — a one-time setup, usually done together with the Pushwoosh SDK integration:
* **For Android**: Add **DeepLinkActivity** to the `AndroidManifest.xml` file.
* **For iOS**: Add the `pushwoosh-YOUR_PUSHWOOSH_APP_ID` URL scheme to the `Info.plist` file.
Follow the instructions for Android and iOS in the [Implementation section.](/developer/first-steps/test-your-integration/test-devices#implementation)
Once that's done, to register a device:
1. In the **Test Devices** section, click **Create test device** and select **Push**.
2. Scan the QR code that appears in the popup with any QR scanner app. This opens the deep link that the Pushwoosh SDK parses to register your device as a test device.
You can add a push test device using one of three methods: Auto-configuration with QR code, registering from the app, or manual configuration.
## Adding test devices automatically
This method is suitable only for iOS and Android devices.
Before your first registration, add deep link handling for test devices to the app — a one-time setup, usually done together with the Pushwoosh SDK integration:
* **For Android**: Add **DeepLinkActivity** to the `AndroidManifest.xml` file.
* **For iOS**: Add the `pushwoosh-YOUR_PUSHWOOSH_APP_ID` URL scheme to the `Info.plist` file.
Follow the instructions for Android and iOS in the [Implementation section.](/developer/first-steps/test-your-integration/test-devices#implementation)
Once that's done, to register a device:
1. In the **Test Devices** section, click **Create test device** and select **Push**.
2. Scan the QR code that appears in the popup with any QR scanner app. This opens the deep link that the Pushwoosh SDK parses to register your device as a test device.
 ## Registering a test device from the app
Independently of the QR code method above, the Pushwoosh SDK can register the current device as a test device on its own: sending the app to the background and bringing it back to the foreground 6 times within 30 seconds. No scanning or manual entry is needed.
To prevent unintentional registrations, this only works while a 1-hour registration window is open.
1. In the [Test Devices section](/product/first-steps/start-with-your-project/test-your-integration/test-devices/#registering-a-test-device-from-the-app), turn on the **Add test devices from the app** toggle. This opens the window for 1 hour.
## Registering a test device from the app
Independently of the QR code method above, the Pushwoosh SDK can register the current device as a test device on its own: sending the app to the background and bringing it back to the foreground 6 times within 30 seconds. No scanning or manual entry is needed.
To prevent unintentional registrations, this only works while a 1-hour registration window is open.
1. In the [Test Devices section](/product/first-steps/start-with-your-project/test-your-integration/test-devices/#registering-a-test-device-from-the-app), turn on the **Add test devices from the app** toggle. This opens the window for 1 hour.
 2. While the window is open, background and foreground the app 6 times within 30 seconds. The device is added to the **Test Devices** list.
## Adding test devices manually
If you prefer to register a test device manually, follow these steps:
1. Obtain the **Hardware ID (HWID)** of the device from a successful [`/registerDevice`](/developer/api-reference/device-api#registerdevice) API call.
2. Fill in the required fields:
* **Device Name**: A descriptive name for the test device (e.g., "John's Android").
* **Device HWID**: The unique hardware ID of the device.
* **Device Type**: Select the platform (e.g., iOS, Android, Web).
* **Description (Optional)**: Add any notes or details about the device for reference.
3. Click **Save** to register the test device.
Once registered, the test device will be available in the **Test Devices** section.
## Registering test devices via API
To provision test devices from a script or CI pipeline instead of the manual form, call [`createTestDevice`](/developer/api-reference/test-devices/#createtestdevice) with the device's [push token](/developer/api-reference/api-identifiers/#push-token) — not the HWID used in the manual form, a different identifier obtained the same way, e.g. from a successful [`/registerDevice`](/developer/api-reference/device-api#registerdevice) call. [`listTestDevices`](/developer/api-reference/test-devices/#listtestdevices) returns what's already registered for an application.
## Implementation
### Android
1. [Integrate Pushwoosh SDK](/developer/pushwoosh-sdk/android-sdk/firebase-integration/integrate-pushwoosh-android-sdk/) with your application.
2. Add **DeepLinkActivity** to your _AndroidManifest.xml_:
```txt
2. While the window is open, background and foreground the app 6 times within 30 seconds. The device is added to the **Test Devices** list.
## Adding test devices manually
If you prefer to register a test device manually, follow these steps:
1. Obtain the **Hardware ID (HWID)** of the device from a successful [`/registerDevice`](/developer/api-reference/device-api#registerdevice) API call.
2. Fill in the required fields:
* **Device Name**: A descriptive name for the test device (e.g., "John's Android").
* **Device HWID**: The unique hardware ID of the device.
* **Device Type**: Select the platform (e.g., iOS, Android, Web).
* **Description (Optional)**: Add any notes or details about the device for reference.
3. Click **Save** to register the test device.
Once registered, the test device will be available in the **Test Devices** section.
## Registering test devices via API
To provision test devices from a script or CI pipeline instead of the manual form, call [`createTestDevice`](/developer/api-reference/test-devices/#createtestdevice) with the device's [push token](/developer/api-reference/api-identifiers/#push-token) — not the HWID used in the manual form, a different identifier obtained the same way, e.g. from a successful [`/registerDevice`](/developer/api-reference/device-api#registerdevice) call. [`listTestDevices`](/developer/api-reference/test-devices/#listtestdevices) returns what's already registered for an application.
## Implementation
### Android
1. [Integrate Pushwoosh SDK](/developer/pushwoosh-sdk/android-sdk/firebase-integration/integrate-pushwoosh-android-sdk/) with your application.
2. Add **DeepLinkActivity** to your _AndroidManifest.xml_:
```txt