# Web push configuration
To start sending web push notifications with Pushwoosh, you need to configure your web push platform and enable the subscription prompt shown to users.
To begin configuration, go to **Settings > Platform Configuration > Web Push Notifications** and click **Configure**.
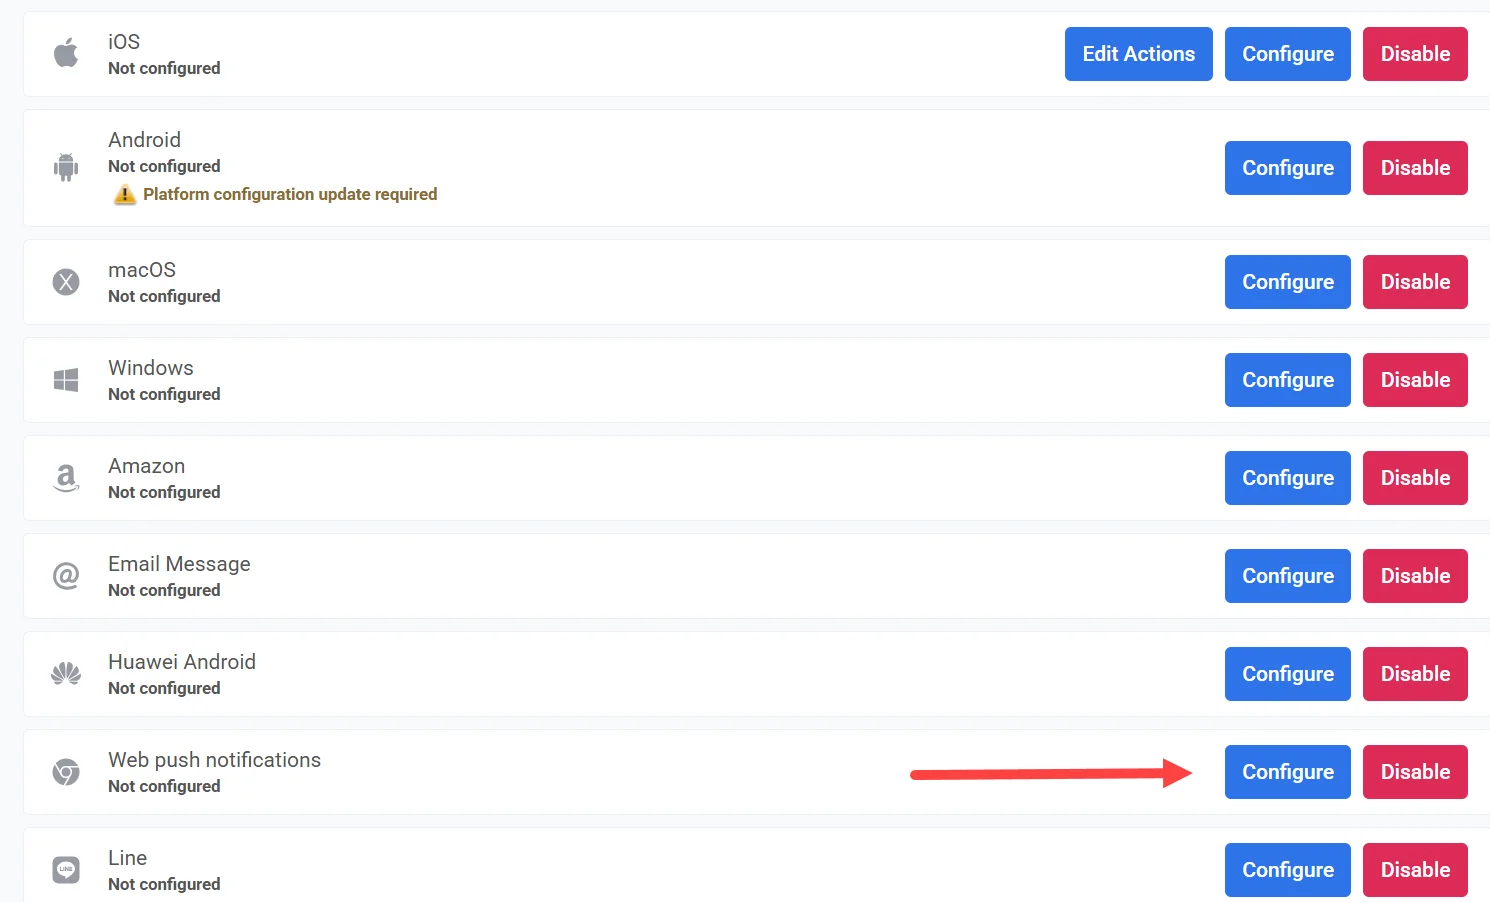
## Configure web push for all browsers (except older Safari versions)
This configuration applies to all modern browsers, including the latest versions of Safari, which now support web push notifications natively.
**Note:** Older Safari versions (macOS 10.14–12) require a separate setup. You can configure that in a dedicated section. Learn more
To begin the setup, click **Configure** under **All browsers configuration**.
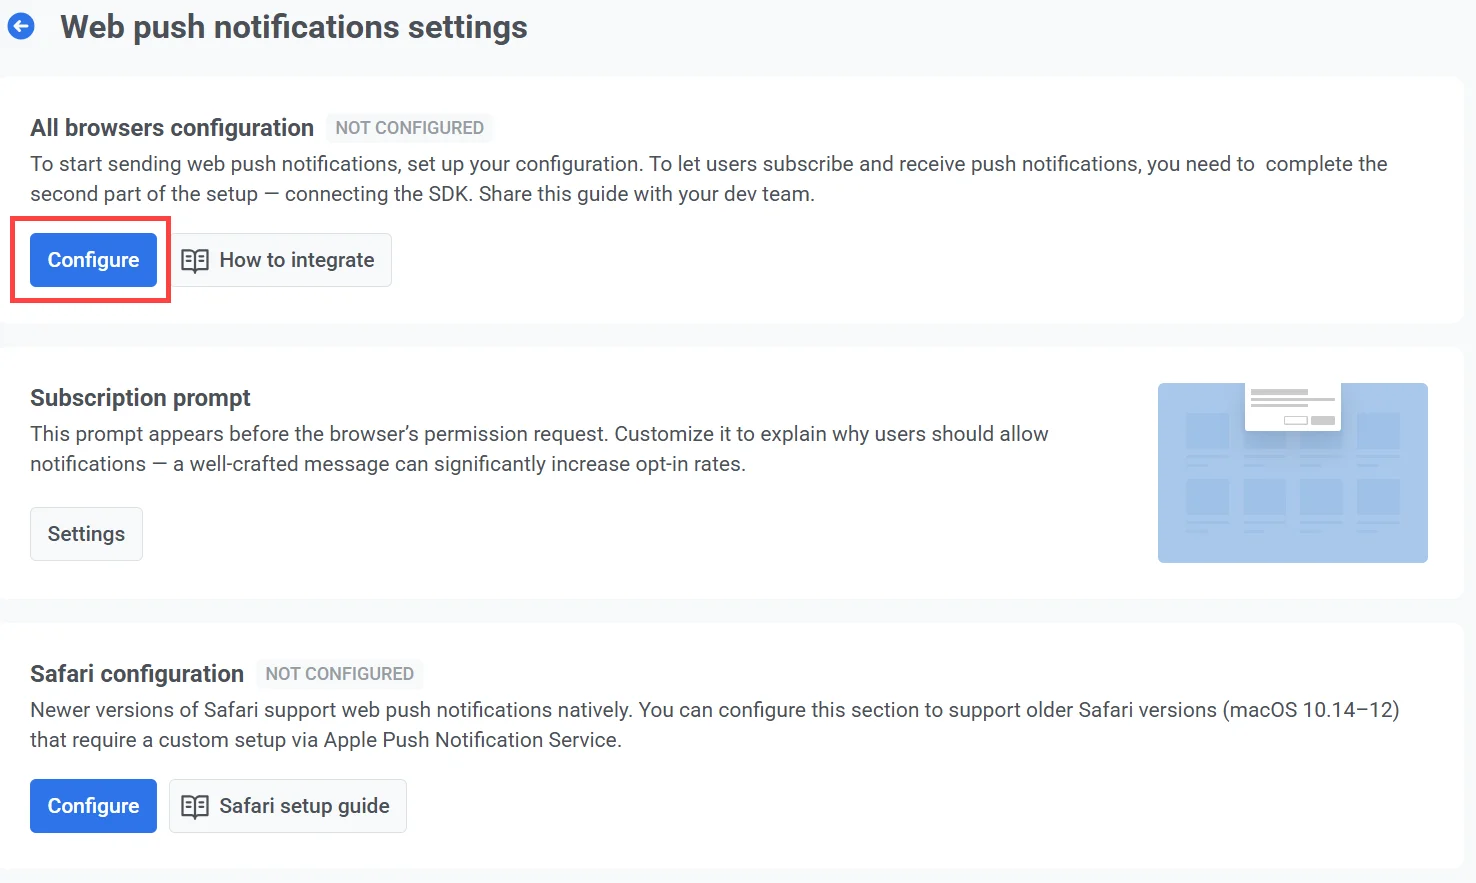
In the configuration window, choose one of the following options:
* **Create a new push configuration**
Recommended if you haven't previously set up web push notifications through another service. Pushwoosh will automatically generate a new VAPID key pair.
* **Use existing configuration**
Choose this option if you already have VAPID keys, for example, from Firebase, and want to keep using them without asking users to subscribe again.
### Create a new push configuration
Choose **Create a new push configuration** if you haven’t previously set up web push notifications with another service. Pushwoosh will automatically generate the required VAPID (Voluntary Application Server Identification) keys for you.
What are VAPID keys?
VAPID keys are a public-private key pair used in the Web Push Protocol to authenticate the application server when sending push notifications to web browsers. The **public key** is shared with the browser when a user subscribes to notifications. The **private key** stays on your server and is used to securely sign each message you send.
Click **Configure** to generate and apply the keys.
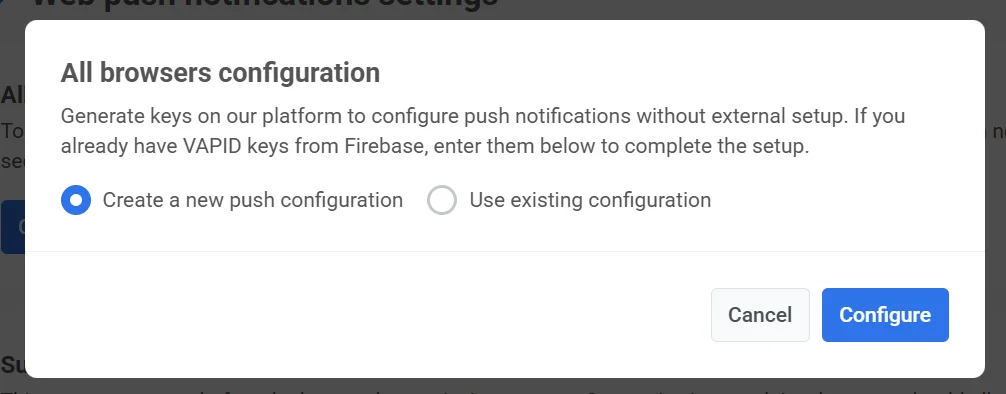
Once created, Pushwoosh will automatically use these keys in the SDK configuration. [Learn more about integrating the Web Push SDK](/developer/pushwoosh-sdk/web-push-notifications/web-push-sdk-30/)
### Use existing configuration
If you already have VAPID keys (such as those generated through Firebase), you can reuse them to set up web push notifications in Pushwoosh.
For this:
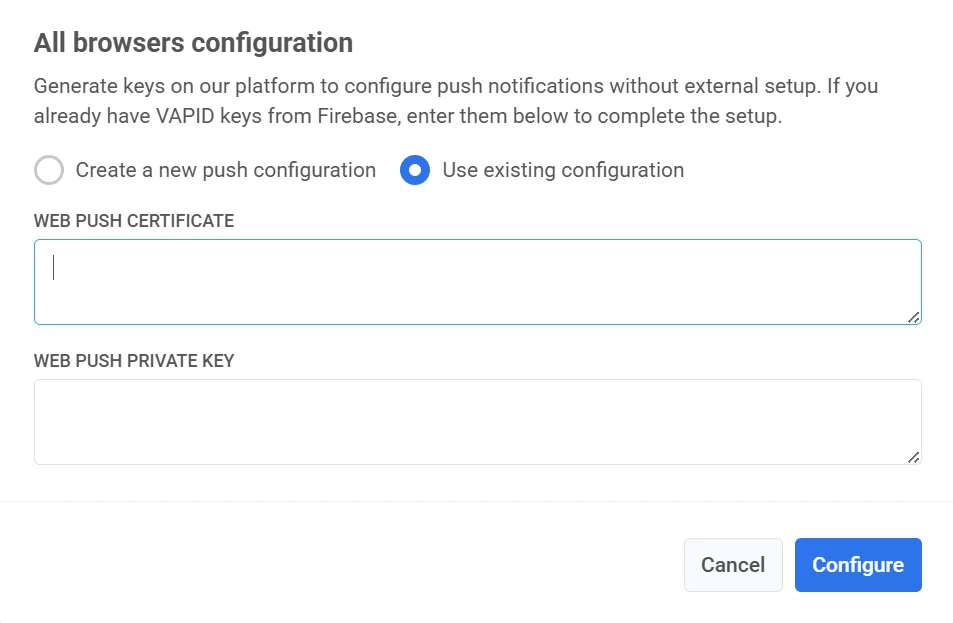
1. Select **Use existing configuration**.
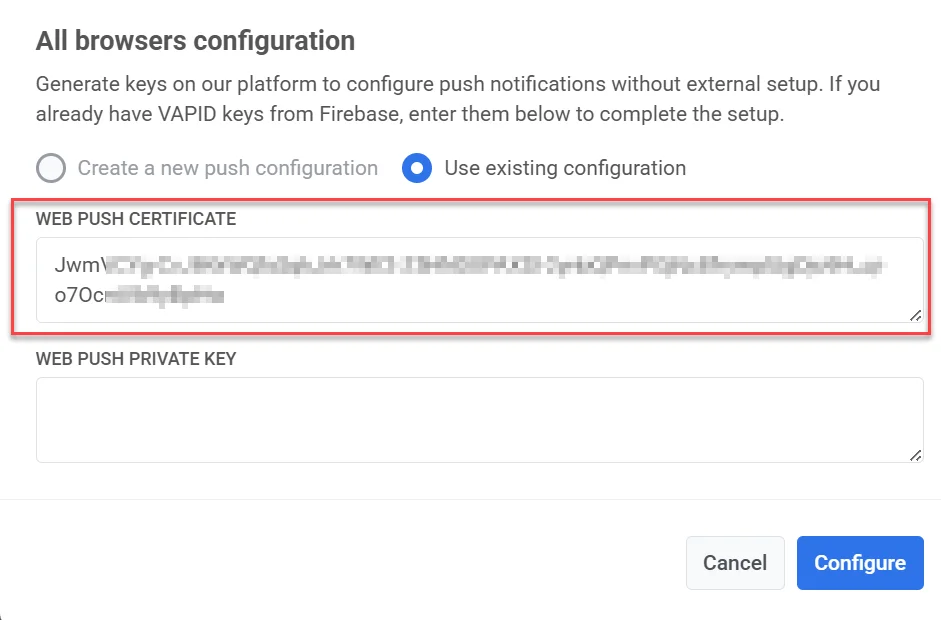
2. In the **Web Push Certificate** field, enter your **VAPID public key**.
3. In the **Web Push Private Key** field, enter your **VAPID private key**.
4. Click **Configure** to save and apply the settings.
#### How to find VAPID keys in Firebase
If you're migrating from Firebase and need to reuse your existing VAPID keys, follow these steps to find them.
##### Web Push certificate
1. In **Firebase**, navigate to **Project Settings → Cloud Messaging**.
2. Scroll down to the **Web Configuration** section and copy the existing key pair.
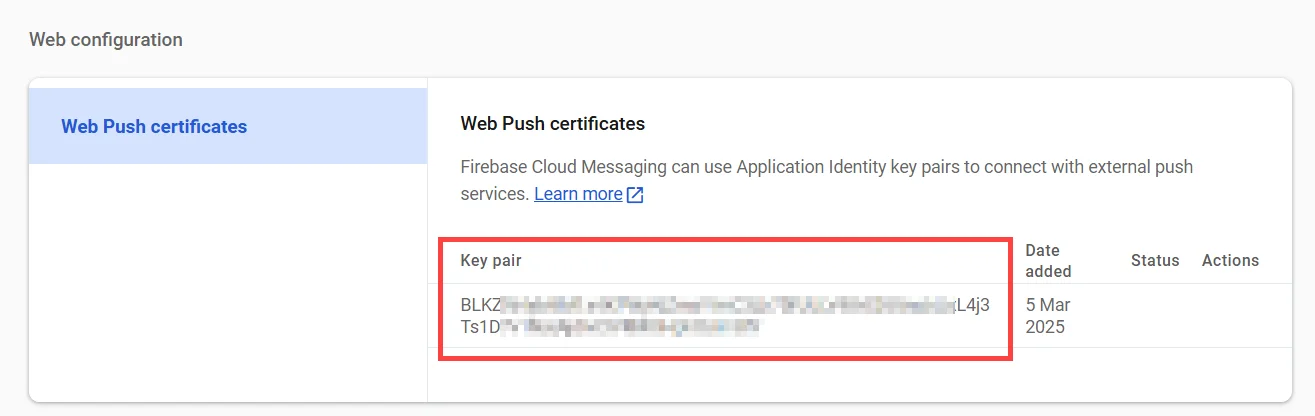
3. Paste it into the **Web Push Certificate** field in Pushwoosh web configuration form.
##### Web Push private key
1. In **Firebase Console**, go to **Project Settings → Cloud Messaging → Web Configuration**.
2. Click the **three-dot menu** under **Actions** next to the key pair and select **Show private key**. This key is essential for ensuring that Web Push notifications function correctly.
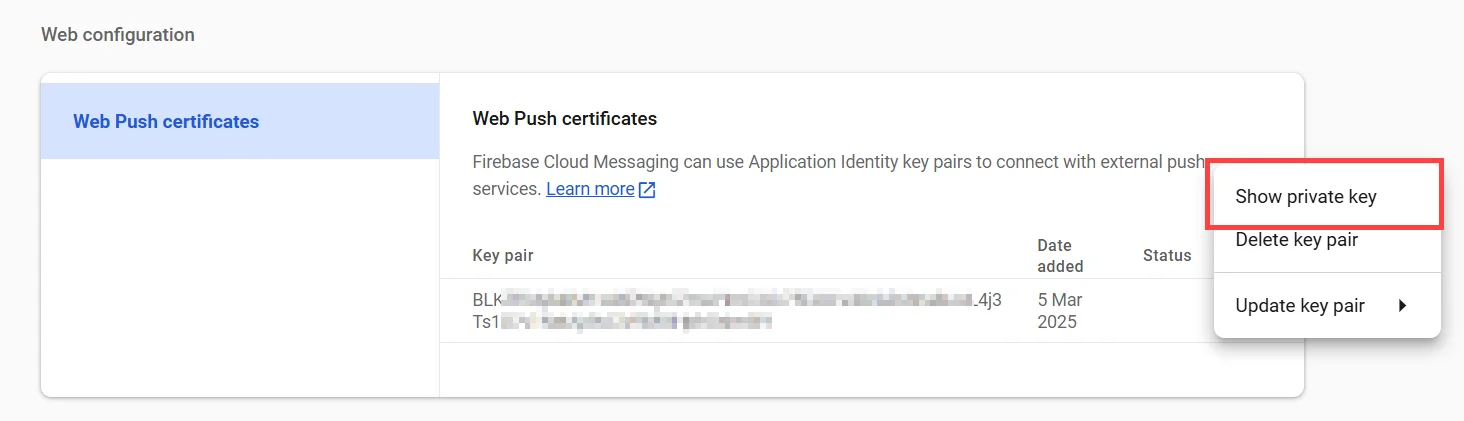
3. Copy the displayed key to your clipboard.
4. In the **Pushwoosh Web Configuration** form, paste it into the **Web Push Private Key** field.
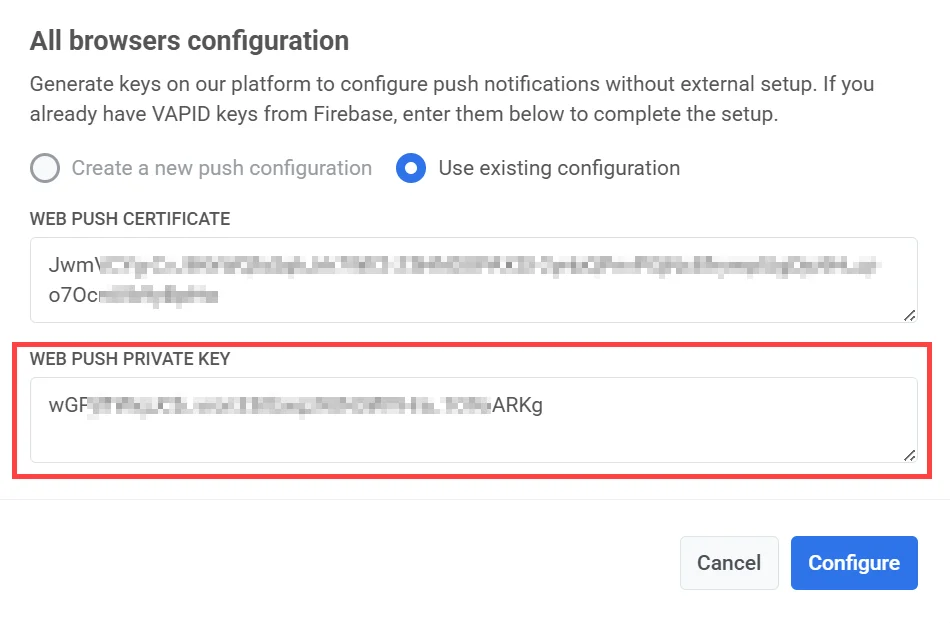
5. Click **Apply** to save your changes.
### Reconfigure web push configuration
If you’ve already set up web push notifications but need to update your credentials (like replacing your VAPID keys), here’s how to do it:
1. Click **Reconfigure** under **All browsers configuration**.
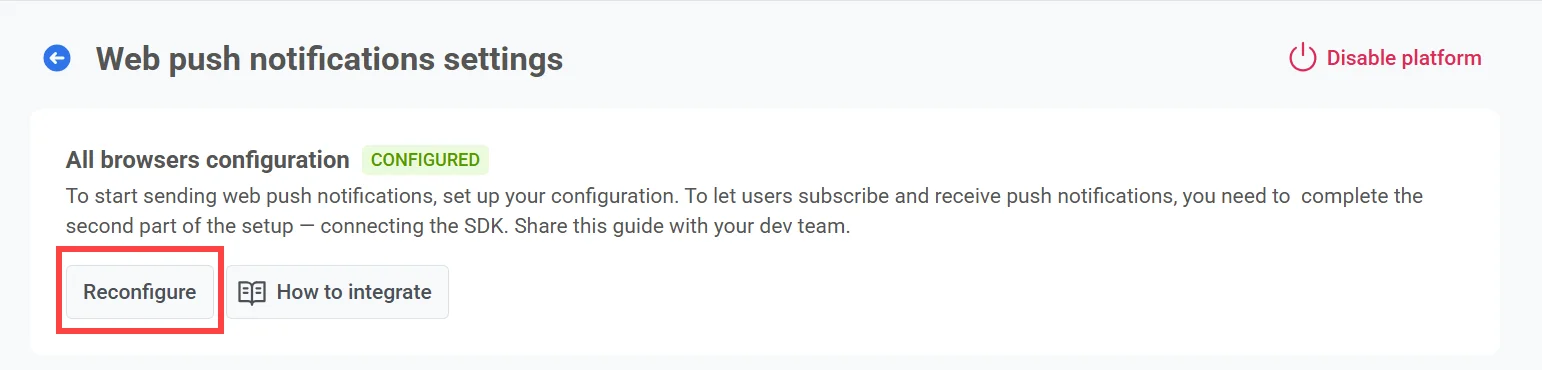
2. In the popup that appears, enter your new VAPID keys:
* **Web Push Certificate**: your new public VAPID key
* **Web Push Private Key**: your new private VAPID key
3. Click **Configure** to save the changes.
### Configure the Subscription prompt
To send push notifications, users must explicitly grant permission through the browser’s system-level prompt. Without this permission, notifications cannot be delivered.
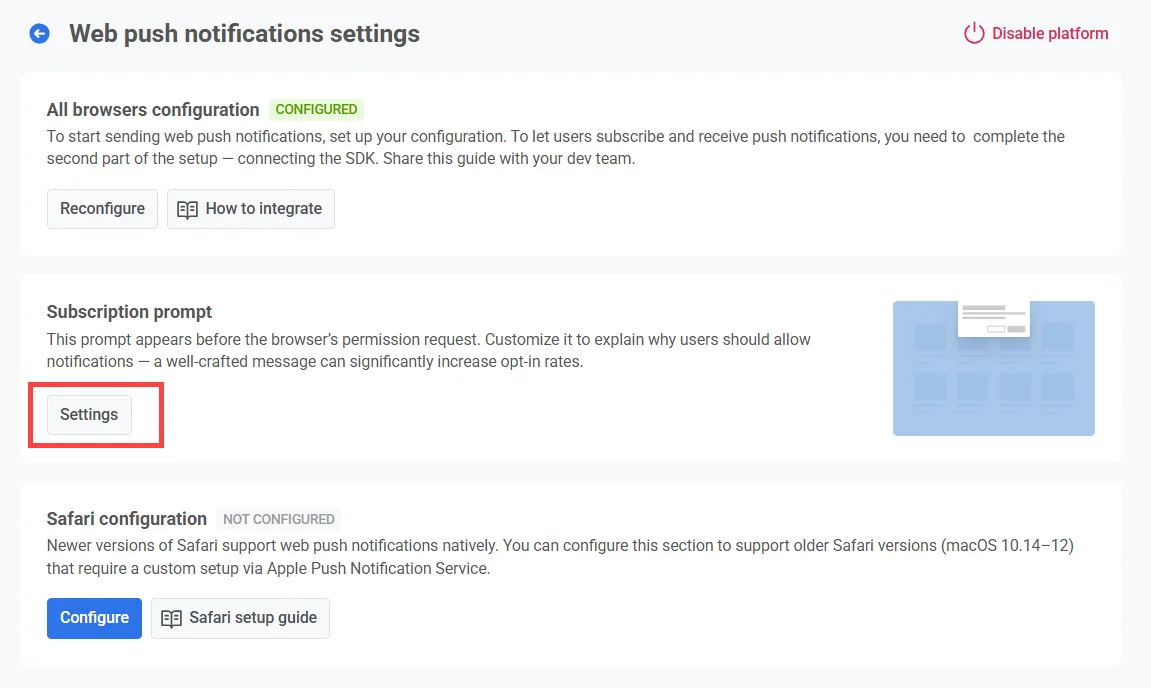
Due to recent Chrome and Firefox policy changes, the native permission pop-up can only appear after the user interacts with the page (e.g., by clicking a button). To meet this requirement, Pushwoosh displays a [Subscription Prompt widget](/developer/guides/messaging-channels/subscription-prompt/) by default. This widget encourages users to opt in and, upon agreement, triggers the native browser prompt.
To customize the prompt text and appearance, click **Settings**.
#### Prompt types
There are two types of subscription prompts available:
* **Default widget**
Provided by Pushwoosh and displayed automatically. [Learn how to customize the default widget](/developer/guides/messaging-channels/subscription-prompt/default-widget/).
* **Custom widget**
Use your own widget design. [Learn more](/developer/guides/messaging-channels/subscription-prompt/custom-subscription-widget/)
> **Note:** Due to platform limitations, changes to the widget may take up to 30 minutes to appear. If changes are not reflected, contact the Pushwoosh Support team.
### Safari Configuration (macOS 10.14–12)
To support push notifications on older versions of Safari (macOS 10.14–12), you need to complete a separate configuration process using your Apple Developer credentials. This step is only required for these older versions as newer Safari versions (macOS Ventura and later) support the standard web push setup included in the [All Browsers Configuration](#configure-web-push-for-all-browsers-except-older-safari-versions).
#### Get the required credentials from Apple
1. Go to [Certificates, Identifiers & Profiles section](https://developer.apple.com/account/overview.action) of Apple Developer Portal.
2. Add new certificate.
3. Choose **Website Push ID Certificate** type and click **Continue**.
4. Select the **Website Push ID** - your unique reverse-domain string, such as _web.com.example.domain_ (must start with _web._).
5. Upload a **Certificate Signing Request**. To learn more on creating Certificate Signing Requests, please refer to the [Developer Account Help article](https://developer.apple.com/help/account/create-certificates/create-a-certificate-signing-request).
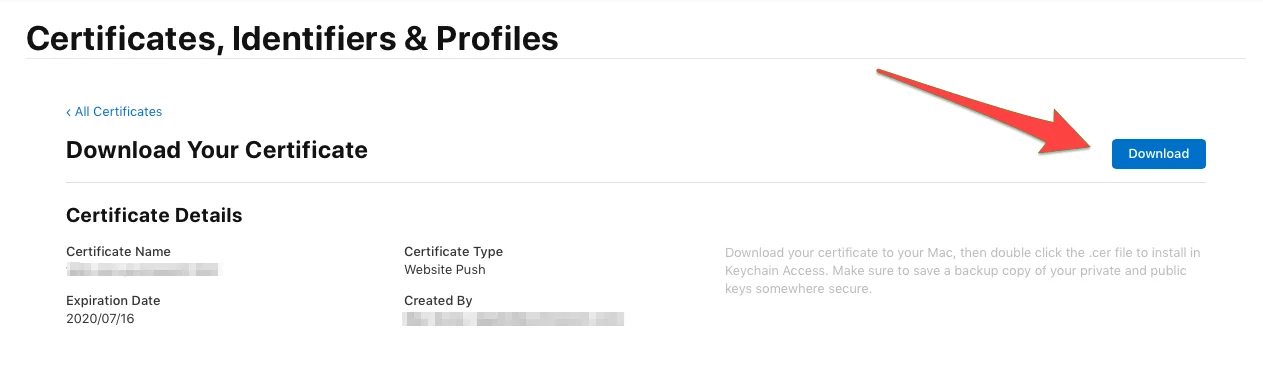
6. Afterwards, download the push notification certificate.
#### Configure Safari in Pushwoosh
1. Click **Configure** under **Safari Configuration**.
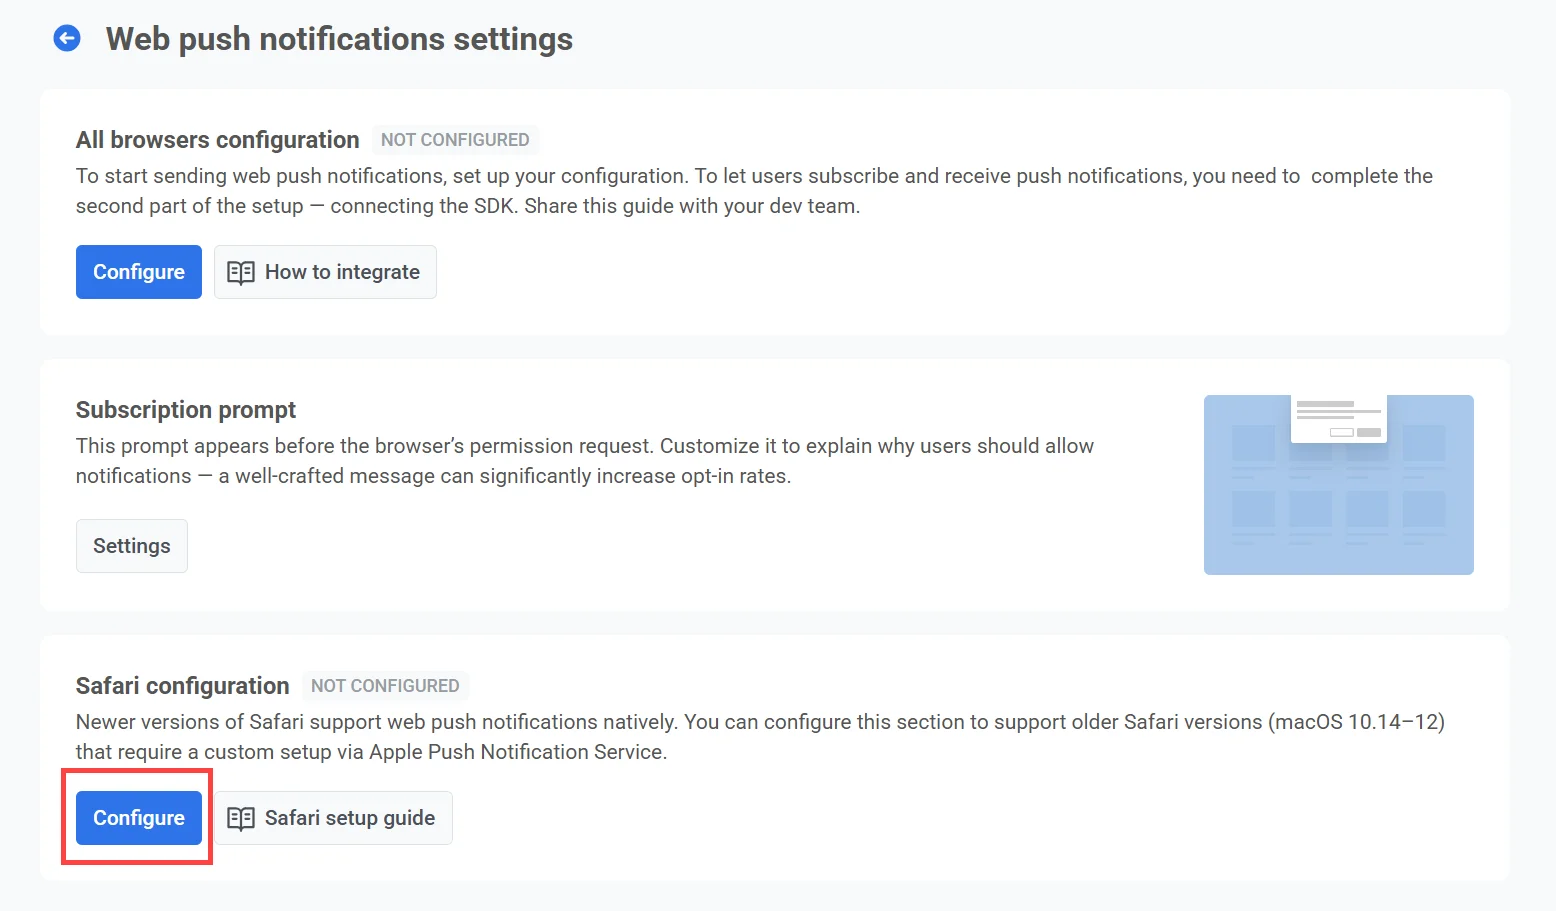
2. Fill in the following fields in the configuration form:
| | |
| ------------------------ | ---------------------------------------------------------------------------------------------------------------------- |
| **Website name** | The name of your website that appears in the push prompt. |
| **Allowed domains** | List of domains allowed to request notification permission (one per line). |
| **URL template** | URL opened when a user clicks the notification. Supports placeholders like `%@`to insert dynamic values. Example: `https://yourwebsite.com/%@` |
| **Website icon** | Upload a square PNG image (256×256 px). Pushwoosh resizes it automatically for different interfaces. |
| **Key file** | Upload the `.p12` certificate exported from your Apple Developer account. |
| **Private key password** | Password used when exporting the `.p12` file. |
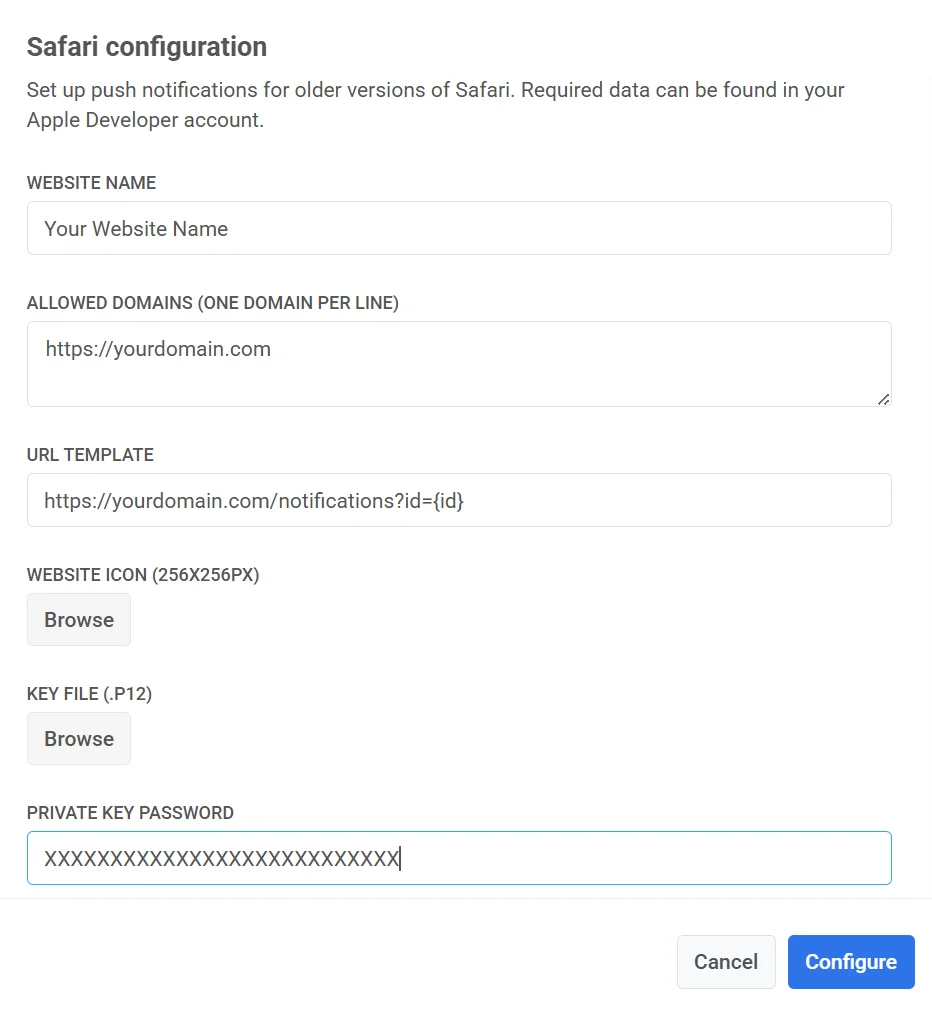
3. Click **Configure** to save your changes.
Pushwoosh will automatically generate the push package with the icon set, website JSON dictionary, and the manifest file that Safari requests from the server. You can download it whenever you need.
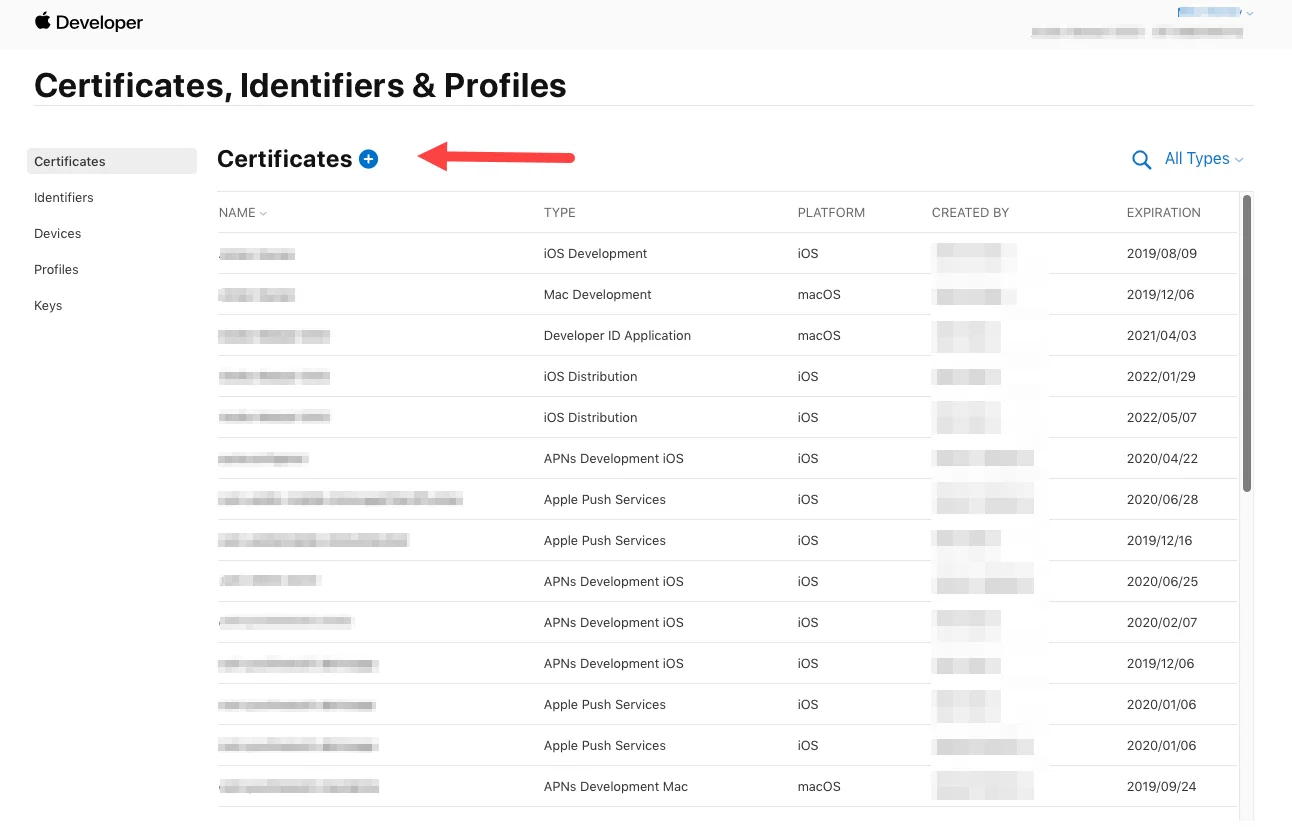 3. Choose **Website Push ID Certificate** type and click **Continue**.
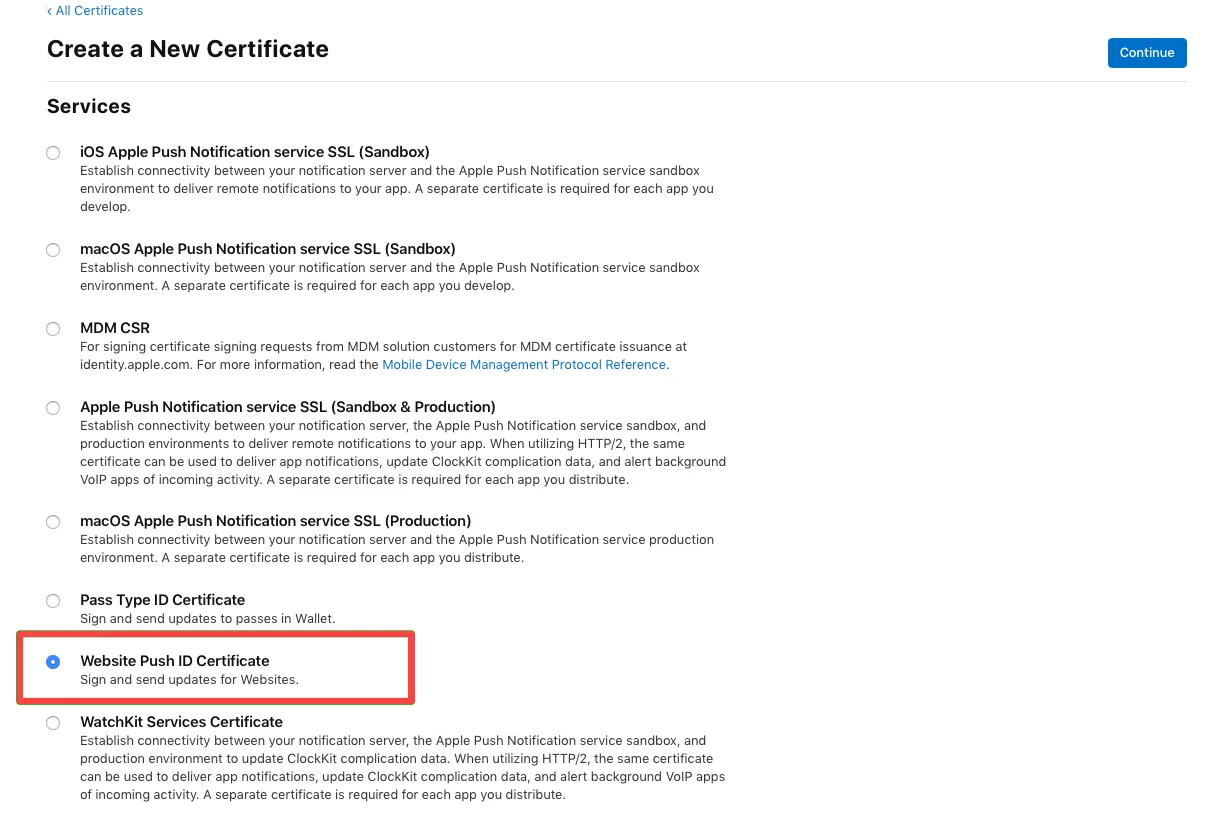 4. Select the **Website Push ID** - your unique reverse-domain string, such as _web.com.example.domain_ (must start with _web._).
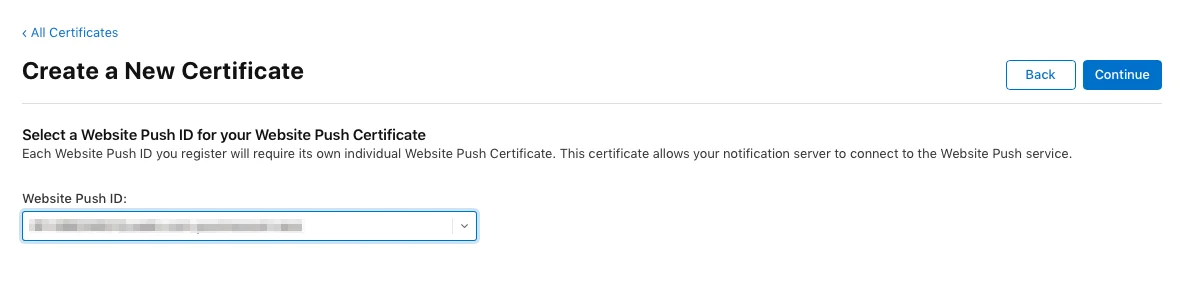 5. Upload a **Certificate Signing Request**. To learn more on creating Certificate Signing Requests, please refer to the [Developer Account Help article](https://developer.apple.com/help/account/create-certificates/create-a-certificate-signing-request).
6. Afterwards, download the push notification certificate.
5. Upload a **Certificate Signing Request**. To learn more on creating Certificate Signing Requests, please refer to the [Developer Account Help article](https://developer.apple.com/help/account/create-certificates/create-a-certificate-signing-request).
6. Afterwards, download the push notification certificate.
 #### Configure Safari in Pushwoosh
1. Click **Configure** under **Safari Configuration**.

2. Fill in the following fields in the configuration form:
| | |
| ------------------------ | ---------------------------------------------------------------------------------------------------------------------- |
| **Website name** | The name of your website that appears in the push prompt. |
| **Allowed domains** | List of domains allowed to request notification permission (one per line). |
| **URL template** | URL opened when a user clicks the notification. Supports placeholders like `%@`to insert dynamic values. Example: `https://yourwebsite.com/%@` |
| **Website icon** | Upload a square PNG image (256×256 px). Pushwoosh resizes it automatically for different interfaces. |
| **Key file** | Upload the `.p12` certificate exported from your Apple Developer account. |
| **Private key password** | Password used when exporting the `.p12` file. |

3. Click **Configure** to save your changes.
Pushwoosh will automatically generate the push package with the icon set, website JSON dictionary, and the manifest file that Safari requests from the server. You can download it whenever you need.
#### Configure Safari in Pushwoosh
1. Click **Configure** under **Safari Configuration**.

2. Fill in the following fields in the configuration form:
| | |
| ------------------------ | ---------------------------------------------------------------------------------------------------------------------- |
| **Website name** | The name of your website that appears in the push prompt. |
| **Allowed domains** | List of domains allowed to request notification permission (one per line). |
| **URL template** | URL opened when a user clicks the notification. Supports placeholders like `%@`to insert dynamic values. Example: `https://yourwebsite.com/%@` |
| **Website icon** | Upload a square PNG image (256×256 px). Pushwoosh resizes it automatically for different interfaces. |
| **Key file** | Upload the `.p12` certificate exported from your Apple Developer account. |
| **Private key password** | Password used when exporting the `.p12` file. |

3. Click **Configure** to save your changes.
Pushwoosh will automatically generate the push package with the icon set, website JSON dictionary, and the manifest file that Safari requests from the server. You can download it whenever you need.