# macOS configuration
macOS apps receive push notifications through Apple Push Notification service (APNs), the same delivery channel iOS uses. Configure the macOS platform in Pushwoosh with either a certificate-based (.p12) or a token-based (.p8) connection to APNs.
## Certificate-based configuration
### Create the .p12 certificate
The Keychain, Apple Developer Portal, and export steps match the iOS certificate flow. Follow that guide and use your **macOS** App ID when Apple asks you to choose one:
1. [Generate a certificate request file](/developer/first-steps/connect-messaging-services/ios-configuration/ios-platform-configuration/#generating-a-certificate-request-file) in **Keychain Access**.
2. [Create an APNs certificate in Apple Developer Portal](/developer/first-steps/connect-messaging-services/ios-configuration/ios-platform-configuration/#creating-an-apns-certificate-in-apple-developer-portal). When you select an **App ID**, pick the ID for your macOS app, not the iOS one.
3. [Export the private key as .p12](/developer/first-steps/connect-messaging-services/ios-configuration/ios-platform-configuration/#exporting-the-private-key-p12) from **Keychain Access**.
You will need the .p12 file and the private key password in the next section.
### Configure the macOS platform in Pushwoosh
1. In your Pushwoosh project, go to **Settings → Configure Platforms**.
2. Click **Connect** next to **macOS** in the **Desktop platforms** section.
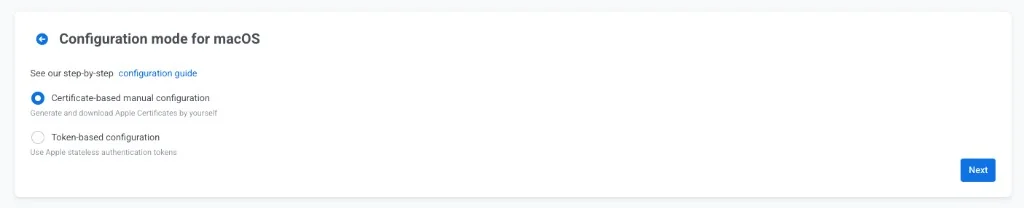
3. In **Configuration mode for macOS**, select **Certificate-based manual configuration**.
4. Click **Next**.
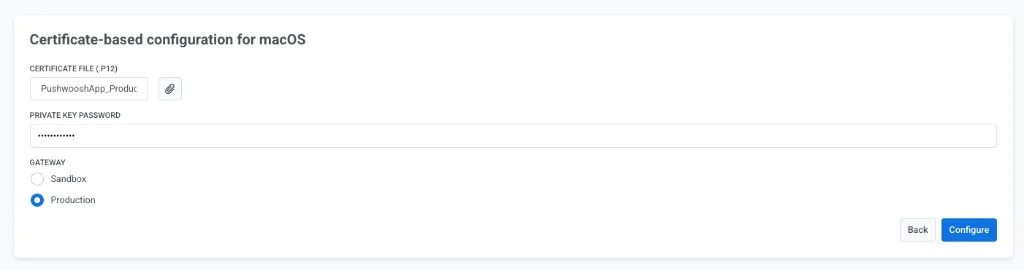
5. On **Certificate-based configuration for macOS**, fill in the form:
* **Certificate file (.p12):** upload the .p12 file you exported from Keychain Access.
* **Private key password:** enter the password you set when exporting the .p12 file.
* **Gateway:** select **Sandbox** for development or **Production** for live apps.
6. Click **Configure** to complete the setup.
## Token-based configuration
You can configure the macOS platform with token-based authentication for faster communication with APNs.
### Obtain a signing key from Apple
Creating the APNs key is the same as for iOS. Follow [Obtain an Encryption Key and Key ID from Apple](/developer/first-steps/connect-messaging-services/ios-configuration/ios-token-based-configuration/#obtain-an-encryption-key-and-key-id-from-apple) in the iOS token-based guide.
You will need the **Key ID** and the **.p8** file in the next section. You can reuse the same APNs key you already use for iOS if you have one.
### Configure the macOS platform in Pushwoosh
1. In your Pushwoosh project, go to **Settings → Configure Platforms**.
2. Click **Connect** next to **macOS** in the **Desktop platforms** section.
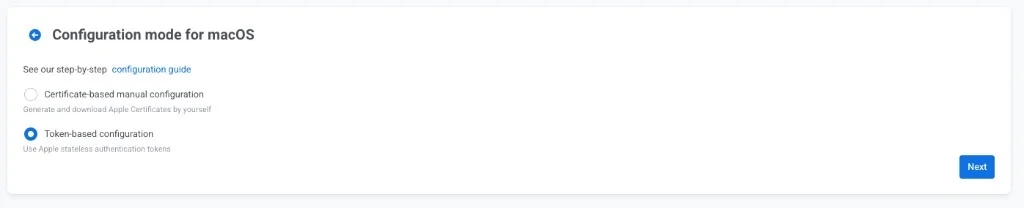
3. In **Configuration mode for macOS**, select **Token-based configuration**.
4. Click **Next**.
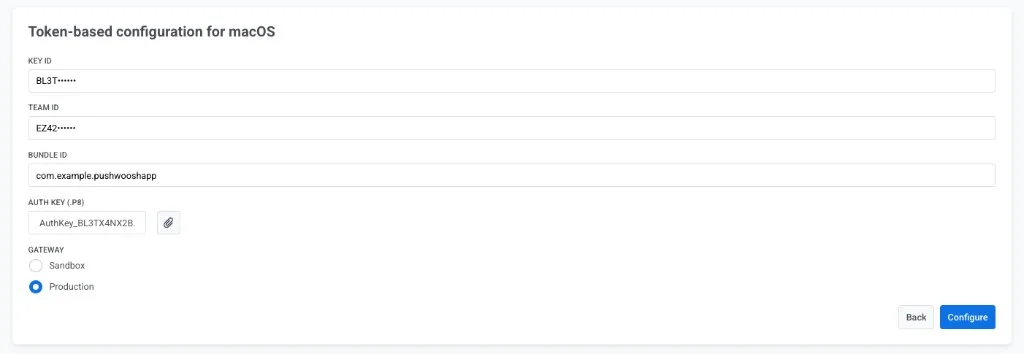
5. On **Token-based configuration for macOS**, fill in the form:
* **Key ID:** paste the 10-character Key ID from Apple.
* **Team ID:** enter your Apple Developer Team ID from the **Membership** section of your Apple Developer account.
* **Bundle ID:** enter the Bundle ID of your macOS app from **Certificates, Identifiers & Profiles**.
* **Auth Key (.p8):** upload the .p8 signing key file you downloaded from Apple.
* **Gateway:** select **Sandbox** for development or **Production** for live apps.
6. Click **Configure** to complete the setup.
 3. In **Configuration mode for macOS**, select **Certificate-based manual configuration**.
4. Click **Next**.
3. In **Configuration mode for macOS**, select **Certificate-based manual configuration**.
4. Click **Next**.
 5. On **Certificate-based configuration for macOS**, fill in the form:
* **Certificate file (.p12):** upload the .p12 file you exported from Keychain Access.
* **Private key password:** enter the password you set when exporting the .p12 file.
* **Gateway:** select **Sandbox** for development or **Production** for live apps.
5. On **Certificate-based configuration for macOS**, fill in the form:
* **Certificate file (.p12):** upload the .p12 file you exported from Keychain Access.
* **Private key password:** enter the password you set when exporting the .p12 file.
* **Gateway:** select **Sandbox** for development or **Production** for live apps.
 6. Click **Configure** to complete the setup.
## Token-based configuration
You can configure the macOS platform with token-based authentication for faster communication with APNs.
### Obtain a signing key from Apple
Creating the APNs key is the same as for iOS. Follow [Obtain an Encryption Key and Key ID from Apple](/developer/first-steps/connect-messaging-services/ios-configuration/ios-token-based-configuration/#obtain-an-encryption-key-and-key-id-from-apple) in the iOS token-based guide.
You will need the **Key ID** and the **.p8** file in the next section. You can reuse the same APNs key you already use for iOS if you have one.
### Configure the macOS platform in Pushwoosh
1. In your Pushwoosh project, go to **Settings → Configure Platforms**.
2. Click **Connect** next to **macOS** in the **Desktop platforms** section.
6. Click **Configure** to complete the setup.
## Token-based configuration
You can configure the macOS platform with token-based authentication for faster communication with APNs.
### Obtain a signing key from Apple
Creating the APNs key is the same as for iOS. Follow [Obtain an Encryption Key and Key ID from Apple](/developer/first-steps/connect-messaging-services/ios-configuration/ios-token-based-configuration/#obtain-an-encryption-key-and-key-id-from-apple) in the iOS token-based guide.
You will need the **Key ID** and the **.p8** file in the next section. You can reuse the same APNs key you already use for iOS if you have one.
### Configure the macOS platform in Pushwoosh
1. In your Pushwoosh project, go to **Settings → Configure Platforms**.
2. Click **Connect** next to **macOS** in the **Desktop platforms** section.
 5. On **Token-based configuration for macOS**, fill in the form:
* **Key ID:** paste the 10-character Key ID from Apple.
* **Team ID:** enter your Apple Developer Team ID from the **Membership** section of your Apple Developer account.
* **Bundle ID:** enter the Bundle ID of your macOS app from **Certificates, Identifiers & Profiles**.
* **Auth Key (.p8):** upload the .p8 signing key file you downloaded from Apple.
* **Gateway:** select **Sandbox** for development or **Production** for live apps.
5. On **Token-based configuration for macOS**, fill in the form:
* **Key ID:** paste the 10-character Key ID from Apple.
* **Team ID:** enter your Apple Developer Team ID from the **Membership** section of your Apple Developer account.
* **Bundle ID:** enter the Bundle ID of your macOS app from **Certificates, Identifiers & Profiles**.
* **Auth Key (.p8):** upload the .p8 signing key file you downloaded from Apple.
* **Gateway:** select **Sandbox** for development or **Production** for live apps.
 6. Click **Configure** to complete the setup.