# Google Wallet pass configuration for Android
Configure your **Google Pay & Wallet Console Issuer ID** and a **Google Cloud service account key** so Pushwoosh can issue and update [Google Wallet passes](/product/messaging-channels/google-wallet-passes/) for your app. This is a one-time setup. Once a valid configuration is in place, the Google Wallet [pass builder](/product/messaging-channels/google-wallet-passes/pass-builder/) unlocks for the application.
## Create the issuer account
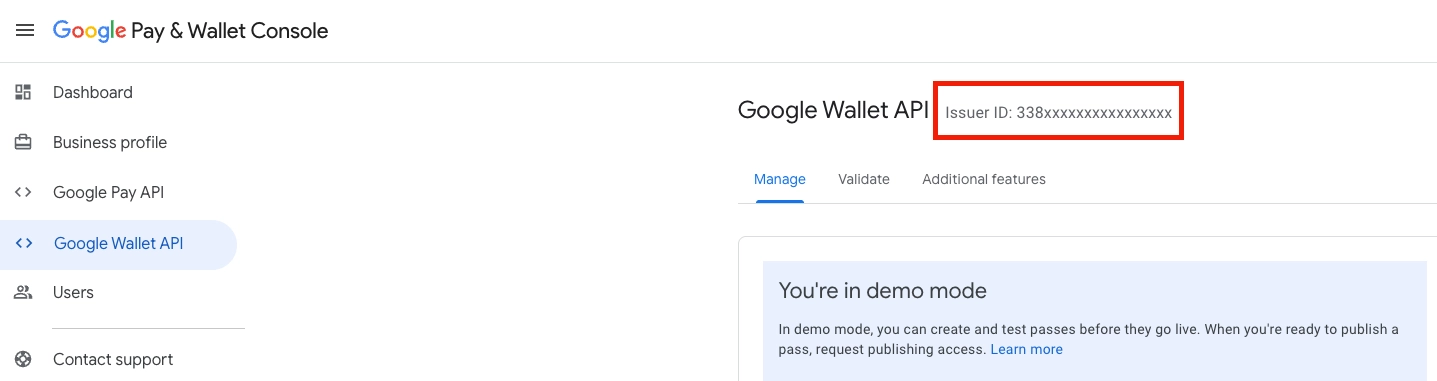
**Sign up for an issuer account.** In the [Google Pay & Wallet Console](https://pay.google.com/business/console), complete the Google Wallet API onboarding to get your **Issuer ID** (a numeric value). You can start in demo mode and request production access later.
## Create the service account key
1. **Create (or pick) a Google Cloud project** and enable the **Google Wallet API** for it. Use the same Google Cloud project that is linked to your issuer in the Google Pay & Wallet Console during onboarding. See [Google's getting started guide](https://developers.google.com/wallet/generic/getting-started/onboarding-guide).
2. **Create a service account** in that project and download its **JSON key**. Follow [Google's guide on generating REST API credentials](https://developers.google.com/wallet/generic/getting-started/auth/rest). The key file must be of type `service_account` and contain a `client_email` and a PEM private key.
3. **Copy the service account's email address** from the JSON key (the `client_email` field). You'll need it in the next step.
### Grant the service account access
In the [Google Pay & Wallet Console](https://pay.google.com/business/console):
1. Open **Users** in the left sidebar.
2. Click **Invite a user**.
3. Paste the service account's email address (from step 3 above).
4. Set **Access level** to **Developer**.
5. Click **Invite**.
Without this step, Pushwoosh cannot create or update Google Wallet passes.
## Configure Google Wallet in the Control Panel
1. Go to **Settings → Configure platforms** in the Control Panel.
2. Under **MOBILE PLATFORMS**, find **Android** and open the **Google Wallet** setup.
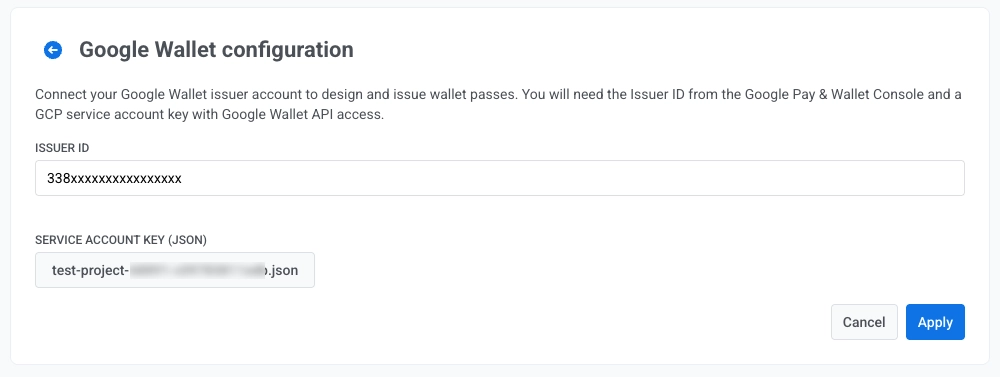
3. In **Issuer ID**, enter the numeric Issuer ID from the Google Pay & Wallet Console.
4. Next to **Service account key (JSON)**, click **Browse...** and select your service account `.json` key file.
5. Click **Apply**.
## Next steps
Once you click **Apply**, you can design passes in the pass builder.
## Manage passes via API
Use the Google Wallet API to create passes, issue save links, and send them to users.
 ## Create the service account key
1. **Create (or pick) a Google Cloud project** and enable the **Google Wallet API** for it. Use the same Google Cloud project that is linked to your issuer in the Google Pay & Wallet Console during onboarding. See [Google's getting started guide](https://developers.google.com/wallet/generic/getting-started/onboarding-guide).
2. **Create a service account** in that project and download its **JSON key**. Follow [Google's guide on generating REST API credentials](https://developers.google.com/wallet/generic/getting-started/auth/rest). The key file must be of type `service_account` and contain a `client_email` and a PEM private key.
3. **Copy the service account's email address** from the JSON key (the `client_email` field). You'll need it in the next step.
### Grant the service account access
In the [Google Pay & Wallet Console](https://pay.google.com/business/console):
1. Open **Users** in the left sidebar.
2. Click **Invite a user**.
3. Paste the service account's email address (from step 3 above).
4. Set **Access level** to **Developer**.
5. Click **Invite**.
Without this step, Pushwoosh cannot create or update Google Wallet passes.
## Configure Google Wallet in the Control Panel
1. Go to **Settings → Configure platforms** in the Control Panel.
2. Under **MOBILE PLATFORMS**, find **Android** and open the **Google Wallet** setup.
## Create the service account key
1. **Create (or pick) a Google Cloud project** and enable the **Google Wallet API** for it. Use the same Google Cloud project that is linked to your issuer in the Google Pay & Wallet Console during onboarding. See [Google's getting started guide](https://developers.google.com/wallet/generic/getting-started/onboarding-guide).
2. **Create a service account** in that project and download its **JSON key**. Follow [Google's guide on generating REST API credentials](https://developers.google.com/wallet/generic/getting-started/auth/rest). The key file must be of type `service_account` and contain a `client_email` and a PEM private key.
3. **Copy the service account's email address** from the JSON key (the `client_email` field). You'll need it in the next step.
### Grant the service account access
In the [Google Pay & Wallet Console](https://pay.google.com/business/console):
1. Open **Users** in the left sidebar.
2. Click **Invite a user**.
3. Paste the service account's email address (from step 3 above).
4. Set **Access level** to **Developer**.
5. Click **Invite**.
Without this step, Pushwoosh cannot create or update Google Wallet passes.
## Configure Google Wallet in the Control Panel
1. Go to **Settings → Configure platforms** in the Control Panel.
2. Under **MOBILE PLATFORMS**, find **Android** and open the **Google Wallet** setup.
 3. In **Issuer ID**, enter the numeric Issuer ID from the Google Pay & Wallet Console.
4. Next to **Service account key (JSON)**, click **Browse...** and select your service account `.json` key file.
3. In **Issuer ID**, enter the numeric Issuer ID from the Google Pay & Wallet Console.
4. Next to **Service account key (JSON)**, click **Browse...** and select your service account `.json` key file.
 5. Click **Apply**.
## Next steps
Once you click **Apply**, you can design passes in the pass builder.
5. Click **Apply**.
## Next steps
Once you click **Apply**, you can design passes in the pass builder.