# HTTP ওয়েবসাইটের জন্য ক্রোম এবং ফায়ারফক্স ওয়েব পুশ
## কনফিগারেশন
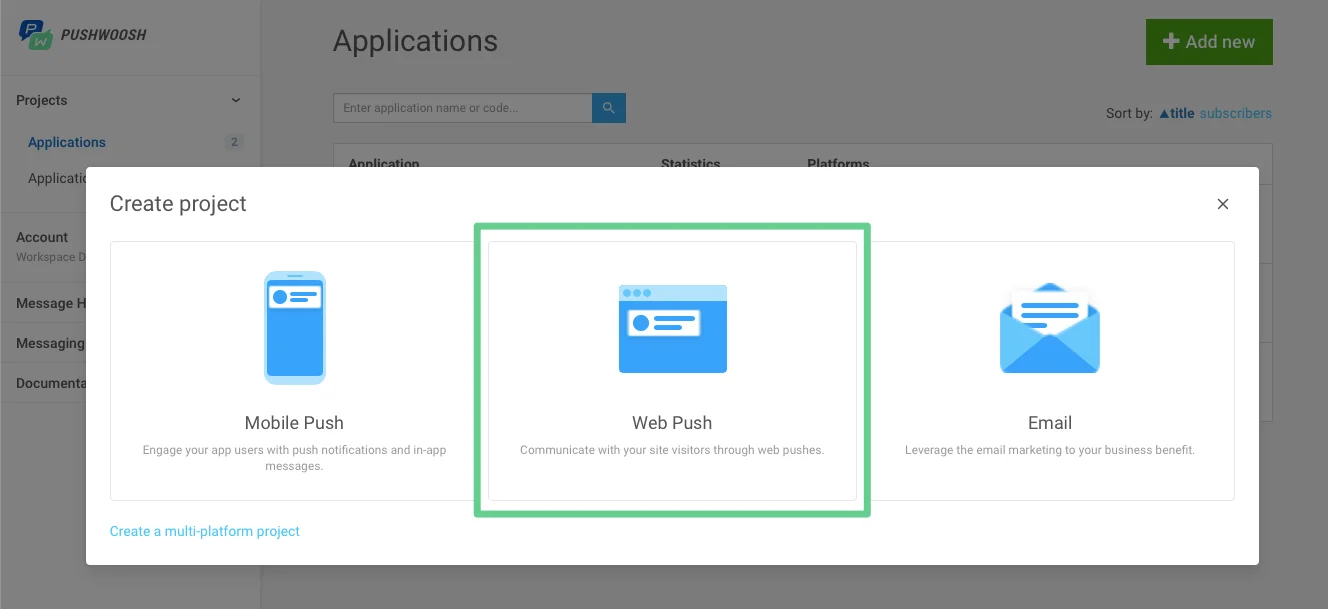
১. একটি প্রজেক্ট তৈরি করার সময় ওয়েব পুশ বিকল্পটি নির্বাচন করুন।
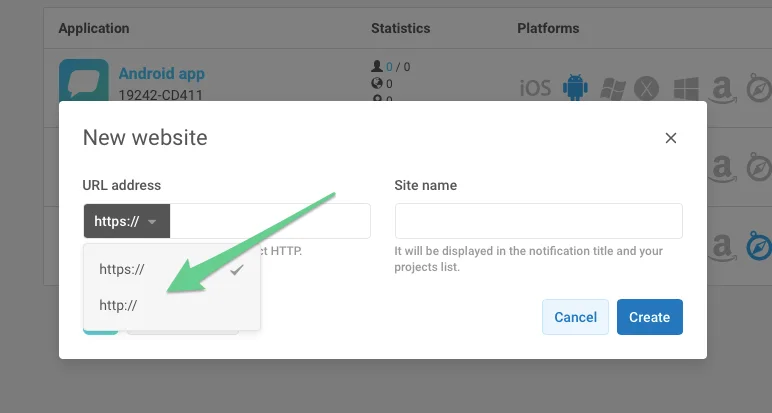
২. http নির্বাচন করুন, আপনার সাইটের URL এবং প্রজেক্টের নাম লিখুন।
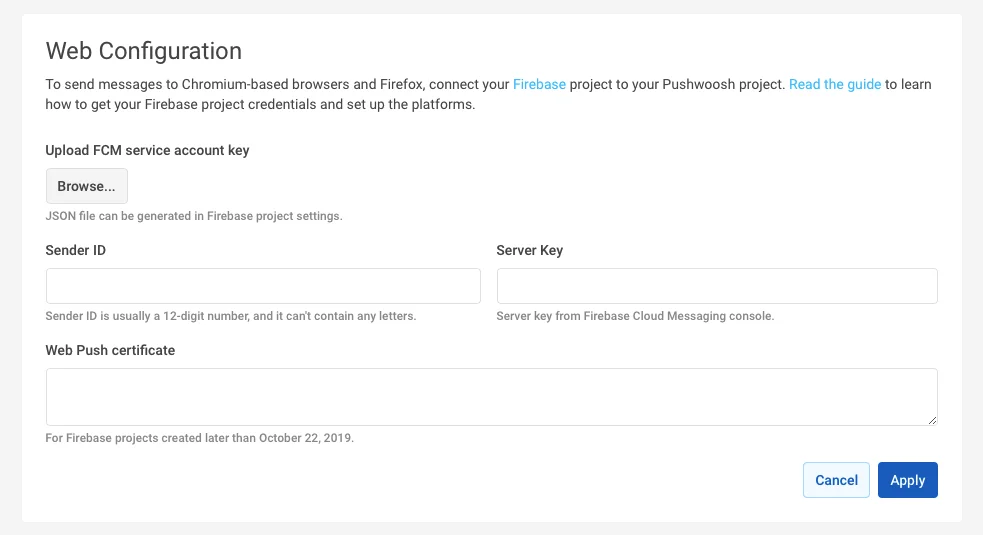
৩. আপনার FCM প্রজেক্টের ক্রেডেনশিয়াল দিয়ে ক্রোম এবং ফায়ারফক্স উভয়ই কনফিগার করুন।
## ইন্টিগ্রেশন
**১.** আপনার ওয়েবসাইটের রুট ডিরেক্টরিতে নিম্নলিখিত বিষয়বস্তু সহ **pushwoosh-web-pushes-http-sdk.js** ফাইল তৈরি করুন:
```javascript
var pushwoosh = {
PUSHWOOSH_APPLICATION_CODE: 'XXXX-XXXX',
PUSHWOOSH_APPLICATION_CODE_GET_PARAMETER: 'pw_application_code',
init: function (applicationCode) {
this.PUSHWOOSH_APPLICATION_CODE = applicationCode;
window.addEventListener('message', this.pwReceiveMessage, false);
},
tryInitUsingGetParameter: function () {
var applicationCode = this.getQueryVariable(this.PUSHWOOSH_APPLICATION_CODE_GET_PARAMETER);
console.log(applicationCode);
if (applicationCode) {
this.init(applicationCode);
}
},
pwReceiveMessage: function (event) {
if (event.data == 'allowPushNotifications') {
localStorage.setItem('pwAllowPushNotifications', true);
}
},
isBrowserChrome: function () {
return navigator.userAgent.toLowerCase().indexOf('chrome') > -1;
},
isBrowserFirefox: function () {
return navigator.userAgent.toLowerCase().indexOf('firefox') > -1;
},
isBrowserSafari: function () {
return navigator.userAgent.toLowerCase().indexOf('safari') > -1 && !this.isBrowserChrome();
},
isBrowserSupported: function () {
return this.isBrowserChrome() || this.isBrowserFirefox();
},
subscribeAtStart: function () {
if (this.isBrowserSupported()) {
if (null === localStorage.getItem('pwAllowPushNotifications')) {
this.showSubscriptionWindow();
}
}
},
isSubscribedForPushNotifications: function () {
return true == localStorage.getItem('pwAllowPushNotifications');
},
showSubscriptionWindow: function () {
if (this.isBrowserSupported()) {
var windowWidth = screen.width / 2;
var windowHeight = screen.height / 2;
var windowLeft = screen.width / 2 - windowWidth / 2;
var windowRight = screen.height / 2 - windowHeight / 2;
var URL = 'https://' + this.PUSHWOOSH_APPLICATION_CODE + '.chrome.pushwoosh.com/';
var pwSubscribeWindow = window.open(URL, '_blank', 'width=' + windowWidth + ',height=' + windowHeight + ',resizable=yes,scrollbars=yes,status=yes,left=' + windowLeft + ',top=' + windowRight);
}
},
getQueryVariable: function (variable) {
// document.currentScript won't work if this code is called from function in event lister
if (document.currentScript) {
var urlParts = document.currentScript.src.split('?');
if (typeof urlParts[1] !== 'undefined') {
var vars = urlParts[1].split('&');
for (var i = 0; i < vars.length; i++) {
var pair = vars[i].split('=');
if (pair[0] == variable) {
return pair[1];
}
}
}
}
else {
console.error('Cannot get current script address');
}
return null;
}
};
pushwoosh.tryInitUsingGetParameter();
```
**২.** পূর্ববর্তী ফাইলটি আপনার ওয়েবসাইটে অন্তর্ভুক্ত করুন এবং XXXXX-XXXXX এর পরিবর্তে **অ্যাপ্লিকেশন কোড** ব্যবহার করে এটি ইনিশিয়ালাইজ করুন।
```javascript
```
**৩.** একটি পুশ সাবস্ক্রিপশন বোতাম তৈরি করতে নিম্নলিখিতটি ব্যবহার করুন:
```txt
```
**৪.** বিকল্পভাবে, আপনি যদি নোটিফিকেশন সাবস্ক্রিপশনগুলি স্বয়ংক্রিয়ভাবে পপ আপ করতে চান (উপরের #৪ এর বিপরীতে), তবে নিম্নলিখিতটি ব্যবহার করুন:
```javascript
```
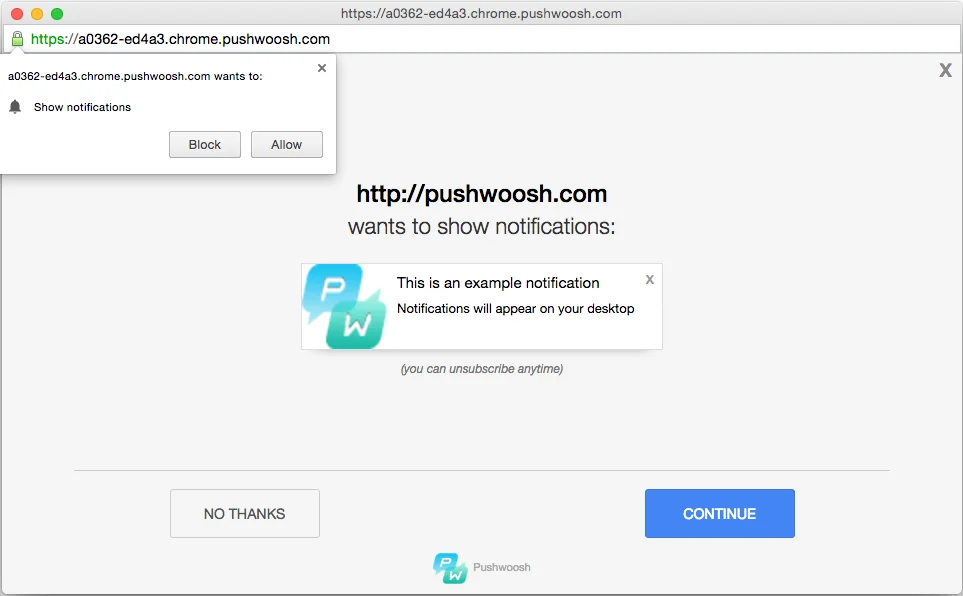
ফলস্বরূপ, ব্যবহারকারীকে ওয়েবসাইট থেকে পুশ নোটিফিকেশনের জন্য সাবস্ক্রাইব করতে বলা হবে:
 ২. http নির্বাচন করুন, আপনার সাইটের URL এবং প্রজেক্টের নাম লিখুন।
 ৩. আপনার FCM প্রজেক্টের ক্রেডেনশিয়াল দিয়ে ক্রোম এবং ফায়ারফক্স উভয়ই কনফিগার করুন।
 ## ইন্টিগ্রেশন
**১.** আপনার ওয়েবসাইটের রুট ডিরেক্টরিতে নিম্নলিখিত বিষয়বস্তু সহ **pushwoosh-web-pushes-http-sdk.js** ফাইল তৈরি করুন:
```javascript
var pushwoosh = {
PUSHWOOSH_APPLICATION_CODE: 'XXXX-XXXX',
PUSHWOOSH_APPLICATION_CODE_GET_PARAMETER: 'pw_application_code',
init: function (applicationCode) {
this.PUSHWOOSH_APPLICATION_CODE = applicationCode;
window.addEventListener('message', this.pwReceiveMessage, false);
},
tryInitUsingGetParameter: function () {
var applicationCode = this.getQueryVariable(this.PUSHWOOSH_APPLICATION_CODE_GET_PARAMETER);
console.log(applicationCode);
if (applicationCode) {
this.init(applicationCode);
}
},
pwReceiveMessage: function (event) {
if (event.data == 'allowPushNotifications') {
localStorage.setItem('pwAllowPushNotifications', true);
}
},
isBrowserChrome: function () {
return navigator.userAgent.toLowerCase().indexOf('chrome') > -1;
},
isBrowserFirefox: function () {
return navigator.userAgent.toLowerCase().indexOf('firefox') > -1;
},
isBrowserSafari: function () {
return navigator.userAgent.toLowerCase().indexOf('safari') > -1 && !this.isBrowserChrome();
},
isBrowserSupported: function () {
return this.isBrowserChrome() || this.isBrowserFirefox();
},
subscribeAtStart: function () {
if (this.isBrowserSupported()) {
if (null === localStorage.getItem('pwAllowPushNotifications')) {
this.showSubscriptionWindow();
}
}
},
isSubscribedForPushNotifications: function () {
return true == localStorage.getItem('pwAllowPushNotifications');
},
showSubscriptionWindow: function () {
if (this.isBrowserSupported()) {
var windowWidth = screen.width / 2;
var windowHeight = screen.height / 2;
var windowLeft = screen.width / 2 - windowWidth / 2;
var windowRight = screen.height / 2 - windowHeight / 2;
var URL = 'https://' + this.PUSHWOOSH_APPLICATION_CODE + '.chrome.pushwoosh.com/';
var pwSubscribeWindow = window.open(URL, '_blank', 'width=' + windowWidth + ',height=' + windowHeight + ',resizable=yes,scrollbars=yes,status=yes,left=' + windowLeft + ',top=' + windowRight);
}
},
getQueryVariable: function (variable) {
// document.currentScript won't work if this code is called from function in event lister
if (document.currentScript) {
var urlParts = document.currentScript.src.split('?');
if (typeof urlParts[1] !== 'undefined') {
var vars = urlParts[1].split('&');
for (var i = 0; i < vars.length; i++) {
var pair = vars[i].split('=');
if (pair[0] == variable) {
return pair[1];
}
}
}
}
else {
console.error('Cannot get current script address');
}
return null;
}
};
pushwoosh.tryInitUsingGetParameter();
```
**২.** পূর্ববর্তী ফাইলটি আপনার ওয়েবসাইটে অন্তর্ভুক্ত করুন এবং XXXXX-XXXXX এর পরিবর্তে **অ্যাপ্লিকেশন কোড** ব্যবহার করে এটি ইনিশিয়ালাইজ করুন।
```javascript
```
**৩.** একটি পুশ সাবস্ক্রিপশন বোতাম তৈরি করতে নিম্নলিখিতটি ব্যবহার করুন:
```txt
```
**৪.** বিকল্পভাবে, আপনি যদি নোটিফিকেশন সাবস্ক্রিপশনগুলি স্বয়ংক্রিয়ভাবে পপ আপ করতে চান (উপরের #৪ এর বিপরীতে), তবে নিম্নলিখিতটি ব্যবহার করুন:
```javascript
```
## ইন্টিগ্রেশন
**১.** আপনার ওয়েবসাইটের রুট ডিরেক্টরিতে নিম্নলিখিত বিষয়বস্তু সহ **pushwoosh-web-pushes-http-sdk.js** ফাইল তৈরি করুন:
```javascript
var pushwoosh = {
PUSHWOOSH_APPLICATION_CODE: 'XXXX-XXXX',
PUSHWOOSH_APPLICATION_CODE_GET_PARAMETER: 'pw_application_code',
init: function (applicationCode) {
this.PUSHWOOSH_APPLICATION_CODE = applicationCode;
window.addEventListener('message', this.pwReceiveMessage, false);
},
tryInitUsingGetParameter: function () {
var applicationCode = this.getQueryVariable(this.PUSHWOOSH_APPLICATION_CODE_GET_PARAMETER);
console.log(applicationCode);
if (applicationCode) {
this.init(applicationCode);
}
},
pwReceiveMessage: function (event) {
if (event.data == 'allowPushNotifications') {
localStorage.setItem('pwAllowPushNotifications', true);
}
},
isBrowserChrome: function () {
return navigator.userAgent.toLowerCase().indexOf('chrome') > -1;
},
isBrowserFirefox: function () {
return navigator.userAgent.toLowerCase().indexOf('firefox') > -1;
},
isBrowserSafari: function () {
return navigator.userAgent.toLowerCase().indexOf('safari') > -1 && !this.isBrowserChrome();
},
isBrowserSupported: function () {
return this.isBrowserChrome() || this.isBrowserFirefox();
},
subscribeAtStart: function () {
if (this.isBrowserSupported()) {
if (null === localStorage.getItem('pwAllowPushNotifications')) {
this.showSubscriptionWindow();
}
}
},
isSubscribedForPushNotifications: function () {
return true == localStorage.getItem('pwAllowPushNotifications');
},
showSubscriptionWindow: function () {
if (this.isBrowserSupported()) {
var windowWidth = screen.width / 2;
var windowHeight = screen.height / 2;
var windowLeft = screen.width / 2 - windowWidth / 2;
var windowRight = screen.height / 2 - windowHeight / 2;
var URL = 'https://' + this.PUSHWOOSH_APPLICATION_CODE + '.chrome.pushwoosh.com/';
var pwSubscribeWindow = window.open(URL, '_blank', 'width=' + windowWidth + ',height=' + windowHeight + ',resizable=yes,scrollbars=yes,status=yes,left=' + windowLeft + ',top=' + windowRight);
}
},
getQueryVariable: function (variable) {
// document.currentScript won't work if this code is called from function in event lister
if (document.currentScript) {
var urlParts = document.currentScript.src.split('?');
if (typeof urlParts[1] !== 'undefined') {
var vars = urlParts[1].split('&');
for (var i = 0; i < vars.length; i++) {
var pair = vars[i].split('=');
if (pair[0] == variable) {
return pair[1];
}
}
}
}
else {
console.error('Cannot get current script address');
}
return null;
}
};
pushwoosh.tryInitUsingGetParameter();
```
**২.** পূর্ববর্তী ফাইলটি আপনার ওয়েবসাইটে অন্তর্ভুক্ত করুন এবং XXXXX-XXXXX এর পরিবর্তে **অ্যাপ্লিকেশন কোড** ব্যবহার করে এটি ইনিশিয়ালাইজ করুন।
```javascript
```
**৩.** একটি পুশ সাবস্ক্রিপশন বোতাম তৈরি করতে নিম্নলিখিতটি ব্যবহার করুন:
```txt
```
**৪.** বিকল্পভাবে, আপনি যদি নোটিফিকেশন সাবস্ক্রিপশনগুলি স্বয়ংক্রিয়ভাবে পপ আপ করতে চান (উপরের #৪ এর বিপরীতে), তবে নিম্নলিখিতটি ব্যবহার করুন:
```javascript
```
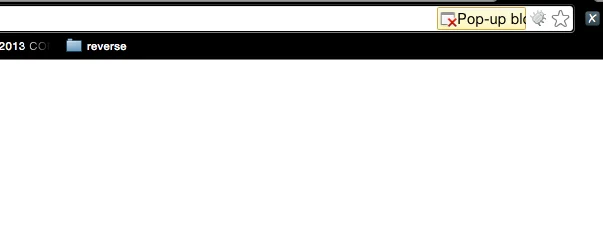
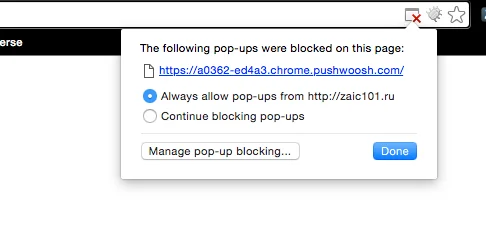 ফলস্বরূপ, ব্যবহারকারীকে ওয়েবসাইট থেকে পুশ নোটিফিকেশনের জন্য সাবস্ক্রাইব করতে বলা হবে: