# iOS SDK বেসিক ইন্টিগ্রেশন গাইড
এই বিভাগে আপনার iOS অ্যাপ্লিকেশনে Pushwoosh SDK কীভাবে ইন্টিগ্রেট করতে হয় সে সম্পর্কে তথ্য রয়েছে।
## পূর্বশর্ত
আপনার অ্যাপে Pushwoosh iOS SDK ইন্টিগ্রেট করার জন্য, আপনার নিম্নলিখিত জিনিসগুলির প্রয়োজন হবে:
## ইন্টিগ্রেশন ধাপ
### ১. ইনস্টলেশন
আপনি **Swift Package Manager** অথবা **CocoaPods** ব্যবহার করে আপনার অ্যাপ্লিকেশনে Pushwoosh SDK ইন্টিগ্রেট করতে পারেন।
#### Swift Package Manager
**Package Dependencies** বিভাগে, নিম্নলিখিত প্যাকেজটি যোগ করুন:
```
https://github.com/Pushwoosh/Pushwoosh-XCFramework
```
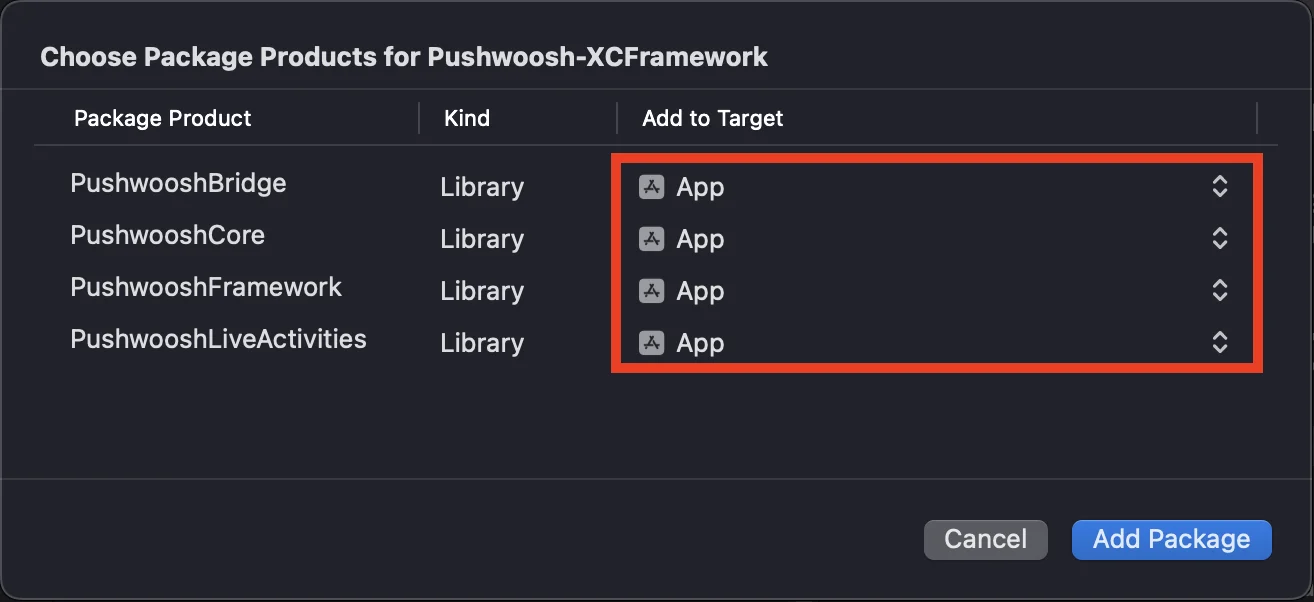
Pushwoosh iOS SDK ব্যবহার করার জন্য, Swift Package Manager এর মাধ্যমে ইন্টিগ্রেট করার সময় আপনার অ্যাপ টার্গেটে নিম্নলিখিত চারটি ফ্রেমওয়ার্ক যোগ করা নিশ্চিত করুন:
* ```PushwooshFramework```
* ```PushwooshCore```
* ```PushwooshBridge```
* ```PushwooshLiveActivities```
 #### CocoaPods
আপনার `Podfile` খুলুন এবং নির্ভরতা (dependency) যোগ করুন:
```bash
# Uncomment the next line to define a global platform for your project
# platform :ios, '9.0'
target 'MyApp' do
# Comment the next line if you don't want to use dynamic frameworks
use_frameworks!
pod 'PushwooshXCFramework'
end
```
তারপর, টার্মিনালে, নির্ভরতা ইনস্টল করার জন্য নিম্নলিখিত কমান্ডটি চালান:
```bash
pod install
```
### ২. Capabilities
আপনার প্রজেক্টে পুশ নোটিফিকেশন সক্রিয় করতে, আপনাকে নির্দিষ্ট capabilities যোগ করতে হবে।
Signing & Capabilities বিভাগে, নিম্নলিখিত capabilities যোগ করুন:
- `Push Notifications`
- `Background Modes`। এই capability যোগ করার পর, `Remote notifications`-এর জন্য বক্সটি চেক করুন।
আপনি যদি Time Sensitive Notifications (iOS 15+) ব্যবহার করতে চান, তাহলে `Time Sensitive Notifications` capability-টিও যোগ করুন।
### ৩. ইনিশিয়ালাইজেশন কোড
#### AppDelegate
আপনার AppDelegate ক্লাসে নিম্নলিখিত কোডটি যোগ করুন:
```swift
import SwiftUI
import PushwooshFramework
@main
struct MyApp: App {
// Register AppDelegate as UIApplicationDelegate
@UIApplicationDelegateAdaptor(AppDelegate.self) var appDelegate
var body: some Scene {
WindowGroup {
ContentView()
}
}
}
class AppDelegate: NSObject, UIApplicationDelegate, PWMessagingDelegate {
func application(_ application: UIApplication, didFinishLaunchingWithOptions launchOptions: [UIApplication.LaunchOptionsKey: Any]?) -> Bool {
// Initialization code
// Set custom delegate for push handling
Pushwoosh.sharedInstance().delegate = self
// Register for push notifications
Pushwoosh.sharedInstance().registerForPushNotifications()
return true
}
// Handle token received from APNS
func application(_ application: UIApplication, didRegisterForRemoteNotificationsWithDeviceToken deviceToken: Data) {
Pushwoosh.sharedInstance().handlePushRegistration(deviceToken)
}
// Handle token receiving error
func application(_ application: UIApplication, didFailToRegisterForRemoteNotificationsWithError error: Error) {
Pushwoosh.sharedInstance().handlePushRegistrationFailure(error)
}
//for silent push notifications
func application(_ application: UIApplication, didReceiveRemoteNotification userInfo: [AnyHashable: Any], fetchCompletionHandler completionHandler: @escaping (UIBackgroundFetchResult) -> Void) {
Pushwoosh.sharedInstance().handlePushReceived(userInfo)
completionHandler(.noData)
}
// Fired when a push is received
func pushwoosh(_ pushwoosh: Pushwoosh, onMessageReceived message: PWMessage) {
print("onMessageReceived: ", message.payload!.description)
}
// Fired when a user taps the notification
func pushwoosh(_ pushwoosh: Pushwoosh, onMessageOpened message: PWMessage) {
print("onMessageOpened: ", message.payload!.description)
}
}
struct ContentView: View {
var body: some View {
Text("Pushwoosh with SwiftUI")
.padding()
}
}
```
```swift
import PushwooshFramework
@UIApplicationMain
class AppDelegate: UIResponder, UIApplicationDelegate, PWMessagingDelegate {
var window: UIWindow?
func application(_ application: UIApplication, didFinishLaunchingWithOptions launchOptions: [UIApplication.LaunchOptionsKey: Any]?) -> Bool {
//initialization code
//set custom delegate for push handling, in our case AppDelegate
Pushwoosh.sharedInstance().delegate = self;
//register for push notifications
Pushwoosh.sharedInstance().registerForPushNotifications()
return true
}
//handle token received from APNS
func application(_ application: UIApplication, didRegisterForRemoteNotificationsWithDeviceToken deviceToken: Data) {
Pushwoosh.sharedInstance().handlePushRegistration(deviceToken)
}
//handle token receiving error
func application(_ application: UIApplication, didFailToRegisterForRemoteNotificationsWithError error: Error) {
Pushwoosh.sharedInstance().handlePushRegistrationFailure(error);
}
//for silent push notifications
func application(_ application: UIApplication, didReceiveRemoteNotification userInfo: [AnyHashable : Any], fetchCompletionHandler completionHandler: @escaping (UIBackgroundFetchResult) -> Void) {
Pushwoosh.sharedInstance().handlePushReceived(userInfo)
completionHandler(.noData)
}
//this event is fired when the push gets received
func pushwoosh(_ pushwoosh: Pushwoosh, onMessageReceived message: PWMessage) {
print("onMessageReceived: ", message.payload!.description)
}
// Fired when a user taps the notification
func pushwoosh(_ pushwoosh: Pushwoosh, onMessageOpened message: PWMessage) {
print("onMessageOpened: ", message.payload!.description)
}
}
```
```objective-c
#import
@implementation AppDelegate
- (BOOL)application:(UIApplication *)application didFinishLaunchingWithOptions:(NSDictionary *)launchOptions {
//-----------PUSHWOOSH PART-----------
// set custom delegate for push handling, in our case AppDelegate
[Pushwoosh sharedInstance].delegate = self;
//register for push notifications!
[[Pushwoosh sharedInstance] registerForPushNotifications];
return YES;
}
//handle token received from APNS
- (void)application:(UIApplication *)application
didRegisterForRemoteNotificationsWithDeviceToken:(NSData *)deviceToken {
[[Pushwoosh sharedInstance] handlePushRegistration:deviceToken];
}
//handle token receiving error
- (void)application:(UIApplication *)application didFailToRegisterForRemoteNotificationsWithError:(NSError *)error {
[[Pushwoosh sharedInstance] handlePushRegistrationFailure:error];
}
//for silent push notifications
- (void)application:(UIApplication *)application
didReceiveRemoteNotification:(NSDictionary *)userInfo
fetchCompletionHandler:(void (^)(UIBackgroundFetchResult))completionHandler {
[[Pushwoosh sharedInstance] handlePushReceived:userInfo];
completionHandler(UIBackgroundFetchResultNoData);
}
//this event is fired when the push gets received
- (void)pushwoosh:(Pushwoosh *)pushwoosh onMessageReceived:(PWMessage *)message {
NSLog(@"onMessageReceived: %@", message.payload);
}
//this event is fired when user taps the notification
- (void)pushwoosh:(Pushwoosh *)pushwoosh onMessageOpened:(PWMessage *)message {
NSLog(@"onMessageOpened: %@", message.payload);
}
@end
```
#### Info.plist
আপনার `Info.plist`-এ:
- Pushwoosh অ্যাপ্লিকেশন কোডে `Pushwoosh_APPID` কী সেট করুন।
- [Pushwoosh ডিভাইস API টোকেন](/bn/developer/api-reference/api-access-token/#device-api-token)-এ `Pushwoosh_API_TOKEN` কী সেট করুন।
### ৪. মেসেজ ডেলিভারি ট্র্যাকিং
Pushwoosh নোটিফিকেশন সার্ভিস এক্সটেনশনের মাধ্যমে পুশ নোটিফিকেশনের জন্য ডেলিভারি ইভেন্ট ট্র্যাকিং সমর্থন করে।
#### নোটিফিকেশন সার্ভিস এক্সটেনশন যোগ করুন
১. Xcode-এ, **File** > **New** > **Target...** নির্বাচন করুন।
২. **Notification Service Extension** বেছে নিন এবং **Next** চাপুন।
৩. টার্গেটের নাম লিখুন এবং **Finish** চাপুন।
৪. সক্রিয়করণের জন্য অনুরোধ করা হলে, **Cancel** চাপুন।
#### নোটিফিকেশন সার্ভিস এক্সটেনশনের জন্য নির্ভরতা (শুধুমাত্র CocoaPods)
দ্রষ্টব্য: আপনি যদি নির্ভরতা পরিচালনা করার জন্য Swift Package Manager ব্যবহার করেন, তবে আপনি এই ধাপটি এড়িয়ে যেতে পারেন, কারণ নির্ভরতাগুলি স্বয়ংক্রিয়ভাবে যোগ করা হয়।
আপনার `Podfile` খুলুন এবং টার্গেটের জন্য নির্ভরতা যোগ করুন:
```ruby title="Podfile"
# Uncomment the next line to define a global platform for your project
# platform :ios, '9.0'
target 'MyApp' do
# Comment the next line if you don't want to use dynamic frameworks
use_frameworks!
pod 'PushwooshXCFramework'
end
target 'MyAppNotificationExtension' do
use_frameworks!
pod 'PushwooshXCFramework'
end
```
নির্ভরতা আপডেট করার জন্য টার্মিনালে নিম্নলিখিত কমান্ডটি চালান:
```shell
pod update
```
#### নোটিফিকেশন সার্ভিস এক্সটেনশনে Pushwoosh SDK যোগ করুন
এই কোডটি আপনাকে আপনার নোটিফিকেশন এক্সটেনশনের মধ্যে নোটিফিকেশন আটকাতে এবং প্রক্রিয়া করতে দেয়।
```swift
import UserNotifications
import PushwooshFramework
class NotificationService: UNNotificationServiceExtension {
var contentHandler: ((UNNotificationContent) -> Void)?
var bestAttemptContent: UNMutableNotificationContent?
override func didReceive(_ request: UNNotificationRequest, withContentHandler contentHandler: @escaping (UNNotificationContent) -> Void) {
// Pushwoosh **********
PWNotificationExtensionManager.shared().handle(request, contentHandler: contentHandler)
// ********************
self.contentHandler = contentHandler
bestAttemptContent = (request.content.mutableCopy() as? UNMutableNotificationContent)
if let bestAttemptContent = bestAttemptContent {
// Modify the notification content here...
contentHandler(bestAttemptContent)
}
}
override func serviceExtensionTimeWillExpire() {
// Called just before the extension will be terminated by the system.
// Use this as an opportunity to deliver your "best attempt" at modified content, otherwise the original push payload will be used.
if let contentHandler = contentHandler, let bestAttemptContent = bestAttemptContent {
contentHandler(bestAttemptContent)
}
}
}
```
```objective-c
#import "PWNotificationExtensionManager.h"
@interface NotificationService : UNNotificationServiceExtension
@end
@implementation NotificationService
- (void)didReceiveNotificationRequest:(UNNotificationRequest *)request withContentHandler:(void (^)(UNNotificationContent * _Nonnull))contentHandler {
// Pushwoosh **********
[[PWNotificationExtensionManager sharedManager] handleNotificationRequest:request contentHandler:contentHandler];
//*********************
}
@end
```
#### Info.plist
আপনার নোটিফিকেশন সার্ভিস এক্সটেনশনের Info.plist-এ যোগ করুন:
- `Pushwoosh_APPID` - আপনার অ্যাপ্লিকেশন কোড।
### ৫. প্রজেক্টটি চালান
১. প্রজেক্টটি বিল্ড করুন এবং চালান।
২. Pushwoosh কন্ট্রোল প্যানেলে যান এবং [একটি পুশ নোটিফিকেশন পাঠান](/bn/product/messaging-channels/push-notifications/send-push-notifications/one-time-push)।
৩. আপনার অ্যাপে নোটিফিকেশনটি দেখতে পাওয়া উচিত।
## বর্ধিত Pushwoosh iOS ইন্টিগ্রেশন
এই পর্যায়ে, আপনি ইতিমধ্যে SDK ইন্টিগ্রেট করেছেন এবং পুশ নোটিফিকেশন পাঠাতে ও গ্রহণ করতে পারেন। এখন, আসুন মূল কার্যকারিতা অন্বেষণ করি।
### পুশ নোটিফিকেশন
Pushwoosh SDK-তে, পুশ নোটিফিকেশন পরিচালনার জন্য দুটি কলব্যাক ডিজাইন করা হয়েছে:
- `onMessageReceived`: এই পদ্ধতিটি কল করা হয় যখন একটি পুশ নোটিফিকেশন পাওয়া যায়।
- `onMessageOpened`: এই পদ্ধতিটি কল করা হয় যখন ব্যবহারকারী নোটিফিকেশনের সাথে ইন্টারঅ্যাক্ট করে (খোলে)।
এই কলব্যাকগুলি ডেভেলপারদের তাদের অ্যাপ্লিকেশনের মধ্যে পুশ নোটিফিকেশন গ্রহণ এবং ব্যবহারকারীর ইন্টারঅ্যাকশন পরিচালনা করতে সক্ষম করে।
```swift
import PushwooshFramework
class AppDelegate: NSObject, UIApplicationDelegate, PWMessagingDelegate {
func application(_ application: UIApplication, didFinishLaunchingWithOptions launchOptions: [UIApplication.LaunchOptionsKey : Any]? = nil) -> Bool {
Pushwoosh.sharedInstance().delegate = self;
}
func pushwoosh(_ pushwoosh: Pushwoosh, onMessageOpened message: PWMessage) {
if let payload = message.payload {
print("onMessageOpened: \(payload)")
}
}
func pushwoosh(_ pushwoosh: Pushwoosh, onMessageReceived message: PWMessage) {
if let payload = message.payload {
print("onMessageReceived: \(payload)")
}
}
}
```
```objective-c
#import
@interface AppDelegate ()
@end
@implementation AppDelegate
- (BOOL)application:(UIApplication *)application didFinishLaunchingWithOptions:(NSDictionary *)launchOptions {
[[Pushwoosh sharedInstance] setDelegate:self];
return YES;
}
- (void)pushwoosh:(Pushwoosh *)pushwoosh onMessageOpened:(PWMessage *)message {
if (message.payload) {
NSLog(@"onMessageOpened: %@", message.payload);
}
}
- (void)pushwoosh:(Pushwoosh *)pushwoosh onMessageReceived:(PWMessage *)message {
if (message.payload) {
NSLog(@"onMessageReceived: %@", message.payload);
}
}
@end
```
### ব্যবহারকারী কনফিগারেশন
ব্যক্তিগত ব্যবহারকারীর আচরণ এবং পছন্দের উপর মনোযোগ দিয়ে, আপনি ব্যক্তিগতকৃত সামগ্রী সরবরাহ করতে পারেন, যা ব্যবহারকারীর সন্তুষ্টি এবং আনুগত্য বৃদ্ধি করে।
```swift
import PushwooshFramework
class Registration {
func afterUserLogin(user: User) {
let pushwoosh = Pushwoosh.sharedInstance()
// set user ID
if let userId = user.userId {
pushwoosh.setUserId(userId)
}
// set user email
if let userEmail = user.email {
pushwoosh.setEmail(userEmail)
}
// set user SMS number
if let userSmsNumber = user.SmsNumber {
pushwoosh.registerSmsNumber(userSmsNumber)
}
// set user WhatsApp number
if let userWhatsAppNumber = user.WhatsAppNumber {
pushwoosh.registerSmsNumber(userWhatsAppNumber)
}
// setting additional user information as tags for Pushwoosh
if let age = user.userDetails.age,
let name = user.userDetails.userName,
let lastLogin = user.userDetails.lastLoginDate {
pushwoosh.setTags([
"age": age,
"name": name,
"last_login": lastLogin
])
}
}
}
```
```objective-c
#import
@implementation Registration
- (void)afterUserLogin:(User *)user {
Pushwoosh *pushwoosh = [Pushwoosh sharedInstance];
// set user ID
if (user.userId) {
[pushwoosh setUserId:user.userId];
}
// set user email
if (user.email) {
[pushwoosh setEmail:user.email];
}
// setting additional user information as tags for Pushwoosh
if (user.userDetails.age && user.userDetails.userName && user.userDetails.lastLoginDate) {
NSDictionary *tags = @{
@"age": user.userDetails.age,
@"name": user.userDetails.userName,
@"last_login": user.userDetails.lastLoginDate
};
[pushwoosh setTags:tags];
}
}
@end
```
### ট্যাগ
ট্যাগ হলো ব্যবহারকারী বা ডিভাইসে নির্ধারিত কী-ভ্যালু পেয়ার, যা পছন্দ বা আচরণের মতো অ্যাট্রিবিউটের উপর ভিত্তি করে সেগমেন্টেশন করতে দেয়, ফলে টার্গেটেড মেসেজিং সক্ষম হয়।
```swift
import PushwooshFramework
class UpdateUser {
func afterUserUpdateProfile(user: User) {
let pushwoosh = Pushwoosh.sharedInstance()
// set list of favorite categories
pushwoosh.setTags(["favorite_categories" : user.getFavoriteCategories()])
// set payment information
pushwoosh.setTags([
"is_subscribed": user.isSubscribed(),
"payment_status": user.getPaymentStatus(),
"billing_address": user.getBillingAddress()
])
}
}
```
```objective-c
#import
@implementation UpdateUser
- (void)afterUserUpdateProfile:(User *)user {
Pushwoosh *pushwoosh = [Pushwoosh sharedInstance];
// set list of favorite categories
[pushwoosh setTags:@{@"favorite_categories" : user.getFavoriteCategories}];
// set payment information
NSDictionary *tags = @{
@"is_subscribed": @(user.isSubscribed),
@"payment_status": user.getPaymentStatus,
@"billing_address": user.getBillingAddress
};
[pushwoosh setTags:tags];
}
@end
```
### ইভেন্ট
ইভেন্ট হলো অ্যাপের মধ্যে নির্দিষ্ট ব্যবহারকারীর ক্রিয়া বা ঘটনা যা আচরণ বিশ্লেষণ করতে এবং সংশ্লিষ্ট বার্তা বা ক্রিয়া ট্রিগার করতে ট্র্যাক করা যেতে পারে।
```swift
import PushwooshFramework
class Registration {
func afterUserLogin(user: User) {
if let userName = user.getUserName(), let lastLogin = user.getLastLoginDate() {
PWInAppManager.shared().postEvent("login", withAttributes: [
"name": userName,
"last_login": lastLogin
])
}
}
func afterUserPurchase(user: User, product: Product) {
let pushwoosh = Pushwoosh.sharedInstance()
// Track purchase event
PWInAppManager.shared().postEvent("purchase", withAttributes: [
"product_id": product.getId(),
"product_name": product.getName(),
"price": product.getPrice(),
"quantity": product.getQuantity()
])
// Set user tags
let lastPurchaseDate = Date().timeIntervalSince1970
let lifetimeSpend = getCurrentLifetimeSpend() + product.getPrice()
pushwoosh.setTags([
"last_purchase_date": lastPurchaseDate,
"lifetime_spend": lifetimeSpend
])
}
}
```
```objective-c
#import
#import
@implementation Registration
- (void)afterUserLogin:(User *)user {
NSString *userName = [user getUserName];
NSDate *lastLogin = [user getLastLoginDate];
if (userName && lastLogin) {
[[PWInAppManager sharedManager] postEvent:@"login" withAttributes:@{
@"name": userName,
@"last_login": lastLogin
}];
}
}
- (void)afterUserPurchase:(User *)user product:(Product *)product {
Pushwoosh *pushwoosh = [Pushwoosh sharedInstance];
// Track purchase event
[[PWInAppManager sharedManager] postEvent:@"purchase" withAttributes:@{
@"product_id": [product getId],
@"product_name": [product getName],
@"price": @([product getPrice]),
@"quantity": @([product getQuantity])
}];
// Set user tags
NSTimeInterval lastPurchaseDate = [[NSDate date] timeIntervalSince1970];
double lifetimeSpend = /* fetch current lifetime spend */ + [product getPrice];
NSDictionary *tags = @{
@"last_purchase_date": @(lastPurchaseDate),
@"lifetime_spend": @(lifetimeSpend)
};
[pushwoosh setTags:tags];
}
@end
```
### রিচ মিডিয়া
রিচ মিডিয়া বলতে ইন্টারেক্টিভ এবং মাল্টিমিডিয়া সামগ্রী, যেমন ছবি, ভিডিও বা HTML বোঝায়, যা ব্যবহারকারীর সম্পৃক্ততা বাড়াতে নোটিফিকেশন এবং ইন-অ্যাপ মেসেজে ব্যবহৃত হয়।
```swift
import PushwooshFramework
class ViewController: UIViewController, PWRichMediaPresentingDelegate {
override func viewDidLoad() {
super.viewDidLoad()
let richMediaConfiguration = PWModalWindowConfiguration.shared()
PWRichMediaManager.shared().delegate = self
richMediaConfiguration.configureModalWindow(with: .PWModalWindowPositionBottom,
present: .PWAnimationPresentFromBottom,
dismiss: .PWAnimationDismissDown)
}
func richMediaManager(_ richMediaManager: PWRichMediaManager!, shouldPresent richMedia: PWRichMedia!) -> Bool {
print("Rich media will be presented with: \(richMedia.pushPayload!)")
return true
}
func richMediaManager(_ richMediaManager: PWRichMediaManager!, didPresent richMedia: PWRichMedia!) {
print("Rich media has been presented with: \(richMedia.pushPayload!)")
}
func richMediaManager(_ richMediaManager: PWRichMediaManager!, didClose richMedia: PWRichMedia!) {
print("Rich media has been closed with: \(richMedia.pushPayload!)")
}
func richMediaManager(_ richMediaManager: PWRichMediaManager!, presentingDidFailFor richMedia: PWRichMedia!, withError error: (any Error)!) {
print("Failed to present rich media with: \(richMedia.pushPayload!). Error: \(error.localizedDescription)")
}
}
```
```objective-c
#import "ViewController.h"
#import
#import
#import
@interface ViewController ()
@end
@implementation ViewController
- (void)viewDidLoad {
[super viewDidLoad];
[[PWRichMediaManager sharedManager] setDelegate:self];
[[PWModalWindowConfiguration shared] configureModalWindowWith:PWModalWindowPositionBottom
presentAnimation:PWAnimationPresentFromBottom
dismissAnimation:PWAnimationDismissDown];
}
- (BOOL)richMediaManager:(PWRichMediaManager *)richMediaManager shouldPresentRichMedia:(PWRichMedia *)richMedia {
NSLog(@"Rich media will be presented with: %@", richMedia.pushPayload);
return YES;
}
- (void)richMediaManager:(PWRichMediaManager *)richMediaManager didPresentRichMedia:(PWRichMedia *)richMedia {
NSLog(@"Rich media has been presented with: %@", richMedia.pushPayload);
}
- (void)richMediaManager:(PWRichMediaManager *)richMediaManager didCloseRichMedia:(PWRichMedia *)richMedia {
NSLog(@"Rich media has been closed with:: %@", richMedia.pushPayload);
}
- (void)richMediaManager:(PWRichMediaManager *)richMediaManager presentingDidFailForRichMedia:(PWRichMedia *)richMedia withError:(NSError *)error {
NSLog(@"Failed to present rich media with: %@. Error: %@", richMedia.pushPayload, error.localizedDescription);
}
@end
```
## সমস্যা সমাধান
### 'PushwooshFramework' মডিউল বিল্ড করতে ব্যর্থ
আপনার প্রজেক্ট বিল্ড করার সময়, আপনি নিম্নলিখিত ধরনের একটি ত্রুটির সম্মুখীন হতে পারেন:
```
Failed to build module 'PushwooshFramework'; this SDK is not supported by the compiler
(the SDK is built with 'Apple Swift version 5.10 (swiftlang-5.10.0.13 clang-1500.3.9.4)',
while this compiler is 'Apple Swift version 6.1.2 effective-5.10 (swiftlang-6.1.2.1.2 clang-1700.0.13.5)')
```
**কারণ:** এই ত্রুটিটি Swift কম্পাইলার সংস্করণের অসঙ্গতির সাথে সম্পর্কিত নয়। Pushwoosh iOS SDK সংস্করণ 6.8.0 থেকে, SDK-টি কয়েকটি উপাদানে মডিউলারাইজ করা হয়েছে যা একে অপরের সাথে ইন্টারঅ্যাক্ট করে। যখন আপনার প্রজেক্টে সমস্ত প্রয়োজনীয় ফ্রেমওয়ার্ক যোগ করা হয় না তখন এই ত্রুটিটি ঘটে।
**সমাধান:** Swift Package Manager এর মাধ্যমে ইন্টিগ্রেট করার সময় আপনার অ্যাপ টার্গেটে চারটি প্রয়োজনীয় ফ্রেমওয়ার্ক যোগ করা হয়েছে কিনা তা নিশ্চিত করুন:
* ```PushwooshFramework```
* ```PushwooshCore```
* ```PushwooshBridge```
* ```PushwooshLiveActivities```
Xcode-এ এটি যাচাই করতে:
১. প্রজেক্ট নেভিগেটরে আপনার প্রজেক্ট নির্বাচন করুন
২. আপনার অ্যাপ টার্গেট নির্বাচন করুন
৩. **General** > **Frameworks, Libraries, and Embedded Content**-এ যান
৪. নিশ্চিত করুন যে চারটি ফ্রেমওয়ার্কই তালিকাভুক্ত আছে
---
ইন্টিগ্রেশন প্রক্রিয়া চলাকালীন আপনি যদি কোনো সমস্যার সম্মুখীন হন, অনুগ্রহ করে [সহায়তা এবং কমিউনিটি](/bn/developer/pushwoosh-sdk/support-and-community) বিভাগটি দেখুন।
#### CocoaPods
আপনার `Podfile` খুলুন এবং নির্ভরতা (dependency) যোগ করুন:
```bash
# Uncomment the next line to define a global platform for your project
# platform :ios, '9.0'
target 'MyApp' do
# Comment the next line if you don't want to use dynamic frameworks
use_frameworks!
pod 'PushwooshXCFramework'
end
```
তারপর, টার্মিনালে, নির্ভরতা ইনস্টল করার জন্য নিম্নলিখিত কমান্ডটি চালান:
```bash
pod install
```
### ২. Capabilities
আপনার প্রজেক্টে পুশ নোটিফিকেশন সক্রিয় করতে, আপনাকে নির্দিষ্ট capabilities যোগ করতে হবে।
Signing & Capabilities বিভাগে, নিম্নলিখিত capabilities যোগ করুন:
- `Push Notifications`
- `Background Modes`। এই capability যোগ করার পর, `Remote notifications`-এর জন্য বক্সটি চেক করুন।
আপনি যদি Time Sensitive Notifications (iOS 15+) ব্যবহার করতে চান, তাহলে `Time Sensitive Notifications` capability-টিও যোগ করুন।
### ৩. ইনিশিয়ালাইজেশন কোড
#### AppDelegate
আপনার AppDelegate ক্লাসে নিম্নলিখিত কোডটি যোগ করুন:
```swift
import SwiftUI
import PushwooshFramework
@main
struct MyApp: App {
// Register AppDelegate as UIApplicationDelegate
@UIApplicationDelegateAdaptor(AppDelegate.self) var appDelegate
var body: some Scene {
WindowGroup {
ContentView()
}
}
}
class AppDelegate: NSObject, UIApplicationDelegate, PWMessagingDelegate {
func application(_ application: UIApplication, didFinishLaunchingWithOptions launchOptions: [UIApplication.LaunchOptionsKey: Any]?) -> Bool {
// Initialization code
// Set custom delegate for push handling
Pushwoosh.sharedInstance().delegate = self
// Register for push notifications
Pushwoosh.sharedInstance().registerForPushNotifications()
return true
}
// Handle token received from APNS
func application(_ application: UIApplication, didRegisterForRemoteNotificationsWithDeviceToken deviceToken: Data) {
Pushwoosh.sharedInstance().handlePushRegistration(deviceToken)
}
// Handle token receiving error
func application(_ application: UIApplication, didFailToRegisterForRemoteNotificationsWithError error: Error) {
Pushwoosh.sharedInstance().handlePushRegistrationFailure(error)
}
//for silent push notifications
func application(_ application: UIApplication, didReceiveRemoteNotification userInfo: [AnyHashable: Any], fetchCompletionHandler completionHandler: @escaping (UIBackgroundFetchResult) -> Void) {
Pushwoosh.sharedInstance().handlePushReceived(userInfo)
completionHandler(.noData)
}
// Fired when a push is received
func pushwoosh(_ pushwoosh: Pushwoosh, onMessageReceived message: PWMessage) {
print("onMessageReceived: ", message.payload!.description)
}
// Fired when a user taps the notification
func pushwoosh(_ pushwoosh: Pushwoosh, onMessageOpened message: PWMessage) {
print("onMessageOpened: ", message.payload!.description)
}
}
struct ContentView: View {
var body: some View {
Text("Pushwoosh with SwiftUI")
.padding()
}
}
```
```swift
import PushwooshFramework
@UIApplicationMain
class AppDelegate: UIResponder, UIApplicationDelegate, PWMessagingDelegate {
var window: UIWindow?
func application(_ application: UIApplication, didFinishLaunchingWithOptions launchOptions: [UIApplication.LaunchOptionsKey: Any]?) -> Bool {
//initialization code
//set custom delegate for push handling, in our case AppDelegate
Pushwoosh.sharedInstance().delegate = self;
//register for push notifications
Pushwoosh.sharedInstance().registerForPushNotifications()
return true
}
//handle token received from APNS
func application(_ application: UIApplication, didRegisterForRemoteNotificationsWithDeviceToken deviceToken: Data) {
Pushwoosh.sharedInstance().handlePushRegistration(deviceToken)
}
//handle token receiving error
func application(_ application: UIApplication, didFailToRegisterForRemoteNotificationsWithError error: Error) {
Pushwoosh.sharedInstance().handlePushRegistrationFailure(error);
}
//for silent push notifications
func application(_ application: UIApplication, didReceiveRemoteNotification userInfo: [AnyHashable : Any], fetchCompletionHandler completionHandler: @escaping (UIBackgroundFetchResult) -> Void) {
Pushwoosh.sharedInstance().handlePushReceived(userInfo)
completionHandler(.noData)
}
//this event is fired when the push gets received
func pushwoosh(_ pushwoosh: Pushwoosh, onMessageReceived message: PWMessage) {
print("onMessageReceived: ", message.payload!.description)
}
// Fired when a user taps the notification
func pushwoosh(_ pushwoosh: Pushwoosh, onMessageOpened message: PWMessage) {
print("onMessageOpened: ", message.payload!.description)
}
}
```
```objective-c
#import
@implementation AppDelegate
- (BOOL)application:(UIApplication *)application didFinishLaunchingWithOptions:(NSDictionary *)launchOptions {
//-----------PUSHWOOSH PART-----------
// set custom delegate for push handling, in our case AppDelegate
[Pushwoosh sharedInstance].delegate = self;
//register for push notifications!
[[Pushwoosh sharedInstance] registerForPushNotifications];
return YES;
}
//handle token received from APNS
- (void)application:(UIApplication *)application
didRegisterForRemoteNotificationsWithDeviceToken:(NSData *)deviceToken {
[[Pushwoosh sharedInstance] handlePushRegistration:deviceToken];
}
//handle token receiving error
- (void)application:(UIApplication *)application didFailToRegisterForRemoteNotificationsWithError:(NSError *)error {
[[Pushwoosh sharedInstance] handlePushRegistrationFailure:error];
}
//for silent push notifications
- (void)application:(UIApplication *)application
didReceiveRemoteNotification:(NSDictionary *)userInfo
fetchCompletionHandler:(void (^)(UIBackgroundFetchResult))completionHandler {
[[Pushwoosh sharedInstance] handlePushReceived:userInfo];
completionHandler(UIBackgroundFetchResultNoData);
}
//this event is fired when the push gets received
- (void)pushwoosh:(Pushwoosh *)pushwoosh onMessageReceived:(PWMessage *)message {
NSLog(@"onMessageReceived: %@", message.payload);
}
//this event is fired when user taps the notification
- (void)pushwoosh:(Pushwoosh *)pushwoosh onMessageOpened:(PWMessage *)message {
NSLog(@"onMessageOpened: %@", message.payload);
}
@end
```
#### Info.plist
আপনার `Info.plist`-এ:
- Pushwoosh অ্যাপ্লিকেশন কোডে `Pushwoosh_APPID` কী সেট করুন।
- [Pushwoosh ডিভাইস API টোকেন](/bn/developer/api-reference/api-access-token/#device-api-token)-এ `Pushwoosh_API_TOKEN` কী সেট করুন।
### ৪. মেসেজ ডেলিভারি ট্র্যাকিং
Pushwoosh নোটিফিকেশন সার্ভিস এক্সটেনশনের মাধ্যমে পুশ নোটিফিকেশনের জন্য ডেলিভারি ইভেন্ট ট্র্যাকিং সমর্থন করে।
#### নোটিফিকেশন সার্ভিস এক্সটেনশন যোগ করুন
১. Xcode-এ, **File** > **New** > **Target...** নির্বাচন করুন।
২. **Notification Service Extension** বেছে নিন এবং **Next** চাপুন।
৩. টার্গেটের নাম লিখুন এবং **Finish** চাপুন।
৪. সক্রিয়করণের জন্য অনুরোধ করা হলে, **Cancel** চাপুন।
#### নোটিফিকেশন সার্ভিস এক্সটেনশনের জন্য নির্ভরতা (শুধুমাত্র CocoaPods)
দ্রষ্টব্য: আপনি যদি নির্ভরতা পরিচালনা করার জন্য Swift Package Manager ব্যবহার করেন, তবে আপনি এই ধাপটি এড়িয়ে যেতে পারেন, কারণ নির্ভরতাগুলি স্বয়ংক্রিয়ভাবে যোগ করা হয়।
আপনার `Podfile` খুলুন এবং টার্গেটের জন্য নির্ভরতা যোগ করুন:
```ruby title="Podfile"
# Uncomment the next line to define a global platform for your project
# platform :ios, '9.0'
target 'MyApp' do
# Comment the next line if you don't want to use dynamic frameworks
use_frameworks!
pod 'PushwooshXCFramework'
end
target 'MyAppNotificationExtension' do
use_frameworks!
pod 'PushwooshXCFramework'
end
```
নির্ভরতা আপডেট করার জন্য টার্মিনালে নিম্নলিখিত কমান্ডটি চালান:
```shell
pod update
```
#### নোটিফিকেশন সার্ভিস এক্সটেনশনে Pushwoosh SDK যোগ করুন
এই কোডটি আপনাকে আপনার নোটিফিকেশন এক্সটেনশনের মধ্যে নোটিফিকেশন আটকাতে এবং প্রক্রিয়া করতে দেয়।
```swift
import UserNotifications
import PushwooshFramework
class NotificationService: UNNotificationServiceExtension {
var contentHandler: ((UNNotificationContent) -> Void)?
var bestAttemptContent: UNMutableNotificationContent?
override func didReceive(_ request: UNNotificationRequest, withContentHandler contentHandler: @escaping (UNNotificationContent) -> Void) {
// Pushwoosh **********
PWNotificationExtensionManager.shared().handle(request, contentHandler: contentHandler)
// ********************
self.contentHandler = contentHandler
bestAttemptContent = (request.content.mutableCopy() as? UNMutableNotificationContent)
if let bestAttemptContent = bestAttemptContent {
// Modify the notification content here...
contentHandler(bestAttemptContent)
}
}
override func serviceExtensionTimeWillExpire() {
// Called just before the extension will be terminated by the system.
// Use this as an opportunity to deliver your "best attempt" at modified content, otherwise the original push payload will be used.
if let contentHandler = contentHandler, let bestAttemptContent = bestAttemptContent {
contentHandler(bestAttemptContent)
}
}
}
```
```objective-c
#import "PWNotificationExtensionManager.h"
@interface NotificationService : UNNotificationServiceExtension
@end
@implementation NotificationService
- (void)didReceiveNotificationRequest:(UNNotificationRequest *)request withContentHandler:(void (^)(UNNotificationContent * _Nonnull))contentHandler {
// Pushwoosh **********
[[PWNotificationExtensionManager sharedManager] handleNotificationRequest:request contentHandler:contentHandler];
//*********************
}
@end
```
#### Info.plist
আপনার নোটিফিকেশন সার্ভিস এক্সটেনশনের Info.plist-এ যোগ করুন:
- `Pushwoosh_APPID` - আপনার অ্যাপ্লিকেশন কোড।
### ৫. প্রজেক্টটি চালান
১. প্রজেক্টটি বিল্ড করুন এবং চালান।
২. Pushwoosh কন্ট্রোল প্যানেলে যান এবং [একটি পুশ নোটিফিকেশন পাঠান](/bn/product/messaging-channels/push-notifications/send-push-notifications/one-time-push)।
৩. আপনার অ্যাপে নোটিফিকেশনটি দেখতে পাওয়া উচিত।
## বর্ধিত Pushwoosh iOS ইন্টিগ্রেশন
এই পর্যায়ে, আপনি ইতিমধ্যে SDK ইন্টিগ্রেট করেছেন এবং পুশ নোটিফিকেশন পাঠাতে ও গ্রহণ করতে পারেন। এখন, আসুন মূল কার্যকারিতা অন্বেষণ করি।
### পুশ নোটিফিকেশন
Pushwoosh SDK-তে, পুশ নোটিফিকেশন পরিচালনার জন্য দুটি কলব্যাক ডিজাইন করা হয়েছে:
- `onMessageReceived`: এই পদ্ধতিটি কল করা হয় যখন একটি পুশ নোটিফিকেশন পাওয়া যায়।
- `onMessageOpened`: এই পদ্ধতিটি কল করা হয় যখন ব্যবহারকারী নোটিফিকেশনের সাথে ইন্টারঅ্যাক্ট করে (খোলে)।
এই কলব্যাকগুলি ডেভেলপারদের তাদের অ্যাপ্লিকেশনের মধ্যে পুশ নোটিফিকেশন গ্রহণ এবং ব্যবহারকারীর ইন্টারঅ্যাকশন পরিচালনা করতে সক্ষম করে।
```swift
import PushwooshFramework
class AppDelegate: NSObject, UIApplicationDelegate, PWMessagingDelegate {
func application(_ application: UIApplication, didFinishLaunchingWithOptions launchOptions: [UIApplication.LaunchOptionsKey : Any]? = nil) -> Bool {
Pushwoosh.sharedInstance().delegate = self;
}
func pushwoosh(_ pushwoosh: Pushwoosh, onMessageOpened message: PWMessage) {
if let payload = message.payload {
print("onMessageOpened: \(payload)")
}
}
func pushwoosh(_ pushwoosh: Pushwoosh, onMessageReceived message: PWMessage) {
if let payload = message.payload {
print("onMessageReceived: \(payload)")
}
}
}
```
```objective-c
#import
@interface AppDelegate ()
@end
@implementation AppDelegate
- (BOOL)application:(UIApplication *)application didFinishLaunchingWithOptions:(NSDictionary *)launchOptions {
[[Pushwoosh sharedInstance] setDelegate:self];
return YES;
}
- (void)pushwoosh:(Pushwoosh *)pushwoosh onMessageOpened:(PWMessage *)message {
if (message.payload) {
NSLog(@"onMessageOpened: %@", message.payload);
}
}
- (void)pushwoosh:(Pushwoosh *)pushwoosh onMessageReceived:(PWMessage *)message {
if (message.payload) {
NSLog(@"onMessageReceived: %@", message.payload);
}
}
@end
```
### ব্যবহারকারী কনফিগারেশন
ব্যক্তিগত ব্যবহারকারীর আচরণ এবং পছন্দের উপর মনোযোগ দিয়ে, আপনি ব্যক্তিগতকৃত সামগ্রী সরবরাহ করতে পারেন, যা ব্যবহারকারীর সন্তুষ্টি এবং আনুগত্য বৃদ্ধি করে।
```swift
import PushwooshFramework
class Registration {
func afterUserLogin(user: User) {
let pushwoosh = Pushwoosh.sharedInstance()
// set user ID
if let userId = user.userId {
pushwoosh.setUserId(userId)
}
// set user email
if let userEmail = user.email {
pushwoosh.setEmail(userEmail)
}
// set user SMS number
if let userSmsNumber = user.SmsNumber {
pushwoosh.registerSmsNumber(userSmsNumber)
}
// set user WhatsApp number
if let userWhatsAppNumber = user.WhatsAppNumber {
pushwoosh.registerSmsNumber(userWhatsAppNumber)
}
// setting additional user information as tags for Pushwoosh
if let age = user.userDetails.age,
let name = user.userDetails.userName,
let lastLogin = user.userDetails.lastLoginDate {
pushwoosh.setTags([
"age": age,
"name": name,
"last_login": lastLogin
])
}
}
}
```
```objective-c
#import
@implementation Registration
- (void)afterUserLogin:(User *)user {
Pushwoosh *pushwoosh = [Pushwoosh sharedInstance];
// set user ID
if (user.userId) {
[pushwoosh setUserId:user.userId];
}
// set user email
if (user.email) {
[pushwoosh setEmail:user.email];
}
// setting additional user information as tags for Pushwoosh
if (user.userDetails.age && user.userDetails.userName && user.userDetails.lastLoginDate) {
NSDictionary *tags = @{
@"age": user.userDetails.age,
@"name": user.userDetails.userName,
@"last_login": user.userDetails.lastLoginDate
};
[pushwoosh setTags:tags];
}
}
@end
```
### ট্যাগ
ট্যাগ হলো ব্যবহারকারী বা ডিভাইসে নির্ধারিত কী-ভ্যালু পেয়ার, যা পছন্দ বা আচরণের মতো অ্যাট্রিবিউটের উপর ভিত্তি করে সেগমেন্টেশন করতে দেয়, ফলে টার্গেটেড মেসেজিং সক্ষম হয়।
```swift
import PushwooshFramework
class UpdateUser {
func afterUserUpdateProfile(user: User) {
let pushwoosh = Pushwoosh.sharedInstance()
// set list of favorite categories
pushwoosh.setTags(["favorite_categories" : user.getFavoriteCategories()])
// set payment information
pushwoosh.setTags([
"is_subscribed": user.isSubscribed(),
"payment_status": user.getPaymentStatus(),
"billing_address": user.getBillingAddress()
])
}
}
```
```objective-c
#import
@implementation UpdateUser
- (void)afterUserUpdateProfile:(User *)user {
Pushwoosh *pushwoosh = [Pushwoosh sharedInstance];
// set list of favorite categories
[pushwoosh setTags:@{@"favorite_categories" : user.getFavoriteCategories}];
// set payment information
NSDictionary *tags = @{
@"is_subscribed": @(user.isSubscribed),
@"payment_status": user.getPaymentStatus,
@"billing_address": user.getBillingAddress
};
[pushwoosh setTags:tags];
}
@end
```
### ইভেন্ট
ইভেন্ট হলো অ্যাপের মধ্যে নির্দিষ্ট ব্যবহারকারীর ক্রিয়া বা ঘটনা যা আচরণ বিশ্লেষণ করতে এবং সংশ্লিষ্ট বার্তা বা ক্রিয়া ট্রিগার করতে ট্র্যাক করা যেতে পারে।
```swift
import PushwooshFramework
class Registration {
func afterUserLogin(user: User) {
if let userName = user.getUserName(), let lastLogin = user.getLastLoginDate() {
PWInAppManager.shared().postEvent("login", withAttributes: [
"name": userName,
"last_login": lastLogin
])
}
}
func afterUserPurchase(user: User, product: Product) {
let pushwoosh = Pushwoosh.sharedInstance()
// Track purchase event
PWInAppManager.shared().postEvent("purchase", withAttributes: [
"product_id": product.getId(),
"product_name": product.getName(),
"price": product.getPrice(),
"quantity": product.getQuantity()
])
// Set user tags
let lastPurchaseDate = Date().timeIntervalSince1970
let lifetimeSpend = getCurrentLifetimeSpend() + product.getPrice()
pushwoosh.setTags([
"last_purchase_date": lastPurchaseDate,
"lifetime_spend": lifetimeSpend
])
}
}
```
```objective-c
#import
#import
@implementation Registration
- (void)afterUserLogin:(User *)user {
NSString *userName = [user getUserName];
NSDate *lastLogin = [user getLastLoginDate];
if (userName && lastLogin) {
[[PWInAppManager sharedManager] postEvent:@"login" withAttributes:@{
@"name": userName,
@"last_login": lastLogin
}];
}
}
- (void)afterUserPurchase:(User *)user product:(Product *)product {
Pushwoosh *pushwoosh = [Pushwoosh sharedInstance];
// Track purchase event
[[PWInAppManager sharedManager] postEvent:@"purchase" withAttributes:@{
@"product_id": [product getId],
@"product_name": [product getName],
@"price": @([product getPrice]),
@"quantity": @([product getQuantity])
}];
// Set user tags
NSTimeInterval lastPurchaseDate = [[NSDate date] timeIntervalSince1970];
double lifetimeSpend = /* fetch current lifetime spend */ + [product getPrice];
NSDictionary *tags = @{
@"last_purchase_date": @(lastPurchaseDate),
@"lifetime_spend": @(lifetimeSpend)
};
[pushwoosh setTags:tags];
}
@end
```
### রিচ মিডিয়া
রিচ মিডিয়া বলতে ইন্টারেক্টিভ এবং মাল্টিমিডিয়া সামগ্রী, যেমন ছবি, ভিডিও বা HTML বোঝায়, যা ব্যবহারকারীর সম্পৃক্ততা বাড়াতে নোটিফিকেশন এবং ইন-অ্যাপ মেসেজে ব্যবহৃত হয়।
```swift
import PushwooshFramework
class ViewController: UIViewController, PWRichMediaPresentingDelegate {
override func viewDidLoad() {
super.viewDidLoad()
let richMediaConfiguration = PWModalWindowConfiguration.shared()
PWRichMediaManager.shared().delegate = self
richMediaConfiguration.configureModalWindow(with: .PWModalWindowPositionBottom,
present: .PWAnimationPresentFromBottom,
dismiss: .PWAnimationDismissDown)
}
func richMediaManager(_ richMediaManager: PWRichMediaManager!, shouldPresent richMedia: PWRichMedia!) -> Bool {
print("Rich media will be presented with: \(richMedia.pushPayload!)")
return true
}
func richMediaManager(_ richMediaManager: PWRichMediaManager!, didPresent richMedia: PWRichMedia!) {
print("Rich media has been presented with: \(richMedia.pushPayload!)")
}
func richMediaManager(_ richMediaManager: PWRichMediaManager!, didClose richMedia: PWRichMedia!) {
print("Rich media has been closed with: \(richMedia.pushPayload!)")
}
func richMediaManager(_ richMediaManager: PWRichMediaManager!, presentingDidFailFor richMedia: PWRichMedia!, withError error: (any Error)!) {
print("Failed to present rich media with: \(richMedia.pushPayload!). Error: \(error.localizedDescription)")
}
}
```
```objective-c
#import "ViewController.h"
#import
#import
#import
@interface ViewController ()
@end
@implementation ViewController
- (void)viewDidLoad {
[super viewDidLoad];
[[PWRichMediaManager sharedManager] setDelegate:self];
[[PWModalWindowConfiguration shared] configureModalWindowWith:PWModalWindowPositionBottom
presentAnimation:PWAnimationPresentFromBottom
dismissAnimation:PWAnimationDismissDown];
}
- (BOOL)richMediaManager:(PWRichMediaManager *)richMediaManager shouldPresentRichMedia:(PWRichMedia *)richMedia {
NSLog(@"Rich media will be presented with: %@", richMedia.pushPayload);
return YES;
}
- (void)richMediaManager:(PWRichMediaManager *)richMediaManager didPresentRichMedia:(PWRichMedia *)richMedia {
NSLog(@"Rich media has been presented with: %@", richMedia.pushPayload);
}
- (void)richMediaManager:(PWRichMediaManager *)richMediaManager didCloseRichMedia:(PWRichMedia *)richMedia {
NSLog(@"Rich media has been closed with:: %@", richMedia.pushPayload);
}
- (void)richMediaManager:(PWRichMediaManager *)richMediaManager presentingDidFailForRichMedia:(PWRichMedia *)richMedia withError:(NSError *)error {
NSLog(@"Failed to present rich media with: %@. Error: %@", richMedia.pushPayload, error.localizedDescription);
}
@end
```
## সমস্যা সমাধান
### 'PushwooshFramework' মডিউল বিল্ড করতে ব্যর্থ
আপনার প্রজেক্ট বিল্ড করার সময়, আপনি নিম্নলিখিত ধরনের একটি ত্রুটির সম্মুখীন হতে পারেন:
```
Failed to build module 'PushwooshFramework'; this SDK is not supported by the compiler
(the SDK is built with 'Apple Swift version 5.10 (swiftlang-5.10.0.13 clang-1500.3.9.4)',
while this compiler is 'Apple Swift version 6.1.2 effective-5.10 (swiftlang-6.1.2.1.2 clang-1700.0.13.5)')
```
**কারণ:** এই ত্রুটিটি Swift কম্পাইলার সংস্করণের অসঙ্গতির সাথে সম্পর্কিত নয়। Pushwoosh iOS SDK সংস্করণ 6.8.0 থেকে, SDK-টি কয়েকটি উপাদানে মডিউলারাইজ করা হয়েছে যা একে অপরের সাথে ইন্টারঅ্যাক্ট করে। যখন আপনার প্রজেক্টে সমস্ত প্রয়োজনীয় ফ্রেমওয়ার্ক যোগ করা হয় না তখন এই ত্রুটিটি ঘটে।
**সমাধান:** Swift Package Manager এর মাধ্যমে ইন্টিগ্রেট করার সময় আপনার অ্যাপ টার্গেটে চারটি প্রয়োজনীয় ফ্রেমওয়ার্ক যোগ করা হয়েছে কিনা তা নিশ্চিত করুন:
* ```PushwooshFramework```
* ```PushwooshCore```
* ```PushwooshBridge```
* ```PushwooshLiveActivities```
Xcode-এ এটি যাচাই করতে:
১. প্রজেক্ট নেভিগেটরে আপনার প্রজেক্ট নির্বাচন করুন
২. আপনার অ্যাপ টার্গেট নির্বাচন করুন
৩. **General** > **Frameworks, Libraries, and Embedded Content**-এ যান
৪. নিশ্চিত করুন যে চারটি ফ্রেমওয়ার্কই তালিকাভুক্ত আছে
---
ইন্টিগ্রেশন প্রক্রিয়া চলাকালীন আপনি যদি কোনো সমস্যার সম্মুখীন হন, অনুগ্রহ করে [সহায়তা এবং কমিউনিটি](/bn/developer/pushwoosh-sdk/support-and-community) বিভাগটি দেখুন।