# Flutter-এর জন্য ব্যাজ সেট আপ করা
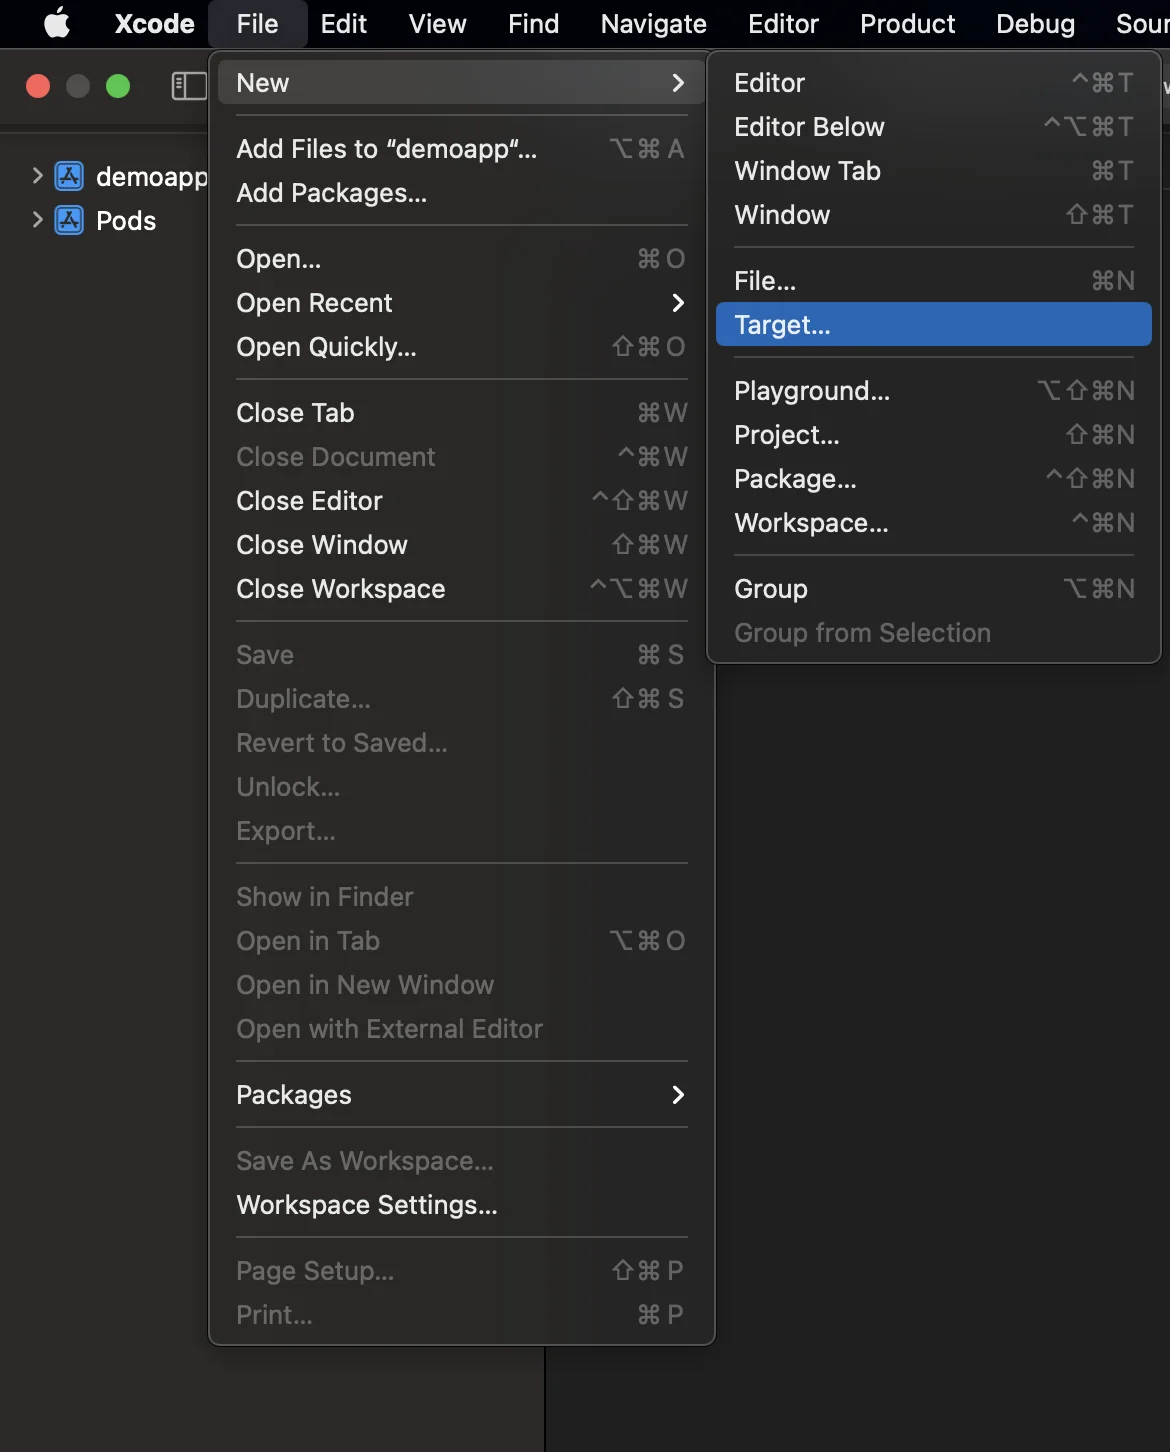
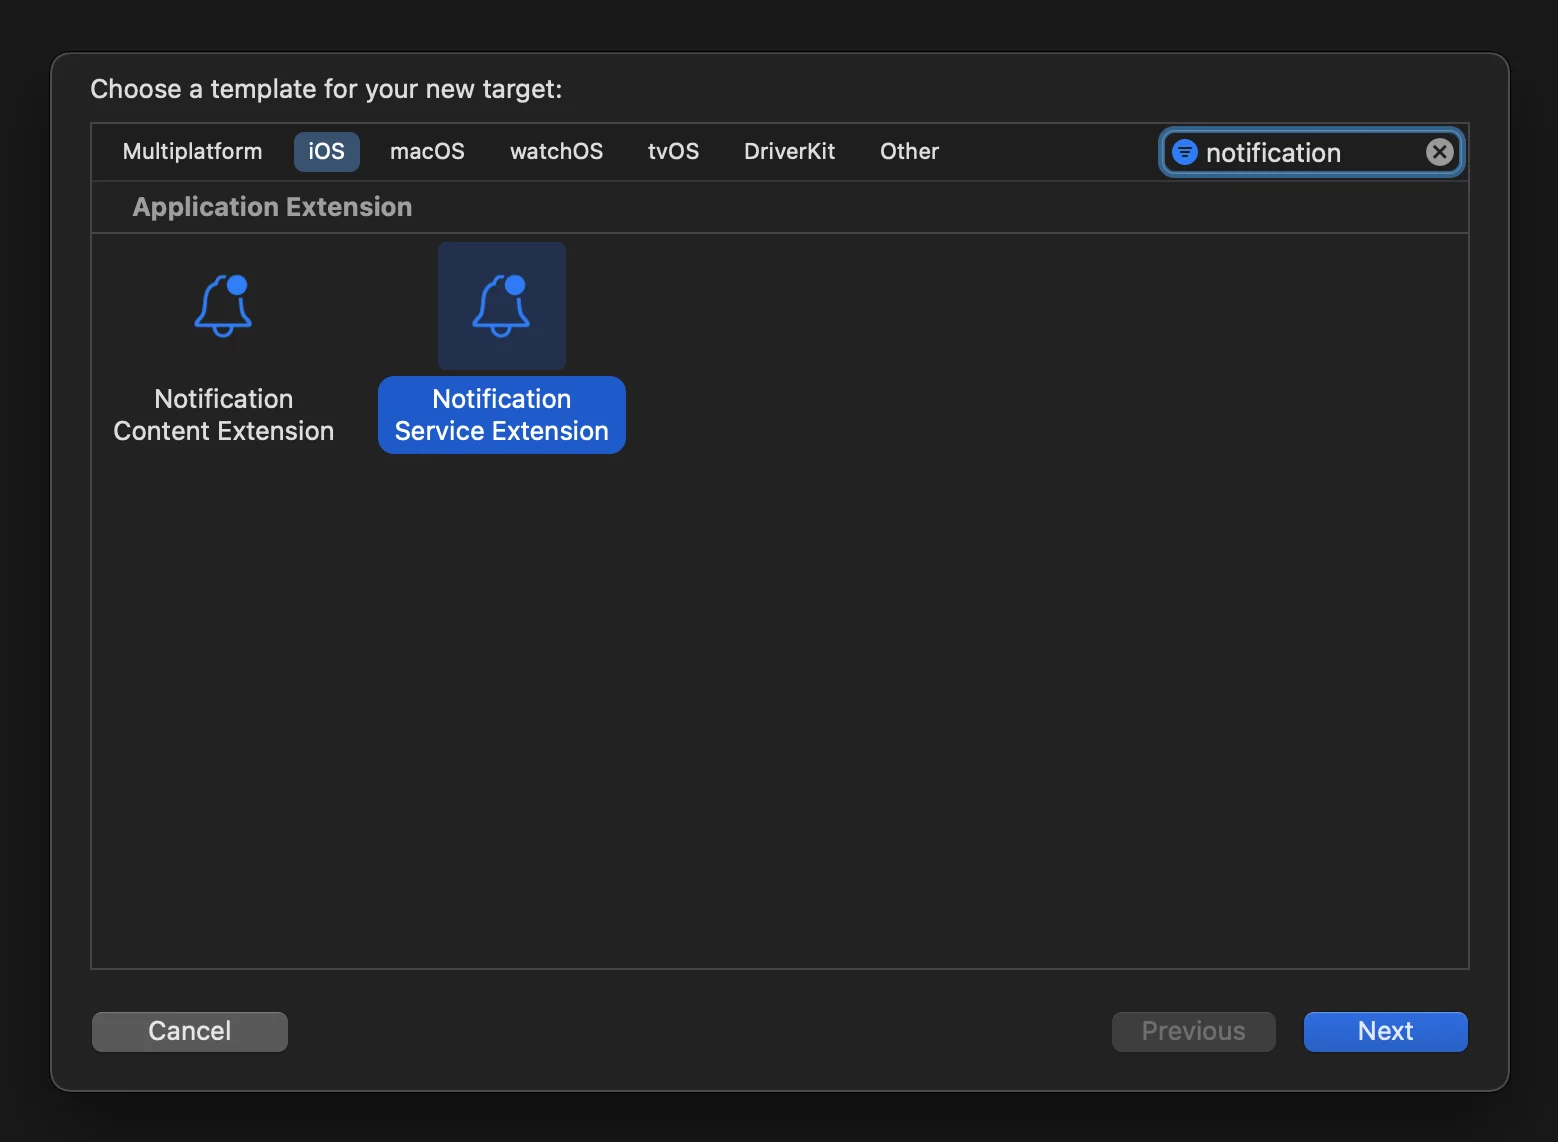
১. আপনার iOS প্রজেক্টটি খুলুন যা **your_project/ios/Runner.xcworkspace**-এ অবস্থিত এবং **NotificationServiceExtension** তৈরি করুন:
২. Podfile খুলুন (**your_project/ios/Podfile**-এ অবস্থিত) এবং NotificationServiceExtensionTarget-এর জন্য **PushwooshXCFramework** ডিপেন্ডেন্সি যোগ করুন:
```
target ‘NotificationService’ do
pod ‘PushwooshXCFramework’, ‘>=6.5.0’
end
```
৩. Terminal-এর মাধ্যমে পড ইনস্টল করুন:
```
cd ios && pod install
```
৪. আপনার Xcode প্রজেক্টটি বন্ধ করে আবার খুলুন।
৫. নিশ্চিত করুন যে আপনার **Deployment target** আপনার **Runner target**-এর সাথে মেলে; অন্যথায়, আপনি আপনার অ্যাপ তৈরি করার সময় সমস্যার সম্মুখীন হতে পারেন (যেমন, যদি আপনি Runner-এ iOS 10.0 এবং NotificationService টার্গেটে iOS 15.5 নির্দিষ্ট করেন)।
৬. Runner এবং NotificationService উভয় টার্গেটে **App Groups capability** যোগ করুন এবং উভয় টার্গেটের জন্য একই নামের একটি নতুন গ্রুপ যোগ করুন:
৭. Runner এবং NotificationService উভয় টার্গেটে **PW_APP_GROUPS_NAME** info.plist ফ্ল্যাগ যোগ করুন এবং এর স্ট্রিং ভ্যালু হিসেবে গ্রুপের নামটি দিন:
৮. **NotificationService.m**-এ যান এবং এর কোডটি নিম্নলিখিত কোড দিয়ে প্রতিস্থাপন করুন:
```objective-c
#import “NotificationService.h”
#import <Pushwoosh/PWNotificationExtensionManager.h>
@interface NotificationService ()
@property (nonatomic, strong) void (^contentHandler)(UNNotificationContent *contentToDeliver);
@property (nonatomic, strong) UNMutableNotificationContent *bestAttemptContent;
@end
@implementation NotificationService
- (void)didReceiveNotificationRequest:(UNNotificationRequest *)request withContentHandler:(void (^)(UNNotificationContent * _Nonnull))contentHandler {
self.contentHandler = contentHandler;
self.bestAttemptContent = [request.content mutableCopy];
[[PWNotificationExtensionManager sharedManager] handleNotificationRequest:request contentHandler:contentHandler];
}
- (void)serviceExtensionTimeWillExpire {
// Called just before the extension will be terminated by the system.
// Use this as an opportunity to deliver your “best attempt” at modified content, otherwise the original push payload will be used.
self.contentHandler(self.bestAttemptContent);
}
@end
```
## আমাদের সাথে আপনার মতামত শেয়ার করুন
আপনার মতামত আমাদের একটি উন্নত অভিজ্ঞতা তৈরি করতে সাহায্য করে, তাই SDK ইন্টিগ্রেশন প্রক্রিয়ার সময় আপনার কোনো সমস্যা হলে আমরা আপনার কাছ থেকে শুনতে চাই। যদি আপনি কোনো অসুবিধার সম্মুখীন হন, তাহলে অনুগ্রহ করে আমাদের সাথে আপনার মতামত শেয়ার করতে দ্বিধা করবেন না [এই ফর্মের মাধ্যমে](https://docs.google.com/forms/d/e/1FAIpQLSd\_0b8jwn-V\_JmoPLIxIFYbHACCQhrzidOZV3ELywoQPXRSxw/viewform)।
 ২. Podfile খুলুন (**your_project/ios/Podfile**-এ অবস্থিত) এবং NotificationServiceExtensionTarget-এর জন্য **PushwooshXCFramework** ডিপেন্ডেন্সি যোগ করুন:
```
target ‘NotificationService’ do
pod ‘PushwooshXCFramework’, ‘>=6.5.0’
end
```
৩. Terminal-এর মাধ্যমে পড ইনস্টল করুন:
```
cd ios && pod install
```
৪. আপনার Xcode প্রজেক্টটি বন্ধ করে আবার খুলুন।
৫. নিশ্চিত করুন যে আপনার **Deployment target** আপনার **Runner target**-এর সাথে মেলে; অন্যথায়, আপনি আপনার অ্যাপ তৈরি করার সময় সমস্যার সম্মুখীন হতে পারেন (যেমন, যদি আপনি Runner-এ iOS 10.0 এবং NotificationService টার্গেটে iOS 15.5 নির্দিষ্ট করেন)।
৬. Runner এবং NotificationService উভয় টার্গেটে **App Groups capability** যোগ করুন এবং উভয় টার্গেটের জন্য একই নামের একটি নতুন গ্রুপ যোগ করুন:
২. Podfile খুলুন (**your_project/ios/Podfile**-এ অবস্থিত) এবং NotificationServiceExtensionTarget-এর জন্য **PushwooshXCFramework** ডিপেন্ডেন্সি যোগ করুন:
```
target ‘NotificationService’ do
pod ‘PushwooshXCFramework’, ‘>=6.5.0’
end
```
৩. Terminal-এর মাধ্যমে পড ইনস্টল করুন:
```
cd ios && pod install
```
৪. আপনার Xcode প্রজেক্টটি বন্ধ করে আবার খুলুন।
৫. নিশ্চিত করুন যে আপনার **Deployment target** আপনার **Runner target**-এর সাথে মেলে; অন্যথায়, আপনি আপনার অ্যাপ তৈরি করার সময় সমস্যার সম্মুখীন হতে পারেন (যেমন, যদি আপনি Runner-এ iOS 10.0 এবং NotificationService টার্গেটে iOS 15.5 নির্দিষ্ট করেন)।
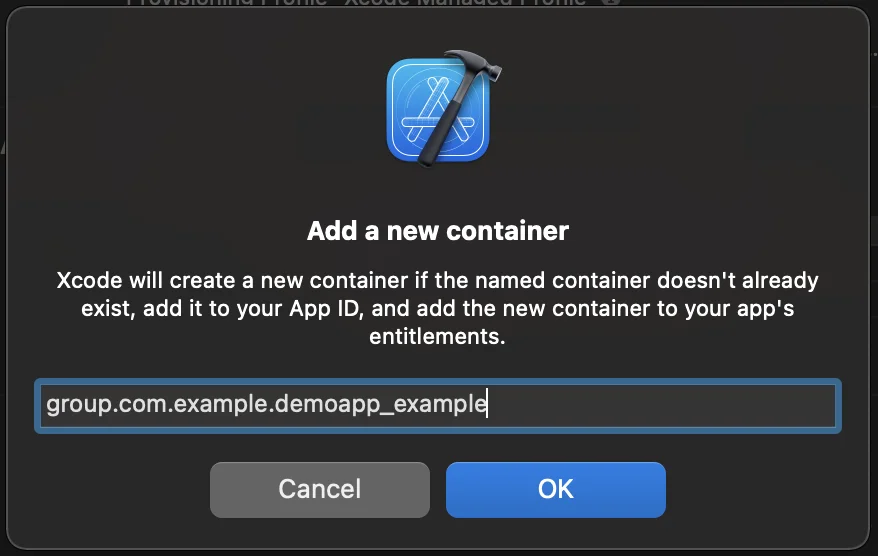
৬. Runner এবং NotificationService উভয় টার্গেটে **App Groups capability** যোগ করুন এবং উভয় টার্গেটের জন্য একই নামের একটি নতুন গ্রুপ যোগ করুন:
 ৭. Runner এবং NotificationService উভয় টার্গেটে **PW_APP_GROUPS_NAME** info.plist ফ্ল্যাগ যোগ করুন এবং এর স্ট্রিং ভ্যালু হিসেবে গ্রুপের নামটি দিন:
 ৮. **NotificationService.m**-এ যান এবং এর কোডটি নিম্নলিখিত কোড দিয়ে প্রতিস্থাপন করুন:
```objective-c
#import “NotificationService.h”
#import <Pushwoosh/PWNotificationExtensionManager.h>
@interface NotificationService ()
@property (nonatomic, strong) void (^contentHandler)(UNNotificationContent *contentToDeliver);
@property (nonatomic, strong) UNMutableNotificationContent *bestAttemptContent;
@end
@implementation NotificationService
- (void)didReceiveNotificationRequest:(UNNotificationRequest *)request withContentHandler:(void (^)(UNNotificationContent * _Nonnull))contentHandler {
self.contentHandler = contentHandler;
self.bestAttemptContent = [request.content mutableCopy];
[[PWNotificationExtensionManager sharedManager] handleNotificationRequest:request contentHandler:contentHandler];
}
- (void)serviceExtensionTimeWillExpire {
// Called just before the extension will be terminated by the system.
// Use this as an opportunity to deliver your “best attempt” at modified content, otherwise the original push payload will be used.
self.contentHandler(self.bestAttemptContent);
}
@end
```
## আমাদের সাথে আপনার মতামত শেয়ার করুন
আপনার মতামত আমাদের একটি উন্নত অভিজ্ঞতা তৈরি করতে সাহায্য করে, তাই SDK ইন্টিগ্রেশন প্রক্রিয়ার সময় আপনার কোনো সমস্যা হলে আমরা আপনার কাছ থেকে শুনতে চাই। যদি আপনি কোনো অসুবিধার সম্মুখীন হন, তাহলে অনুগ্রহ করে আমাদের সাথে আপনার মতামত শেয়ার করতে দ্বিধা করবেন না [এই ফর্মের মাধ্যমে](https://docs.google.com/forms/d/e/1FAIpQLSd\_0b8jwn-V\_JmoPLIxIFYbHACCQhrzidOZV3ELywoQPXRSxw/viewform)।
৮. **NotificationService.m**-এ যান এবং এর কোডটি নিম্নলিখিত কোড দিয়ে প্রতিস্থাপন করুন:
```objective-c
#import “NotificationService.h”
#import <Pushwoosh/PWNotificationExtensionManager.h>
@interface NotificationService ()
@property (nonatomic, strong) void (^contentHandler)(UNNotificationContent *contentToDeliver);
@property (nonatomic, strong) UNMutableNotificationContent *bestAttemptContent;
@end
@implementation NotificationService
- (void)didReceiveNotificationRequest:(UNNotificationRequest *)request withContentHandler:(void (^)(UNNotificationContent * _Nonnull))contentHandler {
self.contentHandler = contentHandler;
self.bestAttemptContent = [request.content mutableCopy];
[[PWNotificationExtensionManager sharedManager] handleNotificationRequest:request contentHandler:contentHandler];
}
- (void)serviceExtensionTimeWillExpire {
// Called just before the extension will be terminated by the system.
// Use this as an opportunity to deliver your “best attempt” at modified content, otherwise the original push payload will be used.
self.contentHandler(self.bestAttemptContent);
}
@end
```
## আমাদের সাথে আপনার মতামত শেয়ার করুন
আপনার মতামত আমাদের একটি উন্নত অভিজ্ঞতা তৈরি করতে সাহায্য করে, তাই SDK ইন্টিগ্রেশন প্রক্রিয়ার সময় আপনার কোনো সমস্যা হলে আমরা আপনার কাছ থেকে শুনতে চাই। যদি আপনি কোনো অসুবিধার সম্মুখীন হন, তাহলে অনুগ্রহ করে আমাদের সাথে আপনার মতামত শেয়ার করতে দ্বিধা করবেন না [এই ফর্মের মাধ্যমে](https://docs.google.com/forms/d/e/1FAIpQLSd\_0b8jwn-V\_JmoPLIxIFYbHACCQhrzidOZV3ELywoQPXRSxw/viewform)।